June 28, 2025--This project is from a class taken at the EGA Seminar I recently attended and taught by Kurdy Biggs. He's absolutely adorable, all done up in Jean Hilton type stitches. I should be able to get him all stitched up within a week or two. Here's where I left off at the end of class last week (Kurdy gave us a needle minder with a photo of the project):
Statcounter
Saturday, June 28, 2025
Friday, June 27, 2025
Pin Poinsettia Beaded - Updated 6/27/25
June 27, 2025--Done! I was obsessed with working on this pin and got it done in no time. Loved learning how this design was "built up" and shaped.
I had some bar pins on hand (cannot remember why I purchased them and am surprised I was able to find them so easily), so stitched one to the back and it's now ready to wear as a pin.
Here's the result:
Pin Poinsettia Beaded Completed |
Pin Poinsettia Beaded Side View |
Pin Poinsettia Beaded Back View
Bar Pins for Poinsettia Pin
Please see the post below for more information about this project.
June 25, 2025--Yesterday I worked on the beaded poinsettia pin class taught by Kay Ackerman at the EGA MAR 2025 Seminar in Gettysburg, PA and got through Page 14. Whew. I've done some flat peyote beaded bracelets but never learned how to make 3D items, so this class was perfect. Below is my progress to date as well as a project photo showing what the poinsettia should look like when I get it done (fingers crossed this will happen).
Pin Poinsettia Beaded Through Page 14 |
Pin Poinsettia Project Photo Size View |
Monday, June 23, 2025
EGA MAR Seminar 2025 - 6/23/25
June 23, 2025--I just returned home from a 6-day Embroiderers Guild of America (EGA) Mid-Atlantic Region (MAR) seminar at the Aspire Hotel in Gettysburg, PA. This is the first time I've attended an EGA event like this and boy, was I impressed with the caliber of teachers, subject matters taught, efficiency of administrative functions, etc. Even the hotel, as old as it is, was clean with very comfortable beds, large rooms with refrigerators and microwaves, plumbing that worked extremely well, etc. And...it was only a 3 hour drive from home. No schlepping suitcases and stitching stuff to and from the airport, satellite parking, long TSA lines, etc. Also, it was a small event with about 150 attendees--plenty of opportunity to make new friends.
No complaints whatsoever! Click here for more information about the seminar.
![]() |
Pin Poinsettia Beaded by Kay Ackerman MAR Seminar 2025 Project Photo |
![]() |
Pulled Thread Few of My Favorite Things by Jane Ellen Balzuweit MAR Seminar 2025 Project Photo |
![]() |
Santa Gnome by Kurdy Biggs MAR Seminar 2025 Project Photo |
Almost forgot...I won an "Opportunity Basket" which was overflowing with stitching kits and paraphernalia. There was also a 1000-piece jigsaw puzzle which I'll start working on this week.
Sunday, June 15, 2025
Ornament Holiday Bell Red - Updated 6/15/25
June 15, 2025--Here's another Holiday Ornament stitched up and I have only one more to do before the Holiday Ornament Collection is done.
Here's the red bell along with a side view to show the dimension of the beads and threads:
Ornament Holiday Bell Red Completed |
Ornament Holiday Bell Red Side View |
See the post(s) below for more information about this project.
June 4, 2025--While waiting for some thread to arrive in the mail for another project, I started working on this red bell, an ornament designed by Susan Portra as part of her Holiday collection. So far, the "mundane' portion of the bell is done, and the fun stitches are next. By mundane, I mean that every one of these Holiday Bells start off the same way--tent stitched outline, shiny cap, inside of bell and padded lip of bell. The fancy stitches and any beads for embellishment are done last.
Here's the red bell with its mundane work done:
Ornament Holiday Red Bell at 2025-06-04 |
Laundry Schedule - Updated 6/15/25
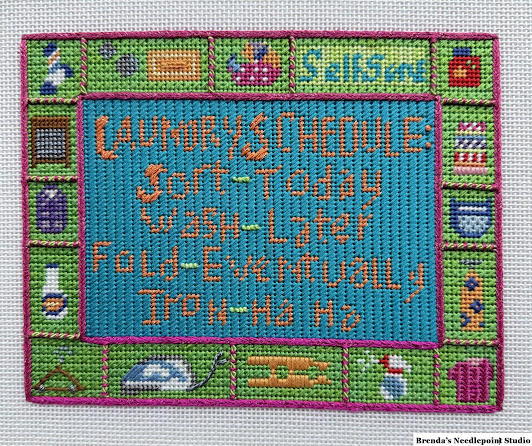
June 15, 2025--Done! In the last post (see below) I had concerns about not having enough green thread used in the 16 boxes around the main sign. Well, I did have enough but with only one length left over. Whew, that was close, especially since my thread was 14 years old and I feared there would be a very noticeable dye lot change.
I don't plan on stitching another painted canvas anytime soon--unless it's stitch painted. I have a hard time figuring out where to place stitches, constantly ripping out through trial and error.
Once framed, this will be a fun addition to my laundry room.
Laundry Schedule Completed |
Please see the posting(s) below for more information about this canvas.
June 11, 2025--Everything is stitched except for the green background in the little boxes. I fear that I might run out of the beautiful Gloriana green thread used for the background, so I stitched up one of the 16 boxes to see how much thread it used, and I calculated I will have just enough--barely. It's going to be tight and there's no room for error. Just in case I do run out, I posted a notice in the "Help, I Need Thread!" Facebook page asking if anyone might have it. This thread is 14 years old and I'm sure dye lots have changed over the years.
Here's my progress to date:
Laundry Schedule at 2025-06-11 |
I like the dimension of the thick thread for the borders and the twisted, couched down memory thread separating the segments around the main sign.
BTW, the more I look at some of the items in the boxed segments, I believe the 6th one is a pile of folded laundry, not a box of powdered detergent. Also, the one I labeled as a hanging hamper may be a folded dress shirt.
Here's what everything looks like so far:
Laundry Schedule at 2025-05-02 |
Laundry Schedule at 2025-05-02 Side View |
May 29, 2925--The main portion of the sign is stitched. The letters look haphazard, but that's how I saw them painted on the canvas. I chose to use a diagonal Gobelin Stitch for the background--much easier to compensate than the Byzantine Stitch recommended in my guide. It also reminds me of shiplap or bead board.
Next up are the items surrounding the main sign, most of which will be done in tent stitch. From what I can tell, they are (clockwise from upper left):
- Sock
- Coins and coin slot (as in a laundromat)
- laundry basket filled with clothes
- Self-Serve sign
- Bottle of liquid detergent (Tide?)
Box of powdered detergentStack of folded laundry- laundry basket/hamper (empty)
- Ironing board
- Stained T-shirt
- Sprayer bottle
- Clothespin
- Iron
- Hanger
- Bottle of fabric softener
Hanging hamper (really not sure about this one)Folded dress shirt- Wash board
Please let me know if you see something different. Thanks.
Laundry Schedule at 2025-05-29 |
May 25, 2021--Look what I pulled out of my projects bin/basket. It's a painted canvas by Shivering Sheep Designs called Laundry Schedule. I purchased this canvas at a deep discount while at the 2012 ANG Seminar in Philadelphia, PA. Then put it away, not having a clue what to do with it.
Then in August of 2014, Fireside Stitchery had a 15% sale on threads along with free stitch guides (when you purchase threads). I took advantage of that offering and was given a delightful set of instructions for stitches to use. Of course, it's called a stitch "guide", so I can change/embellish, etc. the stitches as I like. This should be fun.
![]() |
Laundry Schedule by Shivering Sheep Design Project Photo |
Friday, May 23, 2025
Ornament Holiday Bell Gold - 5/23/2025
Tuesday, May 20, 2025
Heart Swirled in Gold and White - Updated 5/20/25
Heart Swirled in Gold and White Area 4 |
Area 4 Grid Using 6 x 6 Cross Stitches |
May 15, 2025--Area 3 is done, and like the prior area, required some stitch graphing on my iPad and lots of attention to compensation. This heart is turning out to be a very pleasant challenge.
Unfortunately, my vision isn't what it used to be so often enough stitches need to be ripped out and redone. I see simpler projects in my future.
Heart Swirled in Gold and White Area 3 |
May 12, 2025--I finally tackled Area 2 of this pretty heart. I've done a little Or Nué before but was never challenged as I was with this area. I needed 4 working needles, all of which were laid or stitched one "line" at a time. In order to manage this chaos, I had to mark up a chart (see below) showing which direction the laid threads would go and where to couch them. The marked-up chart also helped me know when and where to begin the hearts. Whew.
Heart Swirled in Gold and White Area 2 |
Graph for Area 2 |
May 2, 2025--Finished Area 1 of this beautiful heart described below. Now on to Day 2's lesson.
Heart Swirled in Gold and White Area 1 |
April 25, 2025--At its May meeting, ANG's CyberPointers Online Chapter will be working on the Swirled Heart in Gold and White designed by Rozell Hirschfelt with instructions published in the January 2022 issue of Needle Pointers Magazine. Of course, it can be done in any color, but I'm stitching it in the gold and white threads as designed. It's a very pretty piece and I like the flowing movement of the sections. Here's my preworked outline in advance of the meeting.
Sunday, May 4, 2025
Stocking Emerald and Gold - Updated 5/4/25
May 4, 2025--Those of you who know me will understand that the cuff was looking "unfinished" and it really bugged me. So, this morning I sat down and added more beads--ahh--better. Do you agree? Here's the result:
Stocking Emerald and Gold with Additional Beads Added to Cuff |
May 3, 2025--Completed the stitching on this stocking (see below for more information) and had to make a few changes due to the limitations in supply availability.
First, was unable to find the right size filigree gold disks for the cuff. What I did find was a bit small, so the cuff had to be "filled in" with beads. Beads were not added to the far left and right sides of the cuff--they would have been too close to the edge and possibly in the way of cording. I may change my mind about this--we'll see.
Second, the designer called for seed beads to be stitched onto the toe area. I found the beads looked too crowded, therefore too crooked, so I worked up the area in tent stitches using Kreinik gold thread. I'm also quite sure I didn't have enough beads to fill in the area, so Kreinik was a happy substitute.
It was recommended a row of green tent stiches be placed around the stocking for ease in finishing. I did that but feel this step wouldn't have been necessary if the stocking was stitched on dark green canvas. Note for future projects.
All in all, a fun project to work on. I think it'll be lovely finished as a small stocking. Stay tuned.
Stocking Emerald and Gold Completed |
Stocking Emerald and Gold Side View |
Tuesday, April 22, 2025
Santa Holly Berry - Updated 4/22/25
April 22, 2025--Done. Once I finished the beard's padding, the rest went quickly. All long stitches. Yay.
Now, of the 29 Santas I have that are designed by Janet Zickle Casey, there are 8 to be stitched and 21 completed. Which will I tackle next?
Santa Holly Berry Completed |
April 18, 2025--I continue to work on this cutie as time allows, but mostly at stitch-ins since much of what needs to be done doesn't require the threads be "laid". I've added the hat brim and mouth to his face. Next up--the beard and moustache.
Santa Holly Berry in Process through 2025-04-18 |
March 31, 2025--The face, eyes and eyebrows are stitched, and this project is now ready to "travel". For me that means the balance of the stitching won't require serious attention on my part since most of what's left to do consists of padding, Satin Stitches and Slanted Gobelin Stitches. It's now perfect for stitch-ins and serious movie watching. Easy-peasy.
Santa Holly Berry in Process through 2025-03-31 |
January 6, 2025--Here's the latest Janet Zickler Casey Santa from 2006 than I'm working on called Holly Berry Santa. His beard consists of very long stitches, so I'll do that last. The dark pink threads on his face are his "rosy, red cheeks". I had to order large red beads for the hat to use as berries. Once they come in, I'll resume stitching this cutie.
Thursday, March 13, 2025
Art Deco Tree - Updated 3/13/25
March 13, 2025--Ta da -- Done!!! I've been working on this beautiful tree on and off for the last 3 months and loved every minute. For more information about the source of this project, please scroll down to see prior blog postings. This post will be about the last lesson being given to my ANG chapter (Lesson 3) and the sections covered. As was done for the prior two lessons, I've worked up lots of graphs to make the stitching of this advance level project a bit easier.
The advice I would give to anyone endeavoring to work up this project is to count, count and recount every step of the way. Read EACH sentence carefully--there's a lot of information packed into each paragraph, and you don't want to miss a step. Ripping out sections because the stitch was done incorrectly, or you counted wrong, will be a common theme (was for me). Don't worry about it--just redo it and you'll be happier. This project is very addicting, and you'll want to keep stitching on it as you see each section develop (like a flower opening its petals).
OK, now that I've posted lots of closeup photos below--I can see how bad some of my stitching looks. Oh well--this is a very "busy" project and from a normal distance, my wonky stitches won't look bad at all.
Art Deco Tree Completed |
Art Deco Tree Areas C4, M2 M1 Partial, T1, M4, M3, C5, T2 and Star Completed Lesson 3 |
Area T1, T2, M4, M3 Closeup |
Area C4 Closeup |
Area C5 Closeup
Star Closeup |
February 18, 2025--Below is a photo of Areas B1, B2, B3, B4, C1, C2, C3, E1, E2, and M1 Partial stitched to date. This is a large project. The completed stitching will measure about 13" tall and 11" at the widest point (the tree bottom).
Art Deco Tree Completed Through Area M1 Partial |
Areas B1, B2, B3, B4, C3 and M1 will be part of the second class given to my ANG chapter in May. I calculate I'm about 70% done with this beautiful project. It has a ton of shine and dimension. However, please don't look closely at the stitches and beading--some of it is a "hot mess" so to speak. Also, my Kreinik gold threads had a dye lot change and if you study the stitches closely, you may be able to see the difference. But the pattern is so busy, I don't believe the dye lot changes will jump out at anyone.
Here are photos of each section as stitched:
Art Deco Tree Area C3 Completed |
The beading in area C3 was strung up in a line and couched down rather than attached to the canvas one at a time as instructed. Even though this looks a bit wonky (Mill Hill beads are not as nice as Miyuki or Toho beads, for example), it looks so much better than the other way. This is because the beads are larger than the canvas thread spacing, so you need to skip a canvas thread periodically. I did not like how that looked.
The photos, from this point forward, are of the right side of the tree only.
Art Deco Tree Area B1 |
Art Deco Tree Area B3 |
Art Deco Tree Area B2 |
January 7, 2025--This is a section of the Art Deco Tree project designed by Deborah Reichert published in ANG's Needle Pointers Nov 2024 Magazine. The stitching in this post covers Areas C1, C2, E1 and E2. Isn't it beautiful?
I have the privilege of leading this as a three-part class to Delaware's Seashore Chapter of ANG beginning in March. My class will include lots of additional notes, graphs and instructions to make stitching this piece a little easier and more enjoyable.
Art Deco Tree Completed through Section E2 |