Statcounter

Showing posts with label 2020 Completions. Show all posts

Friday, April 22, 2022

Stacked Rectangles - Updated 9/29/22

September 29, 2022--Won 2nd Place Ribbon for Canvaswork/Needlepoint category at Rehoboth Beach Museum's 10th Annual Needlework Exhibition in Rehoboth Beach, DE.  So pleased.

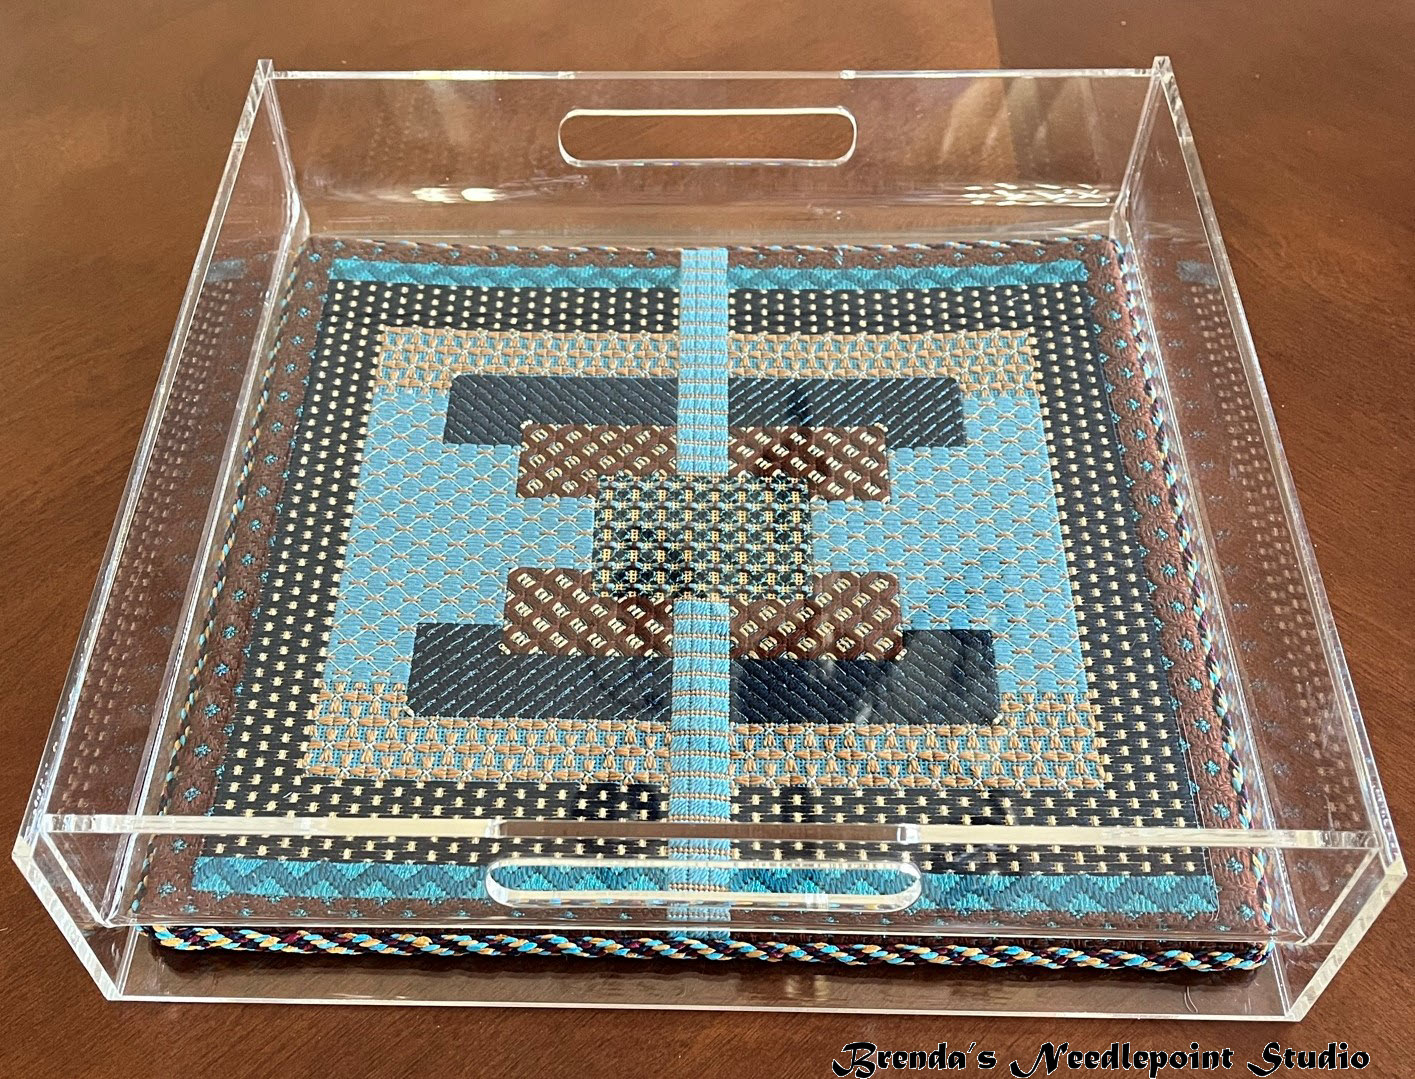
April 22, 2022--Last January I mailed this bright and colorful project to Rittenhouse Needlepoint in Philadelphia for them to finish into an acrylic serving tray and got it back a few weeks ago.  I love it.  I made the Kumihimo cording with 4 colors of ribbon (dark blue, turquoise, burgundy and gold) and it complements the rectangles beautifully.  

If I so desire, I can slide the Stacked Rectangles out of the tray bottom and insert a similarly sized project.  

Stacked Rectangles Finished Side View

Stacked Rectangles Finished Top View

May 6, 2020--Have now completed the stitching on this really cool pilot stitch project designed by Susan Hoekstra for the now canceled ANG Seminar (note this may be available as a future online class).  I would like to place it in an acrylic serving tray, thinking all these electric colors and shiny threads will look great on my outdoor furniture (and better yet holding a bottle or two of wine and glasses).


Later I'll write about my experience on locating a tray and what I need to do to prepare the piece for insertion, or if they want to do it themselves, etc.

Stacked Rectangles Completed

April 22, 2020--Earlier this month I began pilot stitching a project designed by Susan Hoekstra called Stacked Rectangles in advance of the ANG Seminar which may, or may not be held in Tucson, AZ in August.

Originally this was going to be a two day June pilot class taught to participants of the ANG New Jersey Needle Artists chapter, but because of the virus, the class was canceled.  So Susan mailed the kits to 6 of us pilot stitchers to begin immediately, and so far I am thoroughly enjoying the process of putting these challenging, yet fun, stitches on canvas.

Below is a status photo as of April 16th.  The metallic threads make each section pop.  I chose the Rocky Coast colorway with lots of turquoise, gold, navy blue and root beer colors.  My plan is to complete the stitching by month end.  Only eight more days to go.
Stacked Rectangles Status as of April 16, 2020


PS... Susan Hoekstra has approved the posting of this blog.

Wednesday, March 9, 2022

Firecrackers -- Updated 9/29/22

September 29, 2022--Won 3rd Place Ribbon for Canvaswork/Needlepoint category at Rehoboth Beach Museum's 10th Annual Needlework Exhibition in Rehoboth Beach, DE.  So pleased.

March 9, 2022--Won Honorable Mention Ribbon in the Canvaswork-Multi-stitch category at Woodlawn's 59th Annual Needlework Exhibition in Alexandria, VA.  So pleased.

July 26, 2021--Entered this fun project into the Delaware's State Fair and was awarded a Second Place Ribbon along with a small (very small) cash prize.   Nice.

November 23, 2020--I've just finished these firecrackers myself as standups and am very pleased how they turned out.  If interested, there's a tutorial of how I did it below.  Hope you find it helpful if you decide to try this yourself.


Firecrackers Finished as Standups

Below is a brief tutorial of how I made these into standups. 

Firstly, you will need the following:

Fishing line (used for strength).  Click here for more information about what I use.
Circular needle for joining seams
Acid free mounting board (click here for information about what I use).
Fabric for firecracker tops and bottoms.
Matching thread to the fabric.
Compass for drawing circles
#4 Pencil
Weights for standup bottoms
Polyfill stuffing
Foil sparklers


To begin, trim each canvas, leaving a 1/2" seam allowance.
Fold sides of canvas in toward the wrong side (see photo below)


Cut a length of fishing line approximately 3 times the height of the Firecracker and tightly secure the  line at the top seam allowance (be sure your line is very secure otherwise it will come undone as you pull the seam closed)., then begin stitching the long sides together using the Ladder Stitch over 2 canvas threads (count carefully to keep the seams matched up).  

Periodically pull the Ladder Stitches tight to close the seam.  This photo shows the seam closed after an inch or so.

Here the stiches have been pulled tightly halfway through stitching the seam closed

The seam is now completely stitched closed.

Securely end the fishing line in the bottom seam allowance.

Clip into the top and bottom seam allowances so they will easily fold to the inside of the Firecracker.  Leave a few canvas threads "unclipped".


Measure the diameter of each Firecracker.  I came up with the following:
Small Firecracker:  1.5"
Medium Firecracker:  2.25"
Large Firecracker:  2.5"  The photos below are for the large Firecracker


Set up a compass one-half distance of diameter (if diameter is 2.5", the compass should measure 1.25").  I use a #4 pencil so the markings won't "bleed" unto the fabric or canvas.

After drawing and cutting out your circle, measure to confirm it's the size you desire.

Since the board I use is rather thin (for easy cutting), I cut out 3 circles for the bottom and 2 circles for the top).

Cut fabric circles with a seam allowance of about 1/2".

Place a running stitching along the edge of the fabric circle

Now pull the running stitches tight so the fabric will wrap around the board.

I go one step further and lace the edges together so the fabric won't slip.

To begin stitching the bottom to one of the Firecrackers, secure your sewing thread to the canvas edge, then fold the edges of the seam allowance towards the inside of the Firecracker

Using straight pins to temporarily hold the bottom unto the Firecracker, whip stitch both together using thread to match the bottom fabric.

Once the bottom is attached, place a weight inside to rest on the bottom (I used gravel I found around my driveway) then stuff, stuff, stuff until  you can stuff no more with Polyfil.  


Now cover the Firecracker top with fabric.  Then make a hole through the fabric and board (so you can  push a "foil sparkler" through the top) and attach to the Firecracker with pins and sew on as with the bottom.  

That's it.  As you can see, my top and bottoms rest outside the canvas.  Someday I'll learn how to fit a top and/or bottom inside the standup, but as of yet don't have a clue how to do that. 

Please add photos of your Firecrackers to the ANG CyberPointers Photo Album when you get them done.


November 2, 2020--All three firecrackers are now stitched and ready to finish.  I even found some foil sparklers for the top of each one.  Below is a photo of the smallest firecracker.  


Firecracker Small Completed


 October 19, 2020--The medium size firecracker is stitched with only the smaller one left to do.  

Firecracker Medium Completed

October 14, 2020--Here's a photo of  the first of three firecrackers (and largest) that is fully stitched.  I can imagine how cute this will look with a sparkler coming out of the top.  

Firecrackers Large Completed

August 13, 2020--The CyberPointers Chapter of ANG offered this project by Toni Gerdes as a class to be held during its July and September meetings.  I purchased the full kit and love the variety of threads and stitches.  Lesson one given at the July meeting covers the largest of the three firecrackers.  I plan on getting the stitching done in time for the second lesson given in September.

Here's my progress to date.

Firecracker Largest Top Portion Completed


Firecracker Largest Top Portion Completed Closeup


Toni advised us to be sure the laid threads in bargello are flat, not only on the front, but on the back as well to avoid a "twist" working its way from the back to the front.  She's right.  You can see this problem in a few of my red threads on the right side where I didn't worry about what was happening in the back.   Of course, to do this means flipping the canvas over after every stitch.  I realize now that I need to Iearn how to lay stitches on the back without turning the canvas over.  This will be interesting.

Christmas in the Heartland - Updated 3/9/22

March 9, 2022--Won 3rd Place Ribbon in the Whitework category at Woodlawn's 59th Annual Needlework Exhibition in Alexandria, VA.  So pleased.

July 3, 2020--Picked up this project from Michaels Arts & Crafts frame shop today.  Love how it came out--simple yet elegant.  Even though it's a Christmas piece, I'm going to have it hanging in my guest room all year round.

Christmas in the Heartland Framed


May 28, 2020--Fini!  As much of a challenge as this piece was for me, I enjoyed every step of the way.  The very last section contained a hardanger stitch called Greek Cross adjoining Divided Wrapped Bars.  Cindy Valentine's instructions were very clear, but I took a peak at some YouTube videos on how this stitch is executed just for clarification.  Easy peasy!  Lastly, I found one more error and have noted it below in my Notes to the Instructions.

Christmas in the Heartland Completed

Note:  At first I thought the small bird on the lower right side was a chicken.  Heartland = Chicken.
Nope, while stitching it, I realized it's supposed to be a quail because of the piece on top of its head.  Can you see it?


May 26, 2020--Back in 2012, I enrolled in an ANG Workshop by Mail project called Christmas in the Heartland designed by Cindy Valentine.   Because this project has many hardanger type stitches, I put off working on this piece until I was able to take a hardanger class of some sort which I did at Hardanger University in February, 2019.  Glad I did wait--was able to cut the fabric for the first section in full confidence.  Cindy's instructions for doing the hardanger stitches are wonderful and I especially liked her chart giving the path for stitching the needlewoven bars and dove's eyes.  Perfect.

I do wish, however, that I copied the class emails and notes back in 2012, especially those that may have discussed errors in the instructions.  I found a few errors myself and have noted them below in case anyone else has this project in their "to be stitched" stash.  I also made an error in what type of silver Kreinik to use.  The instructions called for "HL", High Lustre silver #4 Kreinik and I'm using regular silver from my stash.  I now can see that the HL Kreinik would have made a much greater impact.  This project is stitched on 25 count Laguna linen and has been a challenge to work on.  Lots of froggin' going on.  The most difficult stitch for me to get right was the Queen's Stitch.  I must have restarted that stitch 4 times.  Aaarrrgh!

All in all, though, I am very much enjoying this project.  There's another band of hardanger cutwork coming up and I'm sure I'll get through that easily enough.   Below is a photo of my progress to date.  I took 2 photos, one with white fabric underneath the linen, another with a silvery color.  I like the silver fabric best--you don't see the threads on the back of the linen carried from one section to another.

Christmas in the Heartland Through Band O

Notes to the Instructions:

  • A Kloster stitch is missing on Band B in the lower right section.  The missing stitch is shown  on Page A Master Chart, Page B Detail of Master Chart Top and on Page 5 Detail of Band B.
  • The Queen Stitches Detail on Page 19 show the angles of the center stitches going in a different direction than those on the Master Chart Page A and on the Detail of Master Chart Center Page C.  I used the Master Chart to determine the angles.
  • The color Kreinik for the Ray stitches on Diagram O Page 21 for the blue colorway should be silver, not gold as printed.
  • Band R on page 22 refers to placing beads in this section.  The instructions made no reference to where those beads were to go.


Saturday, March 27, 2021

My Vintage Heart - Updated 3/27/21

March 27, 2021--Finished this beautiful heart into an ornament and love how it came out.  Lots of sparkly bling.  Project information can be found below copied from prior blogs.


My Vintage Heart Finished Front


My Vintage Heart Finished Back

My Vintage Heart Kumihimo Cord


My Vintage Heart Kumihimo Cord Setup

December 6, 2020--The bling has been added and wow--it's beautiful.    Purchasing Nancy Cucci's designs and kits with beads is always a lot of fun.  There's a nice surprise at the end when all the beads are attached--shine, texture, dimension, etc.   This project did not disappoint.  

My Vintage Heart Completed

My Vintage Heart Completed Side View 1

My Vintage Heart Completed Side View 2

November 30, 2020--The stitching is done and all sections ready for embellishment with the beautiful (and many vintage) beads Nancy included in the kit.  I love how beads add so much "wow" factor and can't wait to see what this will look like all dressed up.  Stay tuned.

My Vintage Heart Before Beading

November 17, 2020--When ANG's CyberPointers Chapter offered up this heart by Nancy Cucci last June with lessons to begin in November, I signed up immediately.  Her hearts are so beautiful with wonderful bead embellishments, and this heart doesn't disappoint (click on Collections to the right to see other projects designed by Nancy Cucci that I've stitched to date).   I love how she added antique beads to the kit that were accumulated by her over the years.

Here's a photo of the completed outline done in Tent Stitch.  Now the fun begins.


My Vintage Heart Outlined

Saturday, December 5, 2020

Stitch of the Month 2020 - Updated 12/5/2020

December 5, 2020--All twelve months of this ANG Stitch of the Month project designed by Kathy Rees are done.  This was lots of fun with plenty of challenges.  I want to make this into a pillow and am trying to determine what type of border to add to the star so it'll have a larger surface.   Stay tuned.


SOTM 2020 through the December Lesson

November 9, 2020--The November instructions called for filling in the upper right and lower left areas.  However, as suggested by Tina of NJNA Chapter of ANG, I used the Balloon Stitch instead of the Hungarian Stitch recommended by Kathy Rees, the project designer,   It's larger than the called for stitch and reflects more light.  The December stitch should counterbalance the larger designs done in this and prior months.

SOTM 2020 through the November Lesson

October 12. 2020--October's stitch covered the second portion of the four different background patterns.  Coming to the end soon.


SOTM 2020 through the October Lesson


September 6, 2020--Below is a photo showing September's stitch, the Diamond Pavilion in the upper left and lower right blocks.  We are definitely approaching the finishing line with 3 more months of different background stitches to be done.

SOTM 2020 through the September Lesson

SOTM 2020 through the September Lesson Closeup

August 10, 2020--The August lesson is now stitched.  This lesson covered the last leg of the 8 legged star and as with all the others, got done very quickly.  The next four lessons will cover the background stitches.  This should make for easy stitching while watching TV.


SOTM 2020 through the August Lesson

SOTM 2020 through the August Lesson Closeup

July 5, 2020--Here's a photo of the 7th star leg stitched as part of the 2020 ANG Stitch of the Month (SOTM) lesson for July.    Half way through this project with one more star leg to do.  After that it's background stitches with the possible addition of a border.   Have six months to think about what would look best.


SOTM 2020 July


June 5, 2020--June's lesson for the 2020 ANG Stitch of the Month (SOTM) is the sixth star leg consisting of waffle stitches.  My favorite is worked up in the 2 corners (left and right).  Two more legs to go in blue, then the background will be next.

SOTM 2020 June Closeup 
SOTM 2020 June


May 9, 2020--Last night I stitched up May's installment (number 5) of the ANG SOTM 2020 project.  This month featured the Milanese stitch which I love when using threads that must be laid such as multiple strands of silk floss, Neon Rays types of ribbon, etc.   However, using variegated Caron Watercolours for a number of this month's sections didn't show off the stitches as well as some other type of thread could have.   But that's why I love doing these ANG SOTM projects--I learn so much and develop confidence to try new things.  Now i have to wait until the next lesson is available on June 1st to continue working on this 8 legged star.

SOTM 2020 May Closeup

SOTM 2020 May


April 5, 2020--Here's the fourth installment of the ANG Stitch of the Month project (SOTM) for 2020.  The designer, Kathy Rees, skipped a star leg and continued on with the red colors using cashmere stitch variations.  Am now thinking about a border to close up the design.  Hmmm.

SOTM 2020 April Closeup

SOTM 2020 April
The pink lines on the canvas are basting threads.


March 19, 2020--Just finished stitching March's lesson.  This third leg of the star highlights Smyrna stitches with some interesting variations.   It's a fun project to stitch...just wish I were doing this under better circumstances (no COVID-19).

SOTM 2020 March Closeup

SOTM 2020 March


February 3, 2020--It didn't take long to stitch up February's lesson.  In fact, was able to get this done while watching the Super Bowl game last night (or mostly listening to the game).  However, I did look up at the television to watch all the commercials and half-time show.  Most of the ads were very entertaining and it was interesting to see the difference in energy levels of Shakira and Jennifer Lopez.

SOTM 2020 February Closeup

SOTM 2020 February


January 25, 2020--January's lesson is stitched.   Based upon the instructions, I can tell this is going to be a lot of fun to work on.

SOTM 2020 January Closeup

SOTM 2020 January


January 2, 2020--The ANG 2020 Stitch of the Month project looks to be fun while offering stitching challenges.  The star designed by Kathy Rees will be great as a "stand up", hanging ornament, etc.  I think I'll encase mine in clear plastic and make it into a front door ornament for use on Independence Day.

So far I've downloaded the two files for January (one is an introduction and the other is January's stitching).  I really like the blue and red colors used by Kathy,  and found some of those threads in my stash.  Then  ordered what I don't have.  I already had a 12" x 12" piece of 18 count mono canvas in white, so will change the background stitches to a very pale, almost white, color rather than the ecru color Kathy used which went with her suggested egg shell colored canvas.

Below is a photo of the basted star.  I started to do the outline in #4 pencil, but feared it might look too dirty where the white background stitching met the star.  Since the design graph is based upon 6 canvas threads equaling 1 thread in the graph, I basted using a count of over/under 6 threads.  Actually faster than counting out each length.

Everything looks a bit messy now because I like having my basting thread knots in front along with their tails to keep an eye on where everything is and easier to remove as each star arm is stitched.  You can see I stitch "in the well" and mount my canvas so it sits on the back of the stretcher bars.  The tacks on the inside of the stretcher bars are for small magnets which will hold needles.

ANG Stitch of the Month 2020 Basting


Below is a photo of the project as designed and stitched by Kathy Rees.