Statcounter

Showing posts with label Source Chapter Led Class. Show all posts

Saturday, May 9, 2026

Heart Fourth of July - Updated 5/9/26

May 9, 2026--I placed the last stitch on this beautiful, very shiny heart today and look forward to finishing it as an ornament in the near future.   I had fun leading this project to a handful of my ANG chapter members and they are moving along nicely.   There was an initial glitch when we learned the threads recommended by the designer are no longer available, but we found RG's Neon Rays made a very nice substitute.  This will make a nice addition to my Memorial Day, Independence Day and Labor Day decorations.

Fourth of July Heart Completed

March 13, 2026--I have the pleasure of leading a class at the Delaware's Seashore Chapter of ANG May meeting called Fourth of July Heart designed by Margaret Bendig.  The instructions were published in ANG's July 2008 Needle Pointers Magazine.  Since we'll have just a few hours to cover everything in class, I'm going to teach it "seminar" style where a little bit is done in each section so the students will learn the stitches involved, then the heart can be completed at home.  Of course, there will be lots of "thread spaghetti" to contend with.   Below is the "prework" the members will be asked to do before the class begins.  


Heart Fourth of July Prework

This is a delightful project to work on to celebrate the USA's 250th anniversary.  I remember celebrating our country's 200th anniversary on the "Mall" in Washington, DC.  OMG--50 years ago!!!  Yup, I'm that old. 馃構

Sunday, November 6, 2022

Patriotic Ornament - Updated 11/6/22

November 6, 2022--Finished this fun project into an ornament in time to display on Veterans Day.   

See prior post below for more information about this project.


Ornament Patriotic Finished Front

Ornament Patriotic Finished Back

Just learned this will be a class taught by Ann Strite-Kurz at Denise's Needlework Shop in St. Michaels, MD sometime in the Spring of 2023.   If interested, call Denise for more information.


October 18, 2022--At the October 3rd meeting of Delaware's Seashore Chapter of ANG, one of our members, Ann Strite-Kurz (also a well-known designer and teacher) held a class on stitching her Patriotic Ornament. 

Working on this ornament was such a pleasure with lots of challenges and surprises.  Now all I need to do is finish it into an ornament.   The pencil markings on the edge of the circle will disappear as part of the seam allowance.

Patriotic Ornament Completed


Tuesday, April 26, 2022

Bargello Fun - Updated 4/26/22

April 26, 2022--Done the stitching on this really pretty bargello project.  I'm imagining this as a purse with a Kumihimo cord and shoulder strap and two large tassels on the right and left bottom corners.  How cool will it look with dark wash blue jeans and a white blouse.  

Bargello Fun Completed

January 30, 2022--I have the blues and am loving it.  The blues I'm talking about are in this project and look wonderful.  The first quadrant of Section 2 is done and actually worked up quickly.   Please ignore the "thread spaghetti".  Will deal with that in the next quadrant.

Bargello Fun Section 2 First Quadrant

January 5, 2022--Getting well into the new year now.  Lots of planned stitching to do, but for now, this is the project I'm very much enjoying.  I believe I've completed about 50% (this calculation includes the time it took to work up the outline in Smyrna stitches).  So here it is with the center and Area 1 completely stitched.  Loving the blues.

Bargello Fun Center and Area 1 Completed

January 1, 2022--Happy New Year!  Wishing everyone the best in 2022.

I've started stitching a new project being led by Delaware's Seashore Chapter member Pat vdA called Bargello Fun designed by Carol Algie Higginbotham.  It's taken from the ANG Chapter Project Book for 2015-2016.  So far, I've stitched the outline done in Smyrna Cross Stitch.  

Bargello Fun Outline Completed

I'm not stitching this in the pink colorway as shown in the project photo.   Instead, I've chosen to work this up in blue colors listed below.

Name/Type Color Number Color Name

DMC/Floss 791 12-13 V Dk Cornflower
DMC/Floss 797 12-11 Royal Blue
DMC/Floss 798 11-07 Dk Delft Blue
DMC/Floss 799 11-06 Md Delft Blue
DMC/Floss 800 10-03 Pale Delft Blue
DMC/Floss 809 10-04 Delft Blue
DMC/Floss Blanc White

Now on to the fun part of doing bargello stitches.

Here's a photo of the project as stitched by the designer.

Bargello Fun Designed by Carol Algie Higginbotham Project Photo


6 comments:

  1. Mi艂ego wyszywania !Czekam na post臋py,ch臋tnie b臋d臋 ogl膮da艂a.艁adne kolory dobra艂a艣.
    Pozdrawiam
    PS. Przepraszam pisz臋 po polsku bo nie znam angielskiego.Pos艂uguj臋 si臋 t艂umaczem internetowym 偶eby przeczyta膰 Tw贸j tekst

    ReplyDelete
    Replies
    1. Thank you for your nice comment. I also use a web translator to read your comments. It works very well. Happy New Year.

      Delete
  2. That is a lot of Smyrnas!! You are working on all those projects? They are on bars? How do you decide which to work on in a given day? By the way, I stitched Bronze Purse but never "finished" it - can't decide what to do with it. I have Fire and Ice on bars but haven't pulled it out in a while.

    ReplyDelete
    Replies
    1. Ah, I can tell you looked at my In Process Projects page. All of them are on stretcher bars with various amount of work done on them. I choose projects by whimsey or chapter commitments, not worrying about what's not getting done. My Fire and Ice project languishes still and I'm not sure I'll ever finish it. The Bronze Purse is definitely one that I want to get done now that the Let the Good Times Roll purse is finished. As far as my Planned Projects, most of them are fully kitted and mounted on stretcher bars. I'm slowly weaning them out by selling what I know I'll never get to--tastes do change. You should see my "dream list" of projects I would love to stitch that I have on Pinterest. Posting photos there instead of actually buying and kitting up those projects has saved me a ton of money. LOL.

  3. Too many on bars cause me anxiety. Process, Planned, and Dream projects! Good way to handle them especially the Dream projects. Thanks for sharing.

    ReplyDelete
  1. Love the blues too!!! Great piece - looking forward to your progress.

    ReplyDelete

Friday, March 11, 2022

Rose in Assisi Technique - 3/11/22

March 11, 2022--The March meeting program of Delaware's Seashore Chapter of ANG consisted of learning the Assisi technique while cross stitching a rose.  This results in a negative effect where the background is stitched, and the central design is left blank.   Thank you, Bobbie R., for introducing us to this style of stitching and I look forward to working up more designs using this technique.  

This project was stitched on 28 count Jobelin linen with two strands of DMC over 2 threads of fabric, effectively making it 14 count linen.  I think the result is quite dramatic.


Rose Assisi Technique on an Embroidery Hoop (stitching in the "well" to make it easier to end threads on the back of this small project)


Rose Assisi Technique Framed (please ignore a small reflection of light on the bottom)


Saturday, March 20, 2021

Blue Diamond Ornament - Updated 3/20/21

March 20, 2021--Finished this tiny diamond into an ornament.  I must admit I almost didn't bother posting on the blog--this is one of the worst finishing jobs I've ever done.  Well, maybe the second worst.  I'm discovering that the smaller the ornament, the more difficult it is to properly finish.   The proof is in the pictures.  I also believe that one of the reasons professional finishers top off their work with lots of bows and fru-fru may be to cover up errors in forming a loop at the top.  It isn't easy stuffing all of that cording into the top of an ornament--something has to give.

Ornament Diamond Blue Completed Front

Ornament Diamond Blue Completed Back


January 27, 2021--Last night I took a Zoom class on how to stitch the below ornament.  

Blue Diamond Ornament

Melita Glavin of  Melitastitches4fun's Blog and a co-attendee of the class, perfectly describes the event as follows:

My EGA Brandywine Chapter hosted a class earlier tonight with Vicky Witterschein so she can gain experience towards her teaching certification with the National Academy of Needlearts (NAN).

Many thanks to her local needlepoint shop, The Edwardian Needle and Pam, for donating 20 kits to each of EGA’s 5 regions. It consists of 5″ x 5″ piece of 18 count canvas, Santa Fe Sage, 2 mm ribbon, Kreinik, pearls, needles, and beading thread.

Vicky led us through the stitches, had video demonstrations, and several of us finished the project during the 2-hour Zoom class. She is well on her to being an excellent teacher.

It could be done as a diamond like I did (2″ x 3″) or a Christmas Tree. Any ribbon thread will work, if I want to make up another. It’s great that the stitches work up easily into 2 different designs.

I chose to stitch the diamond shaped ornament rather than the tree.   It was a fast stitch and one worth repeating.

2 comments:

  1. Lovely, I’m also signed up. My zoom class is in March. Can’t wait.

    ReplyDelete
  2. Definitely would do another. I love seeing you in Zoom classes and meetings!!

    ReplyDelete

Monday, March 8, 2021

Delicate Flowers Stocking by Pat Mazu - Updated 3/8/21

March 8, 2021--This is the third stocking finished using a technique I've recently written about.  It's a process that has many steps and takes time, but is worth the effort to proudly say I've finished it myself and saved quite a bit of money to boot.  Of course, it's not perfect, but it's for my personal use only, so enjoy it I will.


Stocking Delicate Flowers Finished Front


Stocking Delicate Flowers Finished Back (Note year of 2015)


Stocking Delicate Flowers Cording Name

Stocking Delicate Flowers Cording Details


July 13, 2015--Have completed the stitching on this piece and am ready to finish it into a stocking.   The side view picture shows the depth and nap of the threads.

Think I'll make the cording out of the two greens and add white.  Love working on projects that take no time to complete.  It's just what I needed.

Completed Stitching


Side View
July 11, 2015--Finished the cuff on this beautiful stocking.  Changed the color of the Kreinik cross stitches from gold to a pale green.  Hope it'll work.  Here's a photo of my progress so far.


Stocking Delicate Flowers Through Cuff

Stocking Delicate Flowers Through Cuff Closeup

July 6, 2015--My local ANG chapter, Delaware's Seashore Chapter, is stitching Pat Mazu's Delicate Flower Stocking from the 2003-2004 Chapter Project Book.  I've got everything together and ready for the class today.  The threads chosen are from my stash and even though not the traditional holiday colors, I think they'll be lovely (I love all greens with a touch of blue in them).

Delicate Flowers Stocking Project Photo

Thread Selections


This is the first post in over a month--was fishing with DH in Canada and thoroughly enjoyed it.  I love being on the water and DH makes fishing so easy for me--he baits my hook and takes the fish off the hook.  All I have to do is reel it in, and that's where all the fun is.  The lakes were so beautiful.

Fishing at Lost Lake Wilderness Lodge, Ontario, Canada

Friday, March 5, 2021

A Star in the Meadow Stocking - Updated 3/5/21

March 5, 2021--Finally finished this project into a stocking ornament.  This is the second stocking made using a technique I wrote about here.   It's definitely a learning process and some of what I learned can be transferred to flat ornaments.  For example, finger pressing the canvas seam allowance into place, then ironing it flat so it can be used as a mounting board template is a great technique for odd shaped ornaments.  I'm still on the fence about hand sewing together the canvas front to the fabric back, but I'll give it a try with flat backed ornaments rather than gluing them together as I would normally do (hand sewing is a necessity for working up stockings though).  


Stocking Star in the Meadow Finished Front

Stocking Star in the Meadow Finished Back

Below is a photo of the cording I used which was purchased from Michaels Arts & Crafts.


Stocking Star in the Meadow Cording

February 9, 2017--My ANG chapter, Delaware's Seashore Chapter, had a class led by our incomparable Geri W. on stitching Pat Mazu's stocking called A Star in the Meadow.   This was a free download (click here) made available by ANG Needle Pointers Magazine.  Due to the bargello or florentine stitches over multiple threads, this was a very quick finish.  Too bad the shiny Swarovski Bicones don't show well in the photo.  This is the third Pat Mazu project I have ready to finish into a stocking.  They make darling ornaments.


A Star in the Meadow Stocking

  1. Love her stockings. Yours turned out great. Geri is a gem. I just finished I Can Do It through CyberPointers, sent it in for critique & she is doing the finishing!


Tuesday, July 28, 2020

Mulberry (aka Blueberry) & Lime - Updated 5/5/21

May 5, 2021--Won 2nd Place Ribbon in the Canvaswork-Multistitch category at Woodlawn's 58th Annual Needlework Exhibition in Alexandria, VA.

July 28, 2020--Ta da....this project is now framed.  Michaels Arts & Crafts did a good job on this.  The simple metal frame and matting look great with the fancy stitches and beading.  Very pleased.

Mulberry (aka Blueberry) & Lime Framed


July 9, 2020--The stitching on this beautiful project is now done and ready for the framer.  Below are photos of my project done in blues and lime along with the designer's project photo stitched in mulberry and lime (I think both are equally beautiful)

There were many challenges to this piece, most involving thread selection which I wrote about on June 22nd below.  I understand that magazines are limited as to how many pages can be devoted to instructions, so happily there weren't many issues in that regard.  In fact, there was only one instruction missing that I found--the placement of a Smyrna cross stitch in Step 21 needed to be repeated after stitching the right angled row of backstitches.

Mulberry (aka Blueberry) & Lime Completed
Mulberry & Lime Project Photo

Below is a revised list of threads I used in the project compared to those used by the designer.  This has been saved as a .jpeg so it can be enlarged.

Regarding the beads, my stash is limited, so I only used 2 types instead of 4 as designed.


July 4, 2020--All the bands through Step 19 are stitched.  The next steps involve the beautiful lacey looking stitches in the corners and centers, then the placement of lots of beads.   I haven't dived into my stash of beads yet, waiting to see what colors I'll end up using for the lacey stitches.  

Once everything is done, I'll repost my thread list which continues to change as I move forward.  This has been one of the most challenging projects I've done to date, but believe it'll be worth it in the end.  

Wishing everyone a Happy July 4th.

Mulberry (aka Blueberry) & Lime Through Step 19


June 22, 2020--This project has been a challenge, to put it mildly.  At one time I considered dumping the whole thing and starting over.  The biggest problems came from the threads in the instructions which are way too big for use on Congress Cloth.  For example, the designer calls for Kreinik #12 for an Oblique Encroaching Gobelin stitch over 1 thread.  Impossible to use Kreinik #12 without stretching out the Congress Cloth.  Kreinik #4 and #8 work much better.   There are other similar examples, such as using DMC Perle 8 when 12 is the better choice.   I'm also unhappy with my congress cloth.  I'm stitching on a cream color cloth with gold weaving through it.  That gold is always in the way when trying to find a hole in a crowded stitching situation (e.g., working up Jessicas).  Then I decided to change out some colors which involved some frogging.  However, I still love the design and like how the designer worked up the Jessica stitches--they came out beautiful.  So it's a love/hate relationship with this thing.  Still have 7 more steps to stitch which will really add "bang" to the project.

Mulberry (aka Blueberry) & Lime Through Step 14


May 31, 2020--I recently picked an old project I had in my stash designed by Jeanne Polzin and published in ANG’s Needlepointers Magazine in 2012, number 3.  This was a project led by Maryrose C-B for Delaware's Seashore Chapter of ANG back in 2014.  Maryrose wrote up wonderful notes on each section and made fantastic suggestions for alternate thread colorways.  I chose blues and am calling my project Blueberry & Lime.

So far I've stitched Steps 1 and 2, waiting for threads to arrive in the mail before going further.  Here's a photo.

Mulberry (Blueberry) & Lime Completed through Section 2


Saturday, March 21, 2020

Hooray for the Red, White & Blue - Updated 3/21/2020

March 21, 2020--The 3rd and final lesson, the flag block, was supposed to have been given to my ANG chapter at the meeting on April 6th.  However, with everything canceled because of COVID-19, I wrote out the lesson and emailed it to all participants.  They have all done so well on the stitching through the second lesson and I know this last one will be a breeze for them.  The only concern they may have is with the star brads used for embellishment.  I wrote about my experience of placing them on the canvas, so they shouldn't have any trouble at all.  Looking forward to seeing photos of their completed projects.  All in all, this was a lot of fun to work on and to lead as a chapter class.

Hooray for the Red, White & Blue - Lesson 3, Section 8


March 3, 2020--The instructions for the second installment to the project were given to my ANG chapter members yesterday.  The three sections covered were Lettering, Red and White Squares, and Fireworks.   All of us are thoroughly enjoying the variety of stitches in this piece.

The last section, The Flag, will be stitched next month, then I'll have the fun of finishing it into a box standup.

Hooray for the Red, White & Blue - Lesson 2, Sections 5 - 7
The only changes we would have made are in the spacing between the letters L and Y--they need to be closer together by one thread for balance, and lower the firecrackers by 5 threads to allow more room on top for the "spaeklers".  Otherwise it's looking good.


February 4, 2020--This wonderful project, designed by Karen Barras of the Central Kentucky Chapter of ANG, was chosen by Delaware's Seashore Chapter as their project for the first 3 months of 2020.

I have the privilege of leading the members in stitching this design, and yesterday was Lesson 1 covering the first 4 sections (bunting, pinwheel, plaid and flowers).  Of course, prior to the first lesson, all had the opportunity to do the pre-work which outlined each section with Diagonal Gobelin Stitch.

Karen's instructions and graphs are superb, but I did have to review my Chottie's Plaids book to figure out how the plaid section should be stitched.  Using her technique, the back looks as good as the front.  Here are the results:

Hooray for the Red, White & Blue - Lesson 1, Sections 1 - 4

Sunday, August 25, 2019

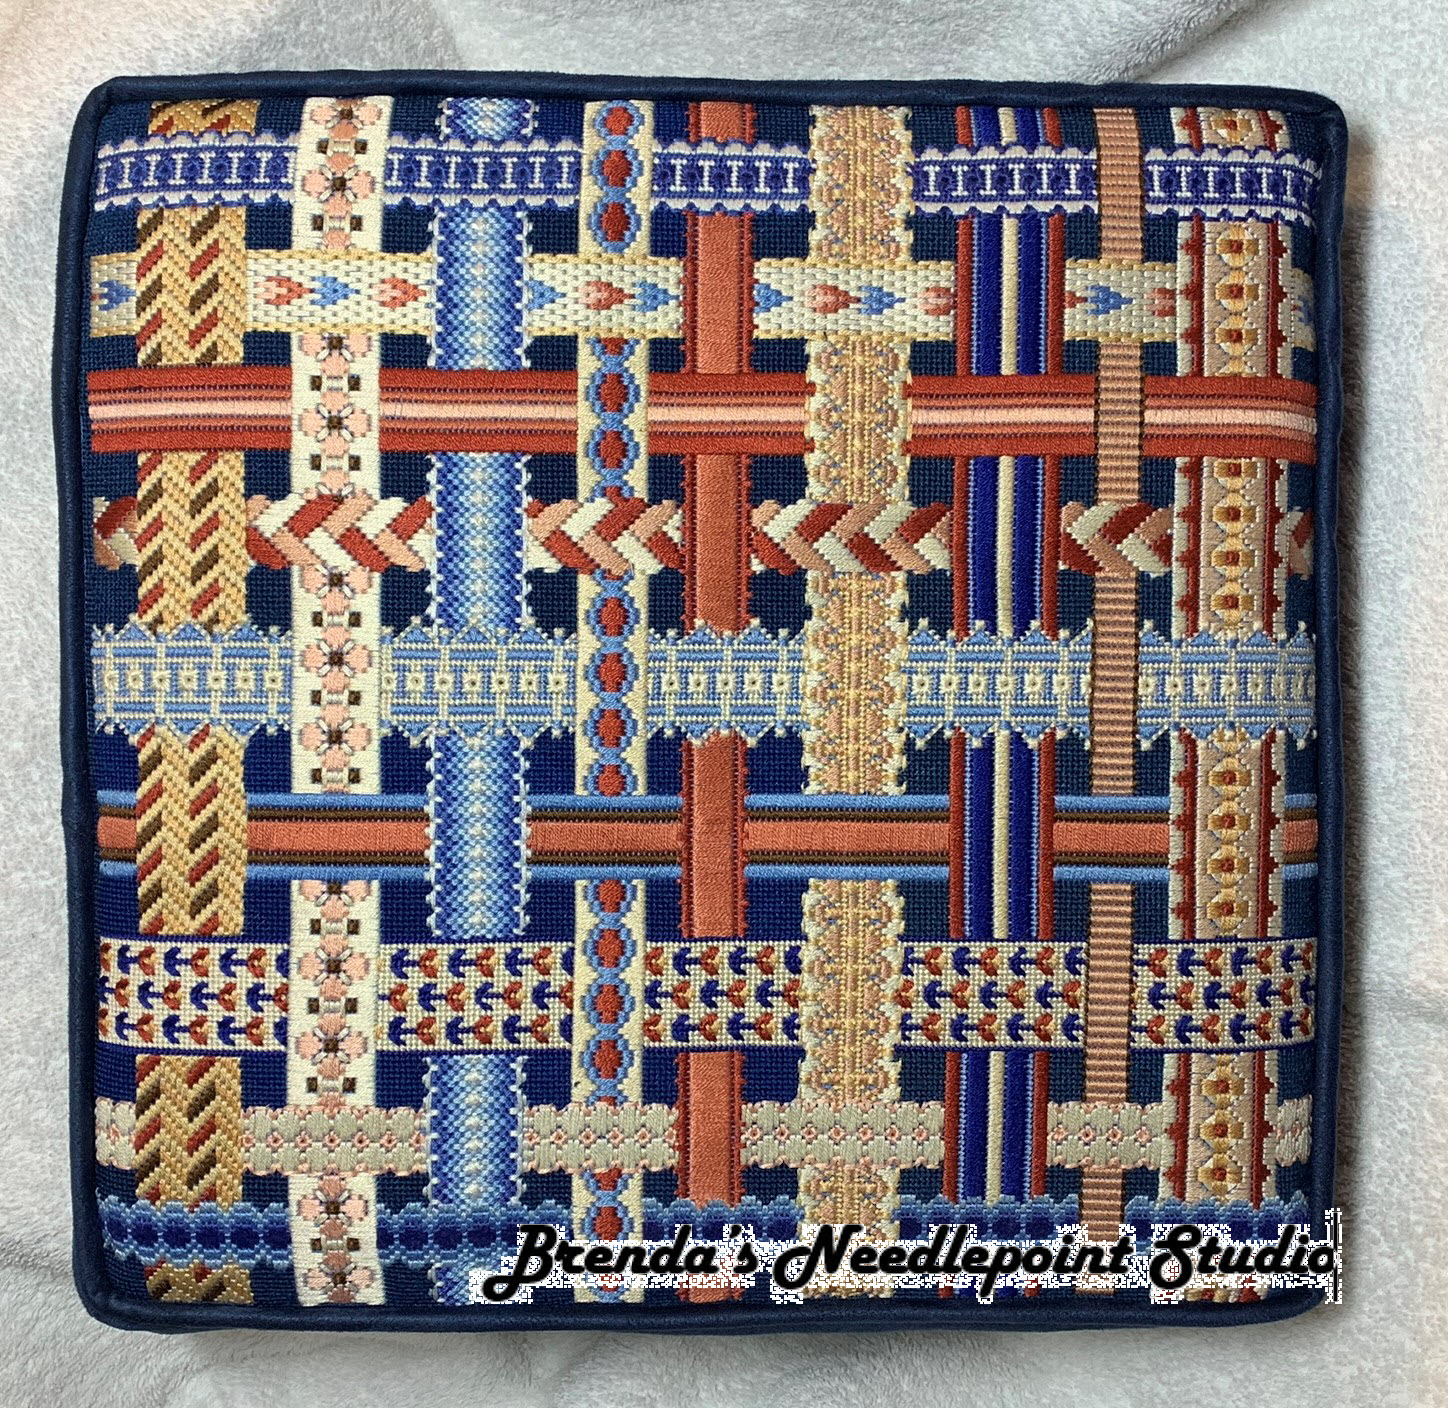
Woven Ribbons and Lace Pillow - Updated 9/14/19

September 14, 2019--Just learned this piece garnered a 2nd place ribbon at the Rehoboth Beach Museum's 9th Annual Needlework Exhibit.   Thank you Jane Nichols for such a beautiful design.

August 25, 2019--After 5 years since the stitching of this project was completed, I finally had this made into a box pillow.  It really came out nice.

Ribbons Woven Finished into a Box Pillow


September 14, 2014--Done!   Just finished stitching the last ribbon, number 9 (vertical ribbon on the far right).  Next--will talk with my upholsterer to see which type of pillow should be made--knife edge or box?

Ribbons Woven, Ribbon 9

September 8, 2014--Finished stitching Ribbon 7 and have only one more to go.  The last ribbon, number 9, is a lacy type of pattern using multiple colors, so will probably take some time to complete.   This really is a fun project.

Ribbons Woven, Ribbon 7
September 3, 2014--Counting down--two more ribbons to stitch.  Below is a picture of my progress to date.  Ribbon G and all horizontal ribbons are done.

Ribbons Woven, Ribbon G


August 24, 2014--Ribbon F done.  Three more to go!

Ribbons Woven, Ribbon F


August 20, 2014--Only 4 more ribbons to stitch.  Below is a picture of the most recent completion--ribbon 4.  

Most of the background of this project is stitched with Paternayan yarn, color #500.  I ran out of this color and, after making a few calls, was unable to find more.  I began to panic (just a little) and then remembered I still have some Paternayan threads purchased over 30 years ago, lovingly stored for all these years.  After digging through this stash, I found a color very, very close to what I was using and, after stitching 3 small squares, am pleased that the color variance is hardly noticeable.  Can you find the color difference?

Ribbons Woven, Ribbon 4

August 7, 2014--Stitched two more ribbons--B and C.   That's going to be it for awhile--lots of life to live over the next few weeks.  Looking forward to completing this project--only 5 more ribbons to go.  

Ribbons Woven, Ribbon C


Ribbons Woven, Ribbon B

August 2, 2014--Ribbon 2 done.  Seems to be stitching up a lot faster now that the lacy ribbons are done.  I also like working on the background where possible--the basketweave stitching is relaxing.

Ribbons Woven, Ribbon 2

July 28, 2014--Ribbon 8 is complete.   Have stitched a total of 10 ribbons so far, over half done with 8 left to go.  

Ribbons Woven, Ribbon 8
July 21, 2014--Ribbon 1 finished.  This project is coming along nicely.

Woven Ribbons, Ribbon 1

July 15, 2014--Another ribbon done--Ribbon D.  Should have stitched this ribbon before completing Ribbon 6.  May have to fix this later.  Now that all the ribbons with extended sides are stitched, can work on any ribbon that strikes my fancy, or work them in rows, or columns, or.......

Woven Ribbons, Ribbon D

July 13, 2014--The photograph below shows Ribbon 6 is now done.  I also stitched in a few of the background blocks to see how I liked the color.  Looks good to me.  Next up--Ribbon D.  

Woven Ribbons, Ribbon 6
July 4, 2014--Happy Independence Day!!!  

Delaware's Seashore Chapter led this class in May, so I pulled it out of the WIP pile a few days ago and completed Ribbon H.  Next up--Ribbon 6.

Woven Ribbons, Ribbon H
December 8, 2013--I'm putting this project away until the Delaware's Seashore Chapter has its class in April, 2014.  I started it early so that my sister could see what it was all about while visiting her in Dallas, TX before Thanksgiving.   I've completed 5 ribbons and learned the hard way that I should have done the ribbons in the following order:  (vertical ribbons are numbered 1 through 9, horizontal ribbons are lettered A through I) A, E, I, 3 then 5. Instead, I stitched E, 3 and 5 before beginning A and I.  I had to rip out portions of ribbons 3 and 5 to make room for the extended edges of ribbons A and I.

The next ribbons will be D, H then 6.  I should be able to stitch the rest of the ribbons, 1, 2, 4, 7, 8, 9, B, C, F and G in any order I please since their edges don't overlap other ribbons (I think).   Below is a picture of my progress to date:


November 21, 2013--Have completed two more ribbons, 3 and 5.  Only 15 more to go.


Ribbon 3
Ribbon 3 Closeup


Ribbon 5


November 17, 2013--The first of 18 ribbons is done. This is Ribbon E. Because its edge extends into other ribbons, it and some others must be done first. 

Ribbon E Closeup


Ribbon E
November 10, 2013--Finished marking the ribbon positions by basting with thread instead of a #4 pencil.   It turned out to be much easier counting with a needle and thread instead of starting and stopping the pencil.  I basted the horizontal lines first, then the vertical.  Once I got the count correct on the first line, the rest was easy to copy.

Lines set up using basting thread
August 30, 2013--Have begun working on the Woven Ribbons and Lace pillow designed by Jane Nichols which the Delaware's Seashore Chapter will have as its April, 2014 class.  This wonderful project can be found in the May/June 1999 Needlepoint Now magazine.  I chose the blue and rust version and all threads have been purchased or pulled from stash and entered into my Threads Database.
Since this is a counted stitch project, the ribbon widths must first be drawn on the 18 count canvas with a #4 pencil.  Have begun laying out the groundwork below.  Will also print out the graphs for each ribbon in such a size that can be easily attached to the canvas with a magnet while stitching.  As you can see, there are 9 vertical ribbons and there will be 9 horizontal ribbons (only 3 are drawn in so far).