Statcounter

Wednesday, November 20, 2024

Angels Clothespin for Hospice - Updated 11/20/24

November 20, 2024--Yesterday a group of us from Delaware's Seashore Chapter met at the Delaware Hospice Center to decorate a tree with the clothespin angels many of us stitched.  To fill in the empty spaces, one of our members donated some cut out wood angels that were the same size as the clothespin angels--perfect.  We are very pleased with how it turned out and hope it garners a large donation to Delaware Hospice.


October 25, 2024--Ta Da--All six have now been made up into little angels with hair and wings.  They actually came out kinda cute.  There will be a total of about 40 of these little angels placed on a tree at Delaware Hospice in November.

Clothespin Angels Finished

August 12, 2024--Finished cross stitching three more "skirts" for the clothespin angels that will be put together at my needlepoint chapter's October meeting.  I love the striped cat with a bluebird sitting on it.

Angels Clothespin Second Group of Three Completed


April 23, 2024--The last of the three Clothespin Angels is now stitched and ready for assembly at my ANG chapter's meeting in August.  This one simply states Happy Holidays with lots of embellishments. 
Angels Clothespin Happy Holidays Completed

Angels Clothespin All Three Completed


April 16, 2024--Now the second of the Clothespin Angels has been stitched--this one called Candles.  Now that I have a better idea of what I'm doing, I'm breezing along nicely.  One more to stitch up, then it's assembly time.   
Angel Clothespin Candles Completed

Angels Clothespin Stitched to Date

April 12, 2024--Have completed one of the Clothespin Angels.  This one is called Joy and was a real learning process for me.  First of all, I had to call our chapter's fearless project leader, Shirley H, on how many strands of floss to use on the 18 count Aida cloth.  I started with 2 strands but thought it might be too bulky.  Shirley agreed and recommended using only 1 strand.  Yay!  No laying or railroading the strands together.  Of course, I had to rip out what had been stitched so far, but that was fine since I totally messed up the "half" cross stitches.  

When working up the half stitches in this project, Shirley advised that only 1/4 of a regular cross stitch needed to be done since the backstitching would complete the half stitch.  See the two half stitches circled in the second photo below.  I'm so glad I checked with her about this--the results are much neater and less bulky than what I had initially done. 

I'm now hoping I didn't work up the design too low on the "skirt".  Need room to add lace around the bottom edge.  I also hope that the fabric will iron out nicely when all the stitching is done since I'm not using stretcher bars or a hoop--instead I'm stitching "in hand".

Angel Clothespin Joy Completed

Half Stitch Question
Boy, do I feel like a doofus on this project.  

April 3, 2024--My local ANG chapter, Delaware's Seashore Chapter, is putting together little angels for the Christmas tree at Delaware Hospice.  We received our kits from the member who is organizing this project (thanks Shirley H) which has enough materials to put together three angels (all we had to do was supply our own threads, needles, embroidery hoop, etc.).  

After cross-stitching the design on the "skirt", the fabric will be edged with lace and glued unto a clothespin.  Then each angel will be embellished with curly hair, drawn faces, a bow, etc.   Even though this isn't something I'd normally do (I generally don't like "crafty" things), they are too cute to resist.

Angels Clothespin Materials

Angels Clothespin Skirt and Sleeves drawn on 18 count Aido Cloth

I finally had an opportunity to use my light board to trace the skirt and sleeve patterns unto the Aida cloth.  I've had the light board for ten plus years now and besides loaning it out to a friend, it's been used only two other times.  Of course, I could have taped the master design unto a window, but it's a dark and rainy day, so the light board was used.  I should mention that I had to grab a ladder to pull the light board down from a top shelf in the closet, then put it back when done where it'll probably sit for another ten years.

Wednesday, November 13, 2024

Ornament Holiday Gift Purple - 11/13/24

November 13, 2024--Was able to stitch the sides of this "gift" before running out of DMC Rayon thread.  While waiting for the order to arrive, I worked up the fleur-de-lis with beads instead of stitching it with french knots (which I hate--can never get them even on the canvas).  So now to put it aside until more rayon thread arrives.

Ornament Holiday Gift Purple in Process


Wednesday, November 6, 2024

Ornament Holiday Light Purple - 11/6/24

November 6, 2024--Another Holiday Light ornament designed by Susan Portra is complete.  The two purple colors are interesting but not my favorite.  The sparkling beads in the center add dimension.

The lights in this series are now done and I have two more "gifts" in the collection to stitch.  


Ornament Holiday Light Completed


Thursday, October 31, 2024

Ornament Holiday Light Orange - 10/31/24

October 31, 2024--Just finished stitching this little light ornament designed by Susan Portra as part of her Holiday Ornament collection.  Orange is such an appropriate color for today, Halloween.   There is a lot more depth than what can be seen in the photo, especially with the horizontally placed beads.  Now on to the next light ornament--maybe a purple one.

Ornament Holiday Light Orange Completed


Tuesday, October 29, 2024

Santa Sea Shell - 10/29/24

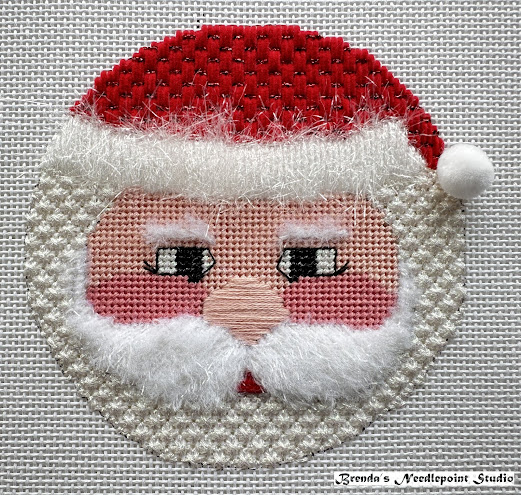
October 29, 2024--I'm now working on another Janet Zickler Casey design called Sea Shell Santa from 2004.  It's easy enough to do but the YLI Metallic Ribbon Floss called for to stitch the beard is giving me issues.  I have some ribbon wound on long plastic supports, but not enough to do the beard (see photo 2 below).  So, I dug through my stash and found some of the same brand and color ribbon, but this time tightly wound on a spool.  This one has problems.  Evidently it was wound too tightly without care to be sure it laid "flat" around the spool, so it comes off the spool looking crooked, twisted, etc.  Most definitely not flat (see photo 3).  After stitching a few sections of the beard, I tore it out and reordered the YLI ribbon not wound on spools.  However, there's a long delay, so this project needs to sit for a while.

Note:  the red threads on both sides of the mouth are "tacking" stitches which will be covered up by the moustache thread.

PS:  I kind of like the beard as it now looks with the DMC Perle 3 padding stitches.  Maybe I'll just keep it or add another layer of the perle, but stitch it horizontally.

Sea Shell Santa 2004 Progress Photo


YLI Ribbon Photo 1


YLI Ribbon Photo 2 (Lies Flat)


YLI Ribbon Photo 3 (Lies Twisted, Not Flat)


Tuesday, October 15, 2024

Santa Gnome - Updated 10/15/24

October 15, 2024--Ta da--Done.   I really dragged my feet on finishing the beard--had to make a twisted cord and couch it down (one of my least favorite things to do), then stitch up the holly leaf with long and short randomly placed stitches inside a floral wire wrapped in buttonhole stitch around the edge.  Whew.  Once the leaf was done, the canvas had to be cut away.  Fortunately, Janet, the designer, gave us a green waterproof Sharpie to color the bits of white canvas that poked through the stitching.  She also gave us some glue to smear over the back of the leaf to keep anything from coming undone.  Very thoughtful.

Now it's being placed in a pile with my other Janet Zickler Casey designed santas to be made into ornaments someday (there are now 19 of them stitched up).

Santa Gnome Completed


October 5, 2024--Here's an update on what's stitched to date.  All that's left is to make a thin twisted cord to place in the beard's groove and stitch up a stump work holly leaf.  


Santa Gnome Progress to Date


Santa Gnome Stump work Holly Leaf to Stitch


May 28, 2024--Started working on Janet Zickler Casey's 2021 Santa Gnome which has plenty of challenges in the diagonal plaid hat, beard and attached holly leaf.  Here's my progress to date:

Santa Gnome Progress to Date

4 comments:

  1. I finished this one some weeks back and it is with the finisher. I am now completing my last Santa, the North Star. Recently my LNS had a JZC trunk show and displayed all my Santas which have all been finished as ornaments. Now I just hope I can fit them onto what I have planned for the display. I will be lost without a JZC Santa to do!!

    ReplyDelete
    Replies
    1. I too love working up Janet Zickler Casey's santas. I've just ordered the "Bottoms Up" Santa for 2024 from Shining Needle Society.

      Delete
  2. I am not familiar with the Shining Needle Society and have only purchased all of my Santas through my LNS. There are other JZC designs I am interested in, but I’ve been told by my LNS that they are not available through their distributor as they are still being taught as a class. Can you tell me how to go about being able to order from the Shining Needle Society? Many thanks.

    ReplyDelete
    Replies
    1. The Shining Needle Society is has IO Group site and can be found at:

      https://shining-needle-society.groups.io/g/HomeRoom

      Hope this helps.

      Delete

Thursday, October 3, 2024

Bracelet Beaded Windows to the Past - 10/3/24

October 3, 2024--I'm working on a beautiful, beaded bracelet designed by Cynthia Rutledge called Windows to the Past.  I took this as a zoom class last month and even though I didn't learn much (the class was more of a stitch-in with participants who knew the instructor well), I'm managing to muddle through.  So far, I've redone the large CZ bezel twice and, for the second time, am beading up the large piece that goes around the CZ.  The band itself is odd count peyote with a very different method of "turning" using a step up, step down, process.  Directions have to be followed precisely.   This project is a serious challenge for me, but so far, I'm up to the task.  Here's what I've accomplished so far:


Bracelet Beaded Windows to the Past In Process

Like in needlepoint, there's lots of thread spaghetti when taking a class.

Saturday, September 14, 2024

Scarf Chevron Beaded - 9/14/24

September 14, 2024--While attending the Makers' Festival (bead show) in Lancaster, PA at the beginning of August, I had the pleasure of meeting Barb, the owner of Owl Be Beading out of Bethlehem, PA.  I purchased her Chevron Scarf kit in the silver, grey, black and blue colorway which I've just completed.  I love it!  The photos below don't do the colors justice, and I still need to learn how to best have the folds hang around my neck.   The scarf is beaded with size 11 beads and the pattern was very detailed and easy to follow.  I'm considering doing another in a gold/black/tan colorway.


Scarf Chevron Finished

Scarf Chevron Finished Shown Flat

Scarf Chevron Finished Shown around Neck

Owl Be Beading has Zoom bead-ins on Wednesday evenings and I hope to be able to participate in this activity soon.  


Wednesday, September 4, 2024

Bracelet and Necklace Super Duo Rope Designed by Susan Sassoon - 9/4/24

September 4, 2024--Some time ago I acquired a pattern to make a rope necklace designed by Susan Sassoon using Super Duo beads.  After searching online for some colors I might like, and not finding anything that appealed to me, I decided to see if I could find something that would work while at the Makers Festival in Lancaster, PA that took place at the beginning of August.   Unfortunately, there wasn't much of a selection to be found, so I landed up with some gold "mixes" as well as something called Milky Way mix.   Then, after getting about 6" worked up, I ran out of beads and had a devil of a time finding more.  Red Panda Beads to the rescue.  Note to self--when purchasing stuff from vendors at the Maker Festival and other similar venues, be sure to buy plenty because if you run out, the likelihood of being able to purchase more from the vendor is slim to none.  

After ordering more beads, I had enough to also make a bracelet.  Very happy with how both came out.  The magnetic clasps (also purchased at the above-mentioned Makers festival) work wonderfully and I'm glad I have more on hand for future projects.  I can even elongate the necklace by adding the bracelet to the back.  Looks really good.

Bracelet and Necklace Super Duo Beads Designed by Susan Sassoon

The four spirals consist of Milky Way Mix black, Milky Way Mix variegated (separated the two colors to make two of the spirals), matte gold, and a matte gold mix.  Much prettier in person than in the photo.


Tuesday, August 13, 2024

Bookmarks Darning, Blackwork, Etc. - Updated 8/13/24

August 13, 2024--I've completed 15 more bookmarks (photos below).  These are so much fun to stitch and work up easily.  

The first two photos are an example of reversible "blackwork" done in purple thread, the first one is partially stitched, showing how the first "path" looks, then the design is completed with the second "path".   However, I do need to work a bit more on my skill to end threads on the reverse side so they don't show.

Blackwork Pattern Partially Stitched


Photo showing front (left) and back (right) sides of Blackwork

I found an excellent resource for darning patterns:


Here are photos of the other fourteen bookmarks:


July 11, 2024--Last year I attended Needlefest New Jersey and had the pleasure at one point of sitting next to Dee L of the New Jersey Needle Artists Chapter of ANG who showed me the bookmarks she was working on.  They were stitched on Aida cloth using various darning patterns, threads, etc., and they were so darned cute.

Soooo, I just had to stitch up some of these myself and learned that our local library in Georgetown, DE, where my needlepoint guild chapter meets, would be happy to have them as give aways to their new card holders, avid readers, etc.  I found some lace edged Aida fabric bookmarks on Amazon which are perfect for this purpose except, in my opinion, they are a bit too wide.   Nevertheless, I have them and am happily working away on them whenever I need a small, easy to carry project (in the car, at stitch-ins, etc.).   Since they are supposed to be reversible, I "finish" off each bookmark by sewing across the top and bottom to catch the threads so they won't pull out.  

I'm now tackling a bookmark with a reversible blackwork pattern.  I went on YouTube to learn how to start and stop threads and was disappointed to see that most of the videos treat blackwork as black thread on white cloth embroidery, but NOT reversible.  Fortunately, I have a decent library collection of blackwork books such as:

    Reversible Blackwork Book 1 by Ilse Altherr, 1978

    Blackwork & Holbein Embroidery Book 2 by Ilse Altherr, 1981

    The Heart of Blackwork by Ann Strite-Kurz, 1992

Below is a collection of twelve bookmarks stitched so far.  I especially like the one with hearts, spades, clubs and diamonds since I'm an avid casino goer.  Each picture shows the bookmark's front (left side of photo) and back (right side of photo).   Most of these have been worked up using a stash of discontinued RG metallic threads given to me by a friend.  Each bookmark takes anywhere between 12 to 20 yards of thread, so I am happy to have this stash.


  1. These are great. Especially since you can put one in your purse and work on wherever you want. Also, it's a good way to practice reverible blackwork.

    ReplyDelete