Statcounter

Friday, December 11, 2020

Golden Gala Evening Purse - Updated 12/11/2020

December 11, 2020--Over the last two weeks I've been working on the finishing required to install the front and back panels into a clear acrylic purse.   After mounting the stitched canvas and lining fabric unto acid free cardboard, I then had to "sew" them together which proved to be very labor intensive.  I used a circular needle which is unwieldly and difficult to maneuver with my arthritic fingers.   After all that, I somehow measured incorrectly and the two panels are a smidge too big for the purse.  Oh well, I just jammed them into each side and am satisfied that they aren't going to slip out of place.  LOL.

This beautiful purse is proudly displayed on a shelf in my dressing closet and adds a touch of class to the casual clothes hanging within.

Golden Gala Evening Purse Front Panel


Golden Gala Evening Purse Back Panel

Interior of Golden Gala Evening Purse Showing Ribbons on the Back of one of the Panels (for use when pulling the panel out of the purse to avoid damage to stitching)


September 26, 2018--Stitching is completed on both the front and back panels.  Now to line each one in preparation of inserting them into the clear acrylic purse form.


Golden Gala Evening Purse Back

Golden Gala Evening Purse Back Slant View

Golden Gala Evening Purse Front and Back Panels


September 21, 2018--While at the ANG 2018 Seminar in Washington, DC last month, I took a class by Michele Roberts called Golden Gala Evening Purse.  It consists of 2 panels (a front and a back), backed with a beautiful fabric and exposed ribbons.  Both panels are inserted into a clear acrylic purse form that has golden hinges and a long detachable strap. 

I learned the ribbons are placed on the back of each panel so the they can easily be pulled out of the acrylic form.   Without the ribbon "handles", damage could be done to the needlepoint when pulling it out.  A very good idea!

Below is a picture of the stitched purse front.  As usual, the photograph doesn't show the vibrancy and beauty of the threads. 

Golden Gala Evening Purse Front

Saturday, December 5, 2020

Stitch of the Month 2020 - Updated 12/5/2020

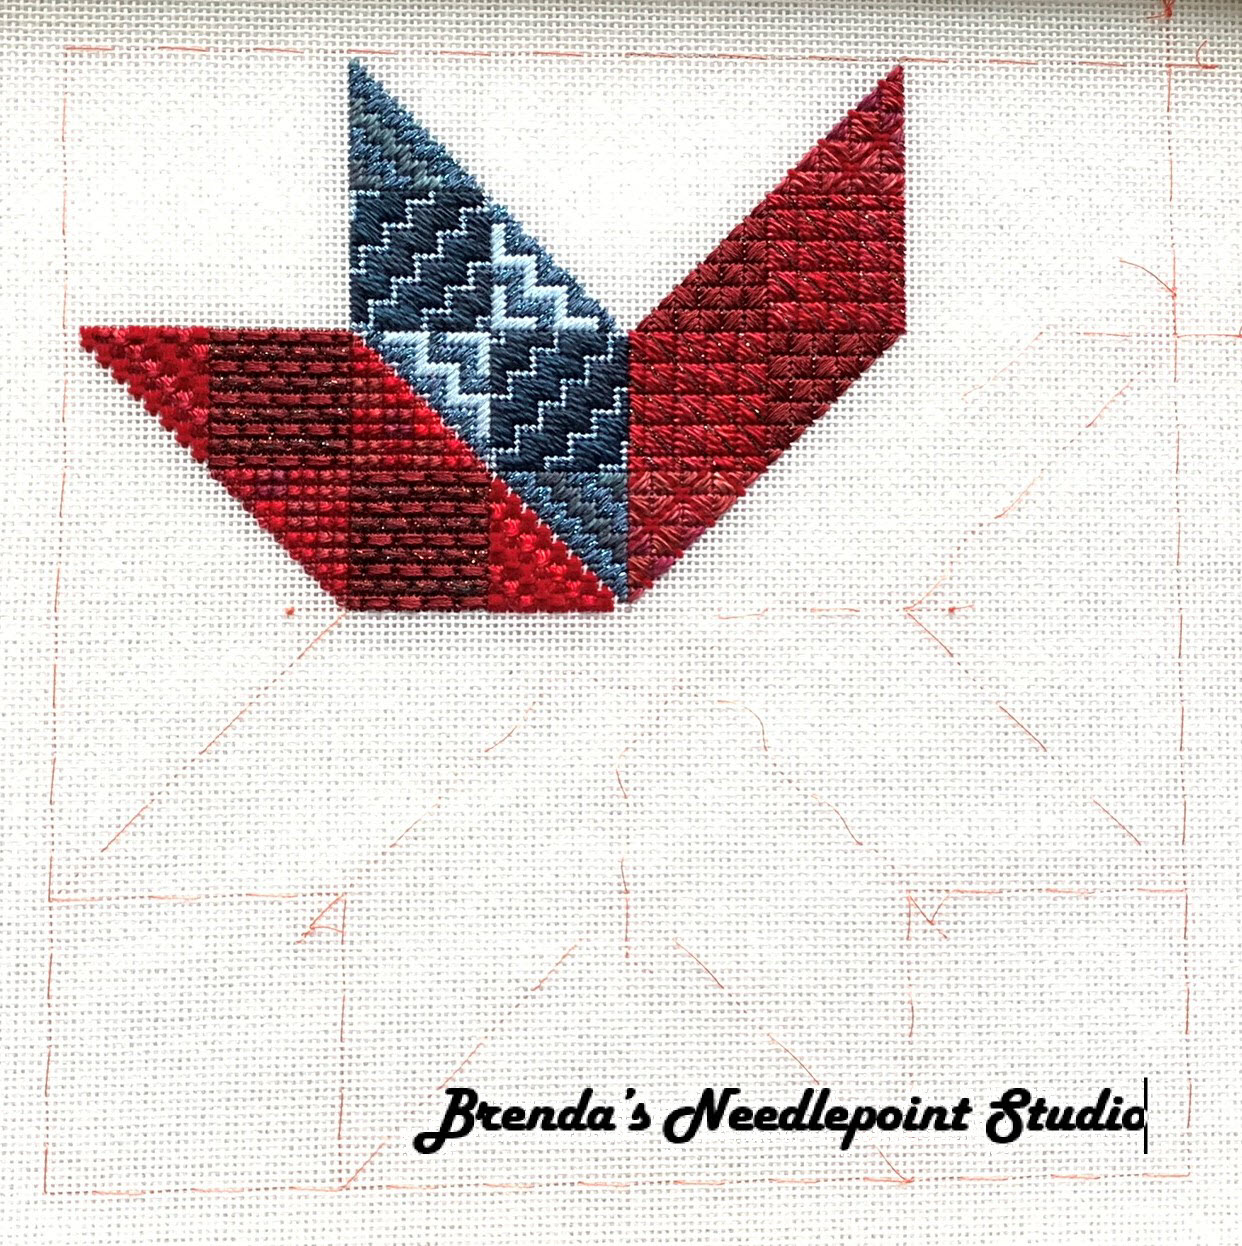
December 5, 2020--All twelve months of this ANG Stitch of the Month project designed by Kathy Rees are done.  This was lots of fun with plenty of challenges.  I want to make this into a pillow and am trying to determine what type of border to add to the star so it'll have a larger surface.   Stay tuned.


SOTM 2020 through the December Lesson

November 9, 2020--The November instructions called for filling in the upper right and lower left areas.  However, as suggested by Tina of NJNA Chapter of ANG, I used the Balloon Stitch instead of the Hungarian Stitch recommended by Kathy Rees, the project designer,   It's larger than the called for stitch and reflects more light.  The December stitch should counterbalance the larger designs done in this and prior months.

SOTM 2020 through the November Lesson

October 12. 2020--October's stitch covered the second portion of the four different background patterns.  Coming to the end soon.


SOTM 2020 through the October Lesson


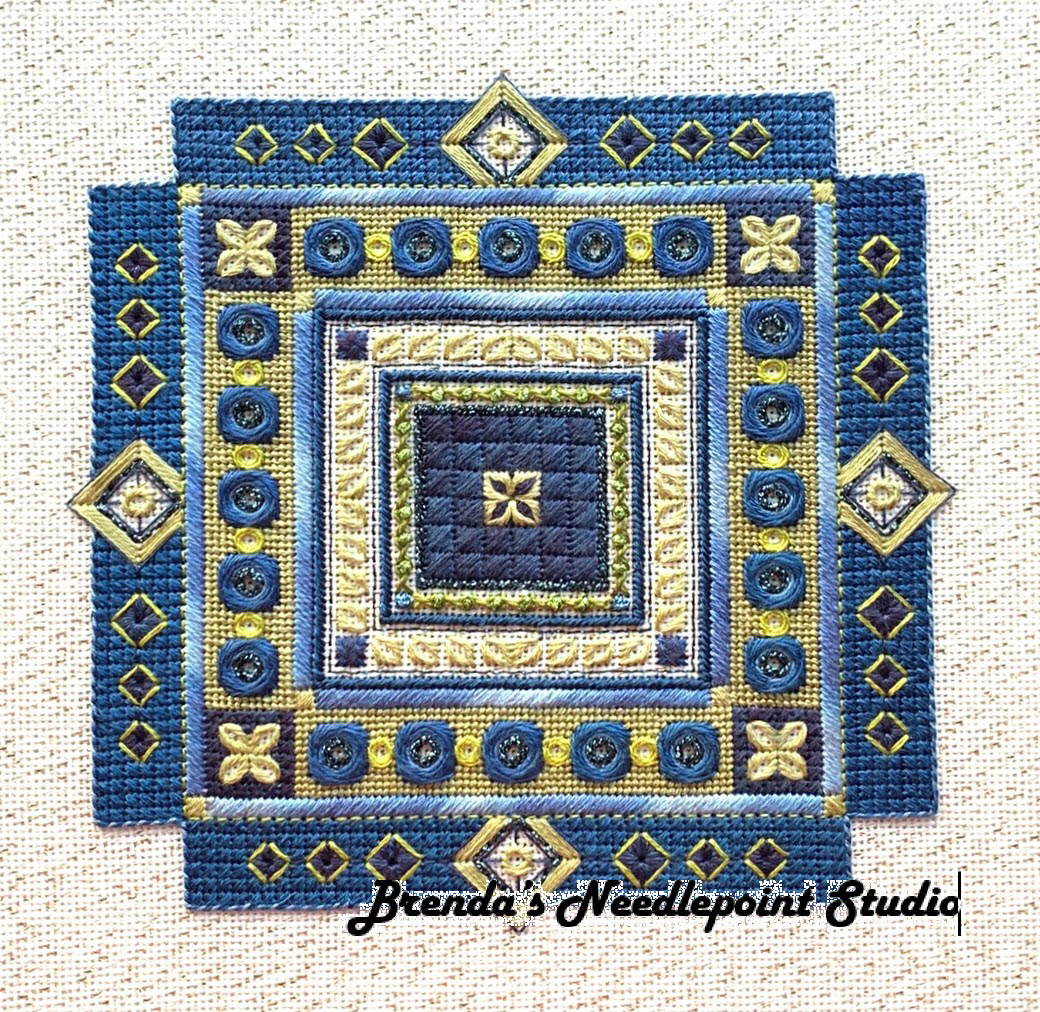
September 6, 2020--Below is a photo showing September's stitch, the Diamond Pavilion in the upper left and lower right blocks.  We are definitely approaching the finishing line with 3 more months of different background stitches to be done.

SOTM 2020 through the September Lesson

SOTM 2020 through the September Lesson Closeup

August 10, 2020--The August lesson is now stitched.  This lesson covered the last leg of the 8 legged star and as with all the others, got done very quickly.  The next four lessons will cover the background stitches.  This should make for easy stitching while watching TV.


SOTM 2020 through the August Lesson

SOTM 2020 through the August Lesson Closeup

July 5, 2020--Here's a photo of the 7th star leg stitched as part of the 2020 ANG Stitch of the Month (SOTM) lesson for July.    Half way through this project with one more star leg to do.  After that it's background stitches with the possible addition of a border.   Have six months to think about what would look best.


SOTM 2020 July


June 5, 2020--June's lesson for the 2020 ANG Stitch of the Month (SOTM) is the sixth star leg consisting of waffle stitches.  My favorite is worked up in the 2 corners (left and right).  Two more legs to go in blue, then the background will be next.

SOTM 2020 June Closeup 
SOTM 2020 June


May 9, 2020--Last night I stitched up May's installment (number 5) of the ANG SOTM 2020 project.  This month featured the Milanese stitch which I love when using threads that must be laid such as multiple strands of silk floss, Neon Rays types of ribbon, etc.   However, using variegated Caron Watercolours for a number of this month's sections didn't show off the stitches as well as some other type of thread could have.   But that's why I love doing these ANG SOTM projects--I learn so much and develop confidence to try new things.  Now i have to wait until the next lesson is available on June 1st to continue working on this 8 legged star.

SOTM 2020 May Closeup

SOTM 2020 May


April 5, 2020--Here's the fourth installment of the ANG Stitch of the Month project (SOTM) for 2020.  The designer, Kathy Rees, skipped a star leg and continued on with the red colors using cashmere stitch variations.  Am now thinking about a border to close up the design.  Hmmm.

SOTM 2020 April Closeup

SOTM 2020 April
The pink lines on the canvas are basting threads.


March 19, 2020--Just finished stitching March's lesson.  This third leg of the star highlights Smyrna stitches with some interesting variations.   It's a fun project to stitch...just wish I were doing this under better circumstances (no COVID-19).

SOTM 2020 March Closeup

SOTM 2020 March


February 3, 2020--It didn't take long to stitch up February's lesson.  In fact, was able to get this done while watching the Super Bowl game last night (or mostly listening to the game).  However, I did look up at the television to watch all the commercials and half-time show.  Most of the ads were very entertaining and it was interesting to see the difference in energy levels of Shakira and Jennifer Lopez.

SOTM 2020 February Closeup

SOTM 2020 February


January 25, 2020--January's lesson is stitched.   Based upon the instructions, I can tell this is going to be a lot of fun to work on.

SOTM 2020 January Closeup

SOTM 2020 January


January 2, 2020--The ANG 2020 Stitch of the Month project looks to be fun while offering stitching challenges.  The star designed by Kathy Rees will be great as a "stand up", hanging ornament, etc.  I think I'll encase mine in clear plastic and make it into a front door ornament for use on Independence Day.

So far I've downloaded the two files for January (one is an introduction and the other is January's stitching).  I really like the blue and red colors used by Kathy,  and found some of those threads in my stash.  Then  ordered what I don't have.  I already had a 12" x 12" piece of 18 count mono canvas in white, so will change the background stitches to a very pale, almost white, color rather than the ecru color Kathy used which went with her suggested egg shell colored canvas.

Below is a photo of the basted star.  I started to do the outline in #4 pencil, but feared it might look too dirty where the white background stitching met the star.  Since the design graph is based upon 6 canvas threads equaling 1 thread in the graph, I basted using a count of over/under 6 threads.  Actually faster than counting out each length.

Everything looks a bit messy now because I like having my basting thread knots in front along with their tails to keep an eye on where everything is and easier to remove as each star arm is stitched.  You can see I stitch "in the well" and mount my canvas so it sits on the back of the stretcher bars.  The tacks on the inside of the stretcher bars are for small magnets which will hold needles.

ANG Stitch of the Month 2020 Basting


Below is a photo of the project as designed and stitched by Kathy Rees.

Monday, August 3, 2020

Hardanger Pick A Flower - Stepped Petals - Updated 8/3/2020

August 3, 2020--Continuing to work on this delightful project.  So far I've finished stitching all the Klosters, including the blanket stitch edging.  Putting this away for awhile, but when it comes out again, will work on the decorative petals and pulled stitches before cutting in preparation for the wrap stitches.  Still lots to do.

Hardanger Pick a Flower - Stepped Petals as of August 2, 2020


June 3, 2020--Just returned from a fishing trip with my husband (he fished, I stitched) in Cape Charles, VA.  Stayed in a beautiful B&B and enjoyed working on a project from the February, 2019  Hardanger University  class taught by Donna Olson.  She gave us instructions and enough cloth to work on four "petal" projects.  I'm starting out with "Stepped Petals" which seems to be the easiest of them all.  Below is a photo showing where I left off after class and another of where I left off today.   I find hardanger very enjoyable to stitch since I'm comfortable working "in hand", not needing to cart around a stand, etc. 

Hardanger Pick a Flower - Stepped Petals at 2020-06-03

Hardanger Pick a Flower - Stepped Petals at Class End
To see a photo of the project as designed, click on "In Process Projects" on the right under the Pages heading.

Tuesday, July 28, 2020

Mulberry (aka Blueberry) & Lime - Updated 5/5/21

May 5, 2021--Won 2nd Place Ribbon in the Canvaswork-Multistitch category at Woodlawn's 58th Annual Needlework Exhibition in Alexandria, VA.

July 28, 2020--Ta da....this project is now framed.  Michaels Arts & Crafts did a good job on this.  The simple metal frame and matting look great with the fancy stitches and beading.  Very pleased.

Mulberry (aka Blueberry) & Lime Framed


July 9, 2020--The stitching on this beautiful project is now done and ready for the framer.  Below are photos of my project done in blues and lime along with the designer's project photo stitched in mulberry and lime (I think both are equally beautiful)

There were many challenges to this piece, most involving thread selection which I wrote about on June 22nd below.  I understand that magazines are limited as to how many pages can be devoted to instructions, so happily there weren't many issues in that regard.  In fact, there was only one instruction missing that I found--the placement of a Smyrna cross stitch in Step 21 needed to be repeated after stitching the right angled row of backstitches.

Mulberry (aka Blueberry) & Lime Completed
Mulberry & Lime Project Photo

Below is a revised list of threads I used in the project compared to those used by the designer.  This has been saved as a .jpeg so it can be enlarged.

Regarding the beads, my stash is limited, so I only used 2 types instead of 4 as designed.


July 4, 2020--All the bands through Step 19 are stitched.  The next steps involve the beautiful lacey looking stitches in the corners and centers, then the placement of lots of beads.   I haven't dived into my stash of beads yet, waiting to see what colors I'll end up using for the lacey stitches.  

Once everything is done, I'll repost my thread list which continues to change as I move forward.  This has been one of the most challenging projects I've done to date, but believe it'll be worth it in the end.  

Wishing everyone a Happy July 4th.

Mulberry (aka Blueberry) & Lime Through Step 19


June 22, 2020--This project has been a challenge, to put it mildly.  At one time I considered dumping the whole thing and starting over.  The biggest problems came from the threads in the instructions which are way too big for use on Congress Cloth.  For example, the designer calls for Kreinik #12 for an Oblique Encroaching Gobelin stitch over 1 thread.  Impossible to use Kreinik #12 without stretching out the Congress Cloth.  Kreinik #4 and #8 work much better.   There are other similar examples, such as using DMC Perle 8 when 12 is the better choice.   I'm also unhappy with my congress cloth.  I'm stitching on a cream color cloth with gold weaving through it.  That gold is always in the way when trying to find a hole in a crowded stitching situation (e.g., working up Jessicas).  Then I decided to change out some colors which involved some frogging.  However, I still love the design and like how the designer worked up the Jessica stitches--they came out beautiful.  So it's a love/hate relationship with this thing.  Still have 7 more steps to stitch which will really add "bang" to the project.

Mulberry (aka Blueberry) & Lime Through Step 14


May 31, 2020--I recently picked an old project I had in my stash designed by Jeanne Polzin and published in ANG’s Needlepointers Magazine in 2012, number 3.  This was a project led by Maryrose C-B for Delaware's Seashore Chapter of ANG back in 2014.  Maryrose wrote up wonderful notes on each section and made fantastic suggestions for alternate thread colorways.  I chose blues and am calling my project Blueberry & Lime.

So far I've stitched Steps 1 and 2, waiting for threads to arrive in the mail before going further.  Here's a photo.

Mulberry (Blueberry) & Lime Completed through Section 2


Monday, May 18, 2020

North Star Santa - 5/18/20

May 18, 2020--Here's another Janet Zickler Casey design called North Star Santa.  This one was published in 2001 and was the easiest to stitch out of all the ones I've completed to date.  Love all the sparkle in the hair and beard, which, of course, doesn't show up in the photo.  Was lucky to find some plastic holly with berries.  Makes for the perfect hat embellishment.  Someday I'll finish this and all the other santas stitched to date into ornaments to hang on a tree, or something (LOL). 

North Star Santa Completed

Tuesday, May 12, 2020

Santa in the Moon - 5/12/20

May 12, 2020--This santa cutie, designed by Janet Zickler Casey, was one of her earlier ones with a 2000 copyright date.  I love the texture of the hat and moustache.  All I need is a star charm to dangle from the hat and it'll be ready for finishing into an ornament.

Santa in the Moon Completed

Thursday, April 30, 2020

Rehoboth Beach Needlework Exhibit for 2020 Cancelled - 4/30/2020

April 30, 2020--I have just received word from the Director of the Rehoboth Beach Historical Society and Museum that this year's needlework exhibit is cancelled.  Here's her very sound explanation:


So many parts of our lives have changed during these past several weeks. Both our personal and professional activities have become limited or just about eliminated.

When this is all finally over, and we are back once again to a Usual Routine, there will be a tremendous rush, crush, and demand for our time.

One deadline that we can erase from your schedule is the  2020 Rehoboth Beach Museum Embroidery Show. We are cancelling it. This will give us all one less thing on the no doubt long To-do List by then, and more time to adjust back to regular life,
we hope.

This will also give us all more time to finish that wonderful piece now in production, to be ready  for the show in 2021. If you haven’t had a chance to start on your planned work, now you can. We’ll look forward to seeing you and your spectacular piece (s)
in 2021.
 

Thursday, April 9, 2020

Frame Weight Stitcher's Parking Lot -- Updated 7/26/21

July 26, 2021--Entered this fun project into the Delaware's State Fair and was awarded a Third Place Ribbon along with a small (very small) cash prize.   Nice.

April 9, 2020--It was a lot easier to finish this than anticipated.  Of course. I didn't mind many of the imperfect stiches and kept moving forward.   When I began to put the two sides together with the binding stitch, I realized the canvas was seriously warped out of shape.  Since it was only going to be a frame weight, I figured the BBs would force it into shape, which they magically did (for the most part).

Filling the frame weight with BBs wasn't difficult.  The hard part came when I spilled half of them onto my kitchen counter, floor, rugs, etc.  To the rescue came my very patient husband and my magnet on a wand device.   We got those BBs under control in no time.

Now I have to find stitching tools large enough to fit snugly into the loops.  Right now it's sitting on top of my Martha Washington Sewing Cabinet (which I'm using for all my stitching accouterments) looking very pretty.


Frame Weight Stitcher's Parking Lot Finished

Frame Weight Stitcher's Parking Lot Finished (Back Side) - Shows serious warpage
Frame Weight Stitcher's Parking Lot Before Finishing Side View


Frame Weight Stitcher's Parking Lot Before Finishing Front Closeup


March 28, 2020--I purchased this frame weight project to stitch along with fellow chapter mates last year, but wasn't able to think about stitching it until the ANG CyberPointers Chapter had this as their July, 2020 project.   I was motivated by the photos and additional class lessons given during the online meeting.  So I finished stitching a few things and felt comfortable starting this project while quarantined at home to avoid the COVID-19 virus.  Here's the under or bottom part of the frame weight:

Frame Weight Stitcher's Parking Lot Under or Back Side

My colors are simple.  The front colors are turquoise perle #3, light, silvery perle #3, silver Kreinik #16 braid, and variegated Watercolours called Twilight (you can see the variegated colors in the photo above).

Sunday, March 22, 2020

Autumn Crackers - Updated 5/5/2021

May 5, 2021--Won 2nd Place Ribbon in the Canvaswork-Multistitch category at Woodlawn's 58th Annual Needlework Exhibition in Alexandria, VA.

March 22, 2020--Took the time yesterday to sew up the canvases pictured below into "crackers".  Marilyn Owen's instructions were wonderful and they worked up quickly.  I made only a few changes to the instructions by first cutting the decorative ribbons the same length as the right and left sides, including seam allowances.  Then, after the crackers were stuffed with batting and narrow red ribbons wrapped around the wide decorative ribbons to close each end, I used the flat edge of a small screw driver to push the decorative ribbon edges in between the canvas seam allowance, then inserted some Fray Check" to keep everything in place.  This eliminated any need to sew the ribbon edges together.  Below is a photo of what the ribbon looked like when "tucked".  Hope this explanation makes sense.

I'm keeping the photo of Marilyn's crackers at the end of this post for comparison purposes.  If you haven't already stitched these crackers, you may want to give them a try.  They'll be adorable on my side table during the Fall season.

Autumn Crackers Finished

Decorative ribbon edges "stuffed" into seam allowance

Decorative Ribbons used in the making of Autumn Crackers


December 19, 2019--All the crackers are now stitched and ready for finishing.  In order to start that process, I had to order some autumn themed 2.5" wired ribbons and found some nice ones on eBay.   Once I determine if the ribbon colors will work with threads used, I plan to turn these canvases into "crackers" as soon as possible.  Here's the last one--a leaf.

Autumn Crackers - Leaf Completed (five of five crackers) 

December 15, 2019--On a roll now--have just finished stitching the fourth cracker--a tree in Fall colors.   There are even some leaves on the ground.  Hope to finish the last one, a leaf, before the month is done.

Autumn Crackers - Tree Completed (four of five crackers) 


December 8, 2019--The third cracker, a quilt block pattern, is done.  These are working up fast and are a lot of fun.  I've stitched the centers of the Tree and Leaf crackers, so the whole set should be done by next month.  Still have yet to purchase autumn themed ribbons.  Stay tuned for that.

Autumn Crackers - Quilt Block Completed (three of five crackers) 

November 22, 2019--The second of five crackers is now stitched.  This is an adorable pumpkin with lots of stitch and thread variety.

I found extra stretcher bars in the size I needed, so have tacked three blank pieces of canvas unto the bars and will do them all at the same time--at least each section will be completed on all three before moving to the next.  The three cracker patterns to be done are Tree, Leaf and Quilt.

Here's the pumpkin cracker:

Autumn Crackers - Pumpkin Completed (two of five crackers) 


November 17, 2019--When ANG's CyberPointers Chapter offered Autumn Crackers by Marilyn Owen (part of that year's Chapter Project Book) as a group project at their July, 2017 meeting, I had to sign up.  They are the cutest things and will look great in the house as autumnal themed needlepoint.   Even though it has taken 2 years for me to start working on these 5 crackers, I've got one completely stitched and am working on the second.  Here's a photo of the owl cracker.

Autumn Crackers - Owl Completed (one of five crackers) 

Marilyn Owen gives lots of choices for the borders and roll areas, but also lets you know which stiches she chose.  I appreciate that since I'm not very good at selecting my own.  Also, her instructions on how to finish each design as a cracker are easy to follow.  I just need to find some 2.5" Fall themed ribbons--easier said than done since I don't have large box craft stores near me (the small Michael's Arts & Craft store near me has moved out their Fall stuff and now has Christmas things).  There are lots of ribbons on eBay, so may purchase a few rolls there and hope the colors match my threads.

Below is a project photo of all 5 crackers stitched and finished by the designer, Marilyn Owen.  Love the colors.

Autumn Crackers by Marilyn Owen Project Photo