Statcounter

Showing posts with label In Process Projects. Show all posts

Thursday, October 3, 2024

Bracelet Beaded Windows to the Past - Updated 3/27/25

March 27, 2025--This project has died on the vine.  I found that I'm too inexperienced to do this bracelet and was constantly undoing and redoing every step.  Then redoing it again.  This actually became a very "unfun" project and I decided enough was enough.  I took it all apart, stored the beads in their little bags, and put everything away.  Maybe I'll tackle this another day, or maybe I won't.

I feel much better now that I've made that decision and can move on to something new (and more wearable).

October 3, 2024--I'm working on a beautiful, beaded bracelet designed by Cynthia Rutledge called Windows to the Past.  I took this as a zoom class last month and even though I didn't learn much (the class was more of a stitch-in with participants who knew the instructor well), I'm managing to muddle through.  So far, I've redone the large CZ bezel twice and, for the second time, am beading up the large piece that goes around the CZ.  The band itself is odd count peyote with a very different method of "turning" using a step up, step down, process.  Directions have to be followed precisely.   This project is a serious challenge for me, but so far, I'm up to the task.  Here's what I've accomplished so far:


Bracelet Beaded Windows to the Past In Process

Like in needlepoint, there's lots of thread spaghetti when taking a class.

Saturday, September 30, 2023

Stitching Girl with Her Horse - 9/30/23

September 30, 2023--I recently took a few days of classes from Sandy Arthur of Duo Designs at a retreat in Kentucky to work on Gayla Elliott's Stitching Girl with Her Horse.   I love this project with all of its embellishments and variety of threads and stitches.  Sandy kept us very busy learning how and where to place stitches to bring this canvas to life.   We had a choice of two Stitching Girl canvases, and I chose this one because of the horse boarding stables behind my property.

Stitching Girl with Her Horse Status as of 9-30-23


Here's the background.....when my husband and I moved to our new home in Delaware 13 years ago, there was a large farm located on the property in back of our house.  We knew living in an agricultural region would mean listening to tractor noises (tilling, planting, fertilizing, harvesting), crop duster planes, etc., and dealing with lots of flies--especially the little fruit flies that infest your home during harvest season, but we didn't realize how bad all of those flies would be.  Then a number of years ago the farm was sold to Windswept Stables, a horse boarding and riding instruction farm.   The only sounds we now hear are the neighing and whinnying of horses.  The house flies have disappeared because they prefer to be at the stables, and we no longer get the harvest fruit flies--YAY!  Sooooo....I'd like to name the horse Independence (the name of my community) and have the Stitching Girl needlepoint the name of the stables on the canvas she's working on (of course you will only see it in reverse).  Then I'll see if the stable owners would like to have this as a gift to hang in their home (or stables for that matter).  If not, it will be part of my guest room stitching gallery.


Stitching Girl with Her Horse Designed by Gayla Elliott, Stitched by Sandra Arthur of Duo Designs

I will post photos of my canvas in future blogs as I stitch it up.  Stay tuned.  

Tuesday, June 28, 2022

Hardanger Pick A Flower - Stepped Petals - Updated 6/28/22

June 28, 2022--Picked this up again after nearly two years and stitched up the center medallion, put in some eyelets, basted the area where four "petals" are stitched on the sides, and began working on one of those petals.  It's slow going and have no idea how many more years it'll be before it gets finished, but it will get done--someday.  

Hardanger Pick a Flower - Stepped Petals Through 2022-06-28


August 3, 2020--Continuing to work on this delightful project.  So far I've finished stitching all the Klosters, including the blanket stitch edging.  Putting this away for awhile, but when it comes out again, will work on the decorative petals and pulled stitches before cutting in preparation for the wrap stitches.  Still lots to do.


Hardanger Pick a Flower - Stepped Petals as of August 2, 2020


June 3, 2020--Just returned from a fishing trip with my husband (he fished, I stitched) in Cape Charles, VA.  Stayed in a beautiful B&B and enjoyed working on a project from the February, 2019  Hardanger University  class taught by Donna Olson.  She gave us instructions and enough cloth to work on four "petal" projects.  I'm starting out with "Stepped Petals" which seems to be the easiest of them all.  Below is a photo showing where I left off after class and another of where I left off today.   I find hardanger very enjoyable to stitch since I'm comfortable working "in hand", not needing to cart around a stand, etc. 

Hardanger Pick a Flower - Stepped Petals at 2020-06-03

Hardanger Pick a Flower - Stepped Petals at Class End
To see a photo of the project as designed, click on "In Process Projects" on the right under the Pages heading.

Friday, October 1, 2021

Nothing To Blog About--YET! - 10/1/21

October 1, 2021--I'm doing lots of stitching, but there's nothing I can blog about except to say I enrolled in ANG's Master Needlepointer Program and am busy working on the first stage of four.  Hopefully I can blog about the piece I'm working on once it has been critiqued.  Stay tuned.   

Also, I volunteered to work on a couple of pilot projects so won't be able to write about those until the instructor gives the OK.  Maybe I can sneak in a few quick ornaments to write about.

In the meantime, happy October!  This is my favorite time of year--temperatures drop and holidays will soon be upon us.


Monday, August 3, 2020

Hardanger Pick A Flower - Stepped Petals - Updated 8/3/2020

August 3, 2020--Continuing to work on this delightful project.  So far I've finished stitching all the Klosters, including the blanket stitch edging.  Putting this away for awhile, but when it comes out again, will work on the decorative petals and pulled stitches before cutting in preparation for the wrap stitches.  Still lots to do.

Hardanger Pick a Flower - Stepped Petals as of August 2, 2020


June 3, 2020--Just returned from a fishing trip with my husband (he fished, I stitched) in Cape Charles, VA.  Stayed in a beautiful B&B and enjoyed working on a project from the February, 2019  Hardanger University  class taught by Donna Olson.  She gave us instructions and enough cloth to work on four "petal" projects.  I'm starting out with "Stepped Petals" which seems to be the easiest of them all.  Below is a photo showing where I left off after class and another of where I left off today.   I find hardanger very enjoyable to stitch since I'm comfortable working "in hand", not needing to cart around a stand, etc. 

Hardanger Pick a Flower - Stepped Petals at 2020-06-03

Hardanger Pick a Flower - Stepped Petals at Class End
To see a photo of the project as designed, click on "In Process Projects" on the right under the Pages heading.

Thursday, February 28, 2019

Hardanger University - 2/28/19

February 28, 2019--I spent last weekend in Myrtle Beach, SC attending Hardanger University, a Spirit of Stitching Event.  I understand this type of seminar has been going on for many, many years, but for only about 5 years under the new name of Hardanger U.


There were three different classes taught by three different instructors held on Friday, Saturday and Sunday.  We were housed at the Embassy Suites Hotel, part of the Kingston Resort, and our classrooms were a shuttle ride away.  I was fortunate to be in a group that consisted of only 5 other students and we were together the whole time.  We did learn a lot about each other and I look forward to continuing friendships made over the weekend.  Here are my classmates:

Kathi B, Meredith M, Karen C, Donna G and Elizabth H.

My first class on Friday was taught by Terri Bay of Terri Bay Needlework Designs.

Terri Bay
She began by having us work on a small ornament sized project, but gave us enough fabric and threads to complete the larger design shown below, Crystal Daisies.
Terri Bay's Teaching Piece

Instructions for Full Size Terri Bay Project 
She also introduced us to an Australian perle thread by Cottage Garden Threads (CGT).  They are dyed so that the color changes are consistent from one skein to another.  Beautiful colors too. 


Here is the status of my ornament at the end of class.....


The second class on Saturday was taught by Marion Scoular, a long time instructor and author of the booklet given to us as part of the kit.  Can you see her beautifully stitched collar?    If you ever have the pleasure to dine with Marion, be prepared for lots of laughter at her stories--enough said.  LOL.

Marion Scoular

Hardanger Booklet by Marion Scoular

Her project, an adorable bell which can be mounted on one of four blank cards included in the kit, can be stitched 2 ways as shown in the examples below.    The fabric used for this project is called "hardanger" and consists of 2 threads woven tightly together, both vertically and horizontally, and stitched as if they were one.

Marion Scoular Project Bell Version 1

Marion Scoular Project Bell Version 2
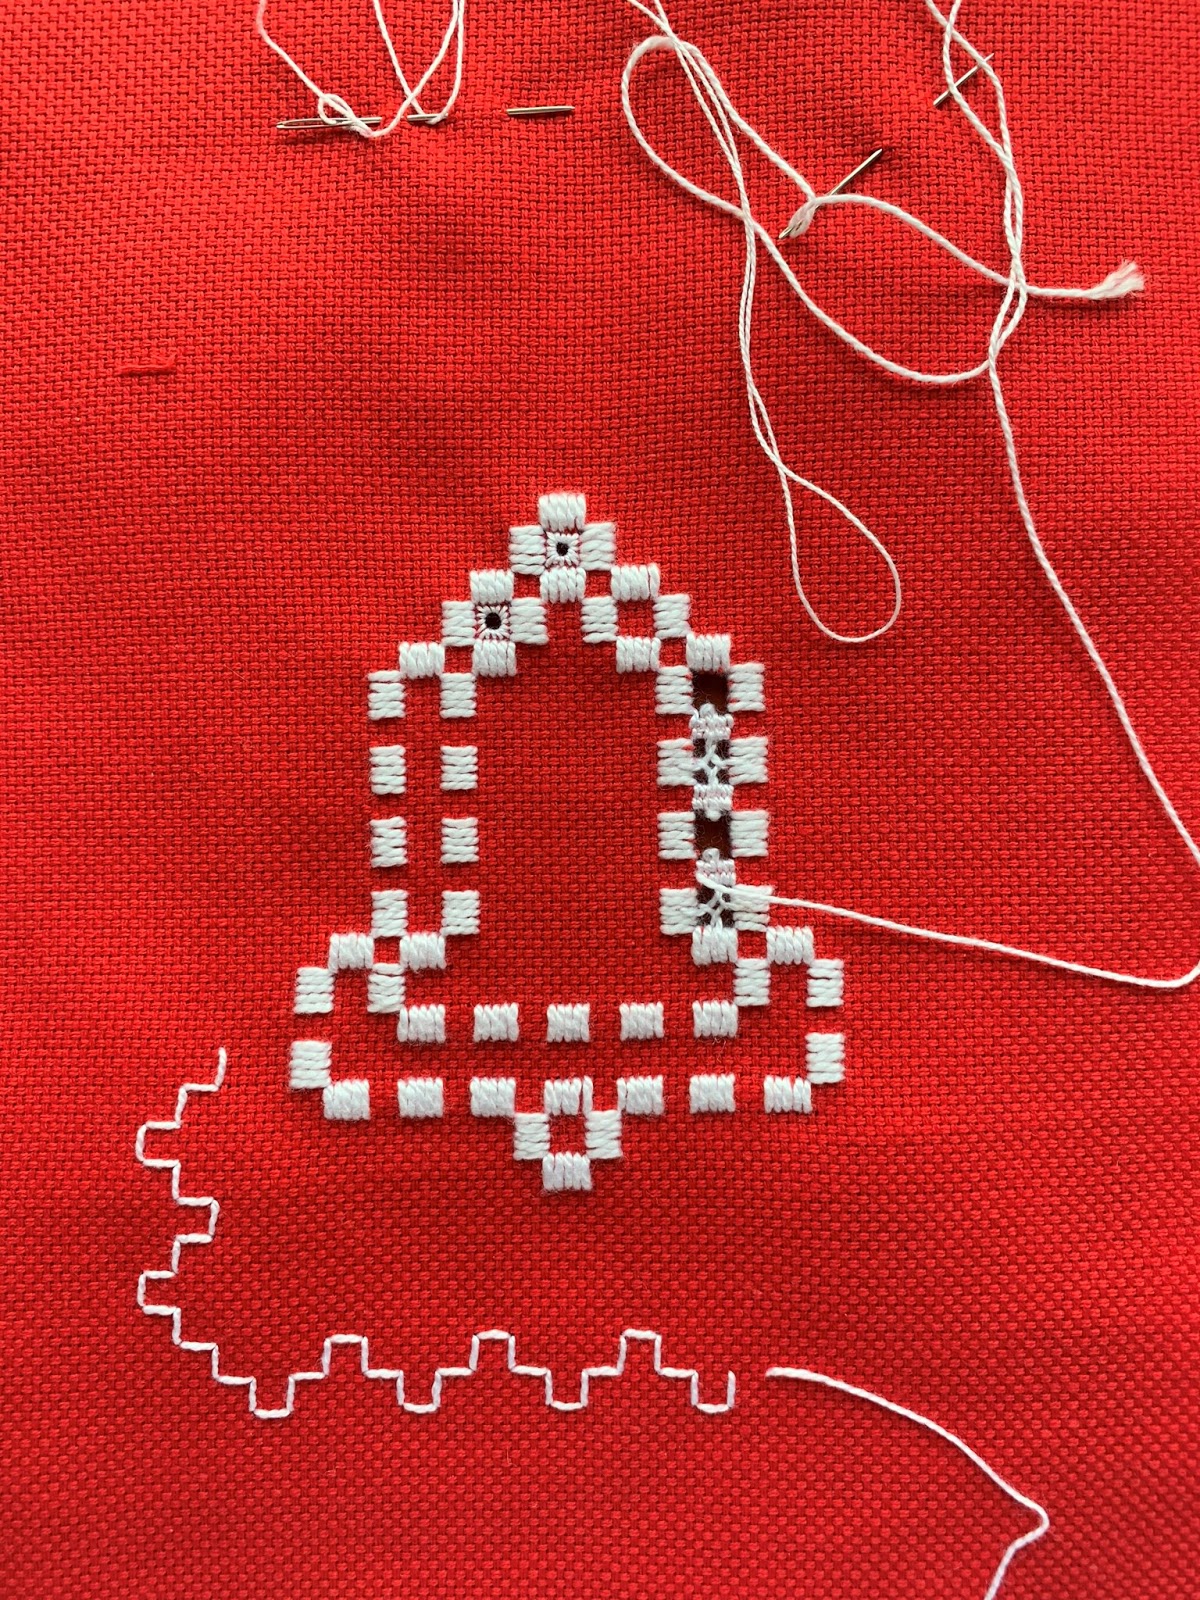
 Here is where I left off at the end of the day.  Learned how to do picots and dove's eyes.  Whew.


Blank cards included in kit for mounting hardangr bell

My third class on Sunday was taught by Donna Olson.

Donna Olson
She gave us plenty of thread and Laguna fabric to complete four large projects pictured below called Satin Stitches Hardangersom.  


This is the project I chose to work on.


 Here's where I left off at the end of the day.  Much of the practice was done on a "doodle" cloth.


Both Marion and Donna stressed the importance of basting over and under 4 threads and, after making a few counting errors, can appreciate why.


All in all, I was very impressed with the high caliber of the three instructors.  Each approached hardanger from a different perspective offering up alternatives to the common and more difficult stitches in the genre.  I was also very happy with the lodging and class room facilities--can't go wrong staying at the resort (my room had an ocean view).   Will I go again next year?  Don't know.  I would like to complete the three projects begun last weekend and explore the hardanger world on You Tube.  Would I recommend this seminar to anyone else?  Yes, yes, yes!

Pictures of my fellow classmates and teachers are posted with their permission.


Friday, January 25, 2019

Coy Koi Purse - 1/25/19

January 25, 2019--At the 2018 ANG Seminar, I took a class from Janet Zickler Casey called Coy Koi Purse (click here for more information).  Finally picked it up again and completed the stitching of the back panel.  The front panel, also pictured below, has some stitching done, but there's a lot more to do.    I'm glad I took pictures of the finished model while in class to use as guides for the various decorative stitches.  Now to just jump in and work on the front...….

Coy Koi Purse Back Panel Completed

Coy Koi Purse Front Panel Class Work
Click on the In Process Projects Page on the right to see what the finished purse will look like.  It really is pretty.


Thursday, June 28, 2018

King's Tulip II - 6/28/18

June 28, 2018--In 2010, I purchased this beautiful project by Margaret Kinsey offered through the Shining Needle Society.  I finished stitching the upper portion of the tulip as well as the side petals, padded the tulip's interior, as pictured below, and decided to go no further.  After re-reading the instructions, I can see why.  I'm at the point where the cutting of purls is in order and this is all new to me.  However, after reading about the beautiful goldwork projects done by D1D2 on her blog, I have learned a lot and feel confident that I can tackle this head on (famous last words).  I plan on doing the cutting and stitching of the gold purl pieces during the day, sitting at the table in my craft/sewing room where I have plenty of light.

Wish me luck.

King's Tulip II to Date


To see the project photo, please click on "In Process Projects" under Pages on the right.

Tuesday, February 27, 2018

Fire and Ice Class - 2/26/18

February 26, 2018--Just finished taking a 2-day class called Fire & Ice taught by Toni Gerdes and hosted by the ANG Checkerspot Chapter of Silver Spring, MD.  Had a wonderful time learning new stitches and starting to "build" this wonderful project.  Toni designed this piece by selecting threads, colors and shapes based upon the Museum at Prairiefire in Overland Park, KS.

Have lots of "thread spaghetti" to untangle when I get back to this project--and it is calling to me.

Museum at Prairiefire, Overland Park, KS

Toni Gerdes, Teacher and Designer of Fire & Ice


Fire & Ice at Class End


Saturday, June 18, 2016

18th Century Sampler by SJ Designs - 6/18/16

June 18, 2016--Have been wanting to stitch this beautiful sampler ever since I read about it on other needlepoint blogs.  It has all the elements I love--beautiful design, challenging stitches, perle threads, etc.   So I ordered it from SJ Designs and a few days ago received the kit and prework instructions.  I managed to stitch the middle section and that's all that will get done until the class starts July 1st, or whenever I receive the instruction manual in the mail, whichever comes first.  I hope to keep up with the class, but with all the traveling DH and I will be doing (most of July, lots of August, September and October), it looks dubious.

I chose to stitch this with ecru perle on 24 ct. eggshell canvas.   Susan has set up a Facebook page for those participating in this project to share their progress and ask questions.

18th Century Sampler through 6/18/16

18th Century Sampler by SJ Designs Project Photo

Wednesday, August 19, 2015

Pumpkin Coasters in Reversible Cross Stitch Updated 8/19/15

August 19, 2015--Stitched the border on the second set of coasters--a gingham pattern in black.  Love how well the technique is working.  The below pictures show front and back of two coasters.  Next step--stitching the cute pumpkins.


Second Pattern Front

Second Pattern Back

August 9, 2015--Signed up to take Catherine Jordan's online class through the Shining Needle Society (SNS) called Reversible Cross Stitch Pumpkin Coasters (project photo below).  There are four coasters to stitch with floss, in two different patterns, on Zweigart Biella 28 count fabric.

Yesterday I began to stitch the outline of one of the designs and discovered early on that I had to increase the magnification of my glasses.  Doing so made a tremendous difference in the quality of my stitches.  The technique learned is a challenge, requiring full attention to each stitch.  Catherine's instructions, however, are wonderful and she even included a password to access a special online, very, very helpful, video to see how the stitches were done.

I also had to zigzag the edges to keep the fabric from unraveling.  Why zigzag using red thread?  It's what was on my sewing machine and I was too lazy (lol) to change the thread.

The whole idea of the technique I'm learning is for the cross stitches to look the same on the front and back.  I've somewhat succeeded with doing this, but hiding beginning and ending threads is still a bit of a challenge for me.  The idea is to NOT have the tails showing under the cross stitches on either side.   Getting there.

First Pattern Front

First Pattern Front Closeup

First Pattern Back

Second Pattern Back Closeup (note:  logo makes the bottom stitches look incomplete)

Catherine Jordan's Reversible Cross Stitch Pumpkin Coasters Project Photo


Wednesday, April 22, 2015

Winter Table by Melissa Shirley 4/22/15

April 22, 2015--Have just returned from a two-day class for a beautiful painted canvas called Winter Table, designed by Melissa Shirley (project photo below) and taught by Laura Taylor.  It was held at Louise's Needlework owned by Jill Mashburn Elia in Powell, Ohio.  

We had a bonus third day with Laura who helped us with stitches and embellishments for our own canvases.  Learned even more (including ribbon work) by watching and listening to what she said to each student.   I'm a very happy camper indeed!

Winter Table by Melissa Shirley Designs Painted Canvas Project Photo
Laura Taylor, Instructor, and Jill Mashburn Elia, Owner of Louise's Needlework


What fun we had learning to embellish this piece with a wide variety of stitches and threads in ways I would never have dreamed of.  Laura Taylor gave us instructions on how to do each section with lots of examples and in such a way as to keep our attention (with much humor too).  This was the first time I've taken a class from Laura and look forward to the next opportunity to do so again.  

Jill, the delightful owner of Louise's Needlework, was a most gracious host--and so very organized. She, along with Emily and Karen who work with her at the shop, had everything ready for us when we arrived. The canvas was taped and tacked to large stretcher bars, all the threads and beads (with matching beading thread) were placed in labeled bags and held together on a ring.  Extras such as paints, paint brush, felt, tracing paper, needles, eyelash thread, and twill tape were in a separate bag and labeled. Other necessities such as glue, paper towels, plates and toothpicks were on each table. Then we were given a large clear, zippered project keeper with handles to place everything in when we were ready to leave.   Jill also lent us floor stands, lighting and lots of plugs, as needed.  

And when we were hungry, delicious lunches were brought in for all 3 days, along with snacks, beverages, etc.  There were bagels and coffee in the morning too.  We wanted for nothing!

And finally, I had a most wonderful time with my classmates who not only came from the local area, but from places far and wide.  Some of us stayed at the Nationwide Hotel & Conference Center where Jill negotiated a special rate for class participants and arranged for van transport to and from her shop each day.  The two room suite was first class and I so much appreciated not having to worry about transportation.

On this piece called Winter Table, I learned lots of new techniques, such as stitching the chrysanthemums with TG Eyelash and beading the centers in such a way as to give a 3D effect.  The paper white petals are padded then beaded--wow, really pretty.  The small white flowers are made with, or all things, Wrights Twill Tape.  We also learned how to shade the leaves with paint instead of using thread.   The pine cone is given dimension using a "lazy daisy" twist.   This is a large project (for me) and I plan on taking my time with each section.

This is a canvas I fell in love with when it first came out.  It so looks like my husband's sun room where he grows paper whites, christmas cactus, etc. and where we see cardinals out the window.  Our female cardinals have more red on their crown and wings than the one painted on the canvas, so I'll add some color to the pretty bird.  Also, our christmas cactus has red blooms, so again, will make a color change.

Female Cardinal
I'll post again as more progress is made on the various sections.