Statcounter

Sunday, March 20, 2022

Holiday Gift White Ornament - 3/20/22

March 20, 2022--Just finished stitching another of Susan Portra's Holiday Ornaments.  This one is called White Gift and was published in the 2015 issue no. 4 of Needlepoint Now Magazine.  This is the 12th ornament I've stitched to date out of 16 published.  There were supposed to have been 24 ornaments published in the magazine, but it doesn't look like that's going to happen.  Susan Portra is selling the instructions for these ornaments on her website, but in groups of type--all eight "gifts" together, eight "lights" and eight "bells".   I don't need all of them, just the few I'm missing.  Hopefully I'll be able to purchase individual instructions from someone who no longer needs them.  Click on the Collections page on the right to see which ones have been done so far.

This ornament has a lot of shine, but the RG Neon Rays ribbon looks a bit wonky.  Try as I might (took it out a few times), I just couldn't get it to lay flat and smooth.  Suspect it has something to do with the length of the stitch being done on the diagonal and how close they lie next to one another (the ribbon is pulled against a corner rather than a straight canvas thread when stitched vertically).  I hope this makes sense.  Below is a graph of what I'm trying to say where you can see a flat ribbon is squeezed into the upper and lower corners of the stitch when done on the diagonal, causing the center of the stitch to curve in on itself.  It stays flat on the canvas when stitched vertically (or horizontally).   The longer the stitch and the more closely they are placed together, the more exaggerated the curve becomes.

One other thing to note--I inserted white beads where french knots were called for.  My beading skills far exceed those of french knot making.


Graph of Laying Ribbon Like Thread on the Diagonal vs Vertical Placement


Ornament Holiday Gift White Completed

Ornament Holiday Gift White Completed
Side View


Friday, March 11, 2022

Rose in Assisi Technique - 3/11/22

March 11, 2022--The March meeting program of Delaware's Seashore Chapter of ANG consisted of learning the Assisi technique while cross stitching a rose.  This results in a negative effect where the background is stitched, and the central design is left blank.   Thank you, Bobbie R., for introducing us to this style of stitching and I look forward to working up more designs using this technique.  

This project was stitched on 28 count Jobelin linen with two strands of DMC over 2 threads of fabric, effectively making it 14 count linen.  I think the result is quite dramatic.


Rose Assisi Technique on an Embroidery Hoop (stitching in the "well" to make it easier to end threads on the back of this small project)


Rose Assisi Technique Framed (please ignore a small reflection of light on the bottom)


Wednesday, March 9, 2022

Woodlawn 59th Annual Needlework Exhibit Ribbons - 3/9/22

March 9, 2022--So very, very pleased and surprised to have won four ribbons for four out of the five projects entered into the Woodlawn 59th Annual Needlework Exhibit. Below is an excerpt from my Exhibited Pieces Page (click on each entry below for more information).

Woodlawn Annual Needlework Exhibit, Alexandria, VA


2022

Purse "Let The Good Times Roll" - Updated 9/29/22

September 29, 2022--Won Honorable Mention Ribbon for Canvaswork/Needlepoint category at Rehoboth Beach Museum's 10th Annual Needlework Exhibition in Rehoboth Beach, DE.  So pleased.

March 9, 2022--Won 2nd Place Ribbon in the Canvaswork-Multi-stitch category at Woodlawn's 59th Annual Needlework Exhibition in Alexandria, VA.  So pleased.

September 19, 2021--Three years after I completed the stitching of this project (see all the details below), I finally had it "finished" into a beautiful clutch purse.  I'm over the moon happy with the results.  I worked with Karen at Rittenhouse Needlepoint (1216 Arch St. 2A, Philadelphia, PA 19107, telephone 215-563-4566 ext. 113) and she helped me decide on lots of little details.   The purse is very sturdy (which is what I wanted) and has lots of interior room for my iPhone, keys, etc.  Love the zippered compartment and six credit card slots.  Imagine how chic I'll look at the casino carrying this.  Right now it's on display in my dressing closet with other goodies.  I smile when getting dressed just looking at these beautiful things (the photo is of my husband and myself taken over 30 years ago).


Purse Let The Good Times Roll Finished Front

Purse Let The Good Times Roll Finished Back

Purse Let The Good Times Roll Finished Interior


Purse Let The Good Times Roll On Display in Dressing Closet


August 20, 2018--As predicted in my July 10th post below, I did get the stitching on this beautiful purse done in August.  Hurray!  I'm seriously thinking about finishing it myself into a clutch purse and have found an old Vogue pattern (#8974) which might work perfectly as a guide.

I originally contacted the shop who finished Janet Zickler Casey's model purse, but they are no longer doing this type of thing.   So I either do it myself or try to find someone else to finish it (understand this type of thing is very expensive).  I'm a DIY kinda gal (does this equate to fearless), so I'll give it a go myself.

Purse Let The Good Times Roll Completed

Vintage Vogue Pattern 8974 Clutch Purse


July 10, 2018--Yay!  All the black diamonds are stitched and just a few white ones to complete.  Maybe by the end of August, at the rate I'm going, they'll all be done.   Then I'll have the fun of finding a purse "finisher".

Purse Let The Good Times Roll as of 7-10-2018


May 27, 2018--Still working on the diamonds--it's a very slow process.  But I am making progress and hope to complete the stitching by the end of the year.  Odds are out to see whether or not this happens, or if it gets done at all.  LOL.

Purse Let The Good Times Roll at 5/26/18


January 7, 2018--I've been working on this purse off and on over the last few months.  Over 25% of the diamonds are now filled in.  Whew.  Each diamond takes nearly two hours to stitch due to the fact there are two different stitches which use different threads that must be "laid".   Also, this is a huge canvas - 14" x 22" and moving your hand around it takes time as well.

In actuality, however, the purse is more than 25% complete since the beaded fleur de lys is in place, the diamonds are outlined in silver Kreinik, the beaded handle put together, and the black diamonds are painted in so that white canvas doesn't show through.

Here's my progress so far:

As of 1/7/18 Close up

As of 1/7/18


November 2, 2017--Began stitching the diamonds.  The lower right 2 rows are done.  Not a difficult stitch, but each diamond does take time.  A good project to stitch while watching TV.

Let the Good Times Roll Purse as of 2017-11-02
April 11,2017--Steadily working away on this project.  Finished stitching the outline of the diamond shapes in silver Kreinik, painted in the black diamonds so that white canvas won't peek though the stitches (no stitches done yet), AND, beaded the Fleur de Lis in "brick stitch" pattern.  I'll wait until the end to add the black "tie down" beads on the Fleur de Lis.

Let the Good Times Roll Purse as of 2017-04-11
Beaded Fleur de Lis Side View

April 5, 2017--I started stitching this purse at the ANG 2016 Seminar in New Orleans, LA in a class taught by Janet Zickler Casey called "Let The Good Times Roll.  This is a very large piece which will be made into an envelope clutch with a beaded handle. I spent much of the class time making the handle since my beading experience for items such as this is practically nil.  It came out well and I hope some day to do more in the way of beading bracelets, necklaces, etc.

Janet offered two colorways for this purse--black and white like the one I'm doing; Mardi Gras colors in green, purple and gold.

Here's my progress to date and a picture of the handle.

Purse Let The Good Times Roll at 2017-04-05

Purse Let The Good Times Roll Beaded Handle
Here's the project photo.  This picture shows the red beaded Fleur de Lis positioned on the back of the purse.  Mine will be on the front.

Purse Let The Good Times Roll Project Photo

  1. That will look lovely. Will you finish it yourself or take it somewhere to make it into a clutch?

    ReplyDelete
    Replies
    1. I'll probably have someone make it into a purse for me. I imagine myself carrying this while gambling in a casino. LOL.

      Delete
  2. That'll be pretty. Only makes sense to have the fleur de lys on the front. and what paint did you use? brave of you to paint so close up to stitched threads.

    ReplyDelete
  3. Used a black fine point permanent marker. Was easy to work around the silver Kreinik threads which have a little black running through them.

    ReplyDelete
  4. This is going to be gorgeous! I can imagine it might be a bit tedious though! I fill in like that with permanent markers frequently, sometimes even after all stitching is done. No problems!

    ReplyDelete
  5. This comment has been removed by a blog administrator.

    ReplyDelete
    Replies
    1. Hi Liz, Sorry, I deleted your nice comment by mistake and am unable to retrieve it. Blogger is changing how I see comments (no longer going to my inbox) and the new viewing has options with which I'm not familiar.

      Delete

Firecrackers -- Updated 9/29/22

September 29, 2022--Won 3rd Place Ribbon for Canvaswork/Needlepoint category at Rehoboth Beach Museum's 10th Annual Needlework Exhibition in Rehoboth Beach, DE.  So pleased.

March 9, 2022--Won Honorable Mention Ribbon in the Canvaswork-Multi-stitch category at Woodlawn's 59th Annual Needlework Exhibition in Alexandria, VA.  So pleased.

July 26, 2021--Entered this fun project into the Delaware's State Fair and was awarded a Second Place Ribbon along with a small (very small) cash prize.   Nice.

November 23, 2020--I've just finished these firecrackers myself as standups and am very pleased how they turned out.  If interested, there's a tutorial of how I did it below.  Hope you find it helpful if you decide to try this yourself.


Firecrackers Finished as Standups

Below is a brief tutorial of how I made these into standups. 

Firstly, you will need the following:

Fishing line (used for strength).  Click here for more information about what I use.
Circular needle for joining seams
Acid free mounting board (click here for information about what I use).
Fabric for firecracker tops and bottoms.
Matching thread to the fabric.
Compass for drawing circles
#4 Pencil
Weights for standup bottoms
Polyfill stuffing
Foil sparklers


To begin, trim each canvas, leaving a 1/2" seam allowance.
Fold sides of canvas in toward the wrong side (see photo below)


Cut a length of fishing line approximately 3 times the height of the Firecracker and tightly secure the  line at the top seam allowance (be sure your line is very secure otherwise it will come undone as you pull the seam closed)., then begin stitching the long sides together using the Ladder Stitch over 2 canvas threads (count carefully to keep the seams matched up).  

Periodically pull the Ladder Stitches tight to close the seam.  This photo shows the seam closed after an inch or so.

Here the stiches have been pulled tightly halfway through stitching the seam closed

The seam is now completely stitched closed.

Securely end the fishing line in the bottom seam allowance.

Clip into the top and bottom seam allowances so they will easily fold to the inside of the Firecracker.  Leave a few canvas threads "unclipped".


Measure the diameter of each Firecracker.  I came up with the following:
Small Firecracker:  1.5"
Medium Firecracker:  2.25"
Large Firecracker:  2.5"  The photos below are for the large Firecracker


Set up a compass one-half distance of diameter (if diameter is 2.5", the compass should measure 1.25").  I use a #4 pencil so the markings won't "bleed" unto the fabric or canvas.

After drawing and cutting out your circle, measure to confirm it's the size you desire.

Since the board I use is rather thin (for easy cutting), I cut out 3 circles for the bottom and 2 circles for the top).

Cut fabric circles with a seam allowance of about 1/2".

Place a running stitching along the edge of the fabric circle

Now pull the running stitches tight so the fabric will wrap around the board.

I go one step further and lace the edges together so the fabric won't slip.

To begin stitching the bottom to one of the Firecrackers, secure your sewing thread to the canvas edge, then fold the edges of the seam allowance towards the inside of the Firecracker

Using straight pins to temporarily hold the bottom unto the Firecracker, whip stitch both together using thread to match the bottom fabric.

Once the bottom is attached, place a weight inside to rest on the bottom (I used gravel I found around my driveway) then stuff, stuff, stuff until  you can stuff no more with Polyfil.  


Now cover the Firecracker top with fabric.  Then make a hole through the fabric and board (so you can  push a "foil sparkler" through the top) and attach to the Firecracker with pins and sew on as with the bottom.  

That's it.  As you can see, my top and bottoms rest outside the canvas.  Someday I'll learn how to fit a top and/or bottom inside the standup, but as of yet don't have a clue how to do that. 

Please add photos of your Firecrackers to the ANG CyberPointers Photo Album when you get them done.


November 2, 2020--All three firecrackers are now stitched and ready to finish.  I even found some foil sparklers for the top of each one.  Below is a photo of the smallest firecracker.  


Firecracker Small Completed


 October 19, 2020--The medium size firecracker is stitched with only the smaller one left to do.  

Firecracker Medium Completed

October 14, 2020--Here's a photo of  the first of three firecrackers (and largest) that is fully stitched.  I can imagine how cute this will look with a sparkler coming out of the top.  

Firecrackers Large Completed

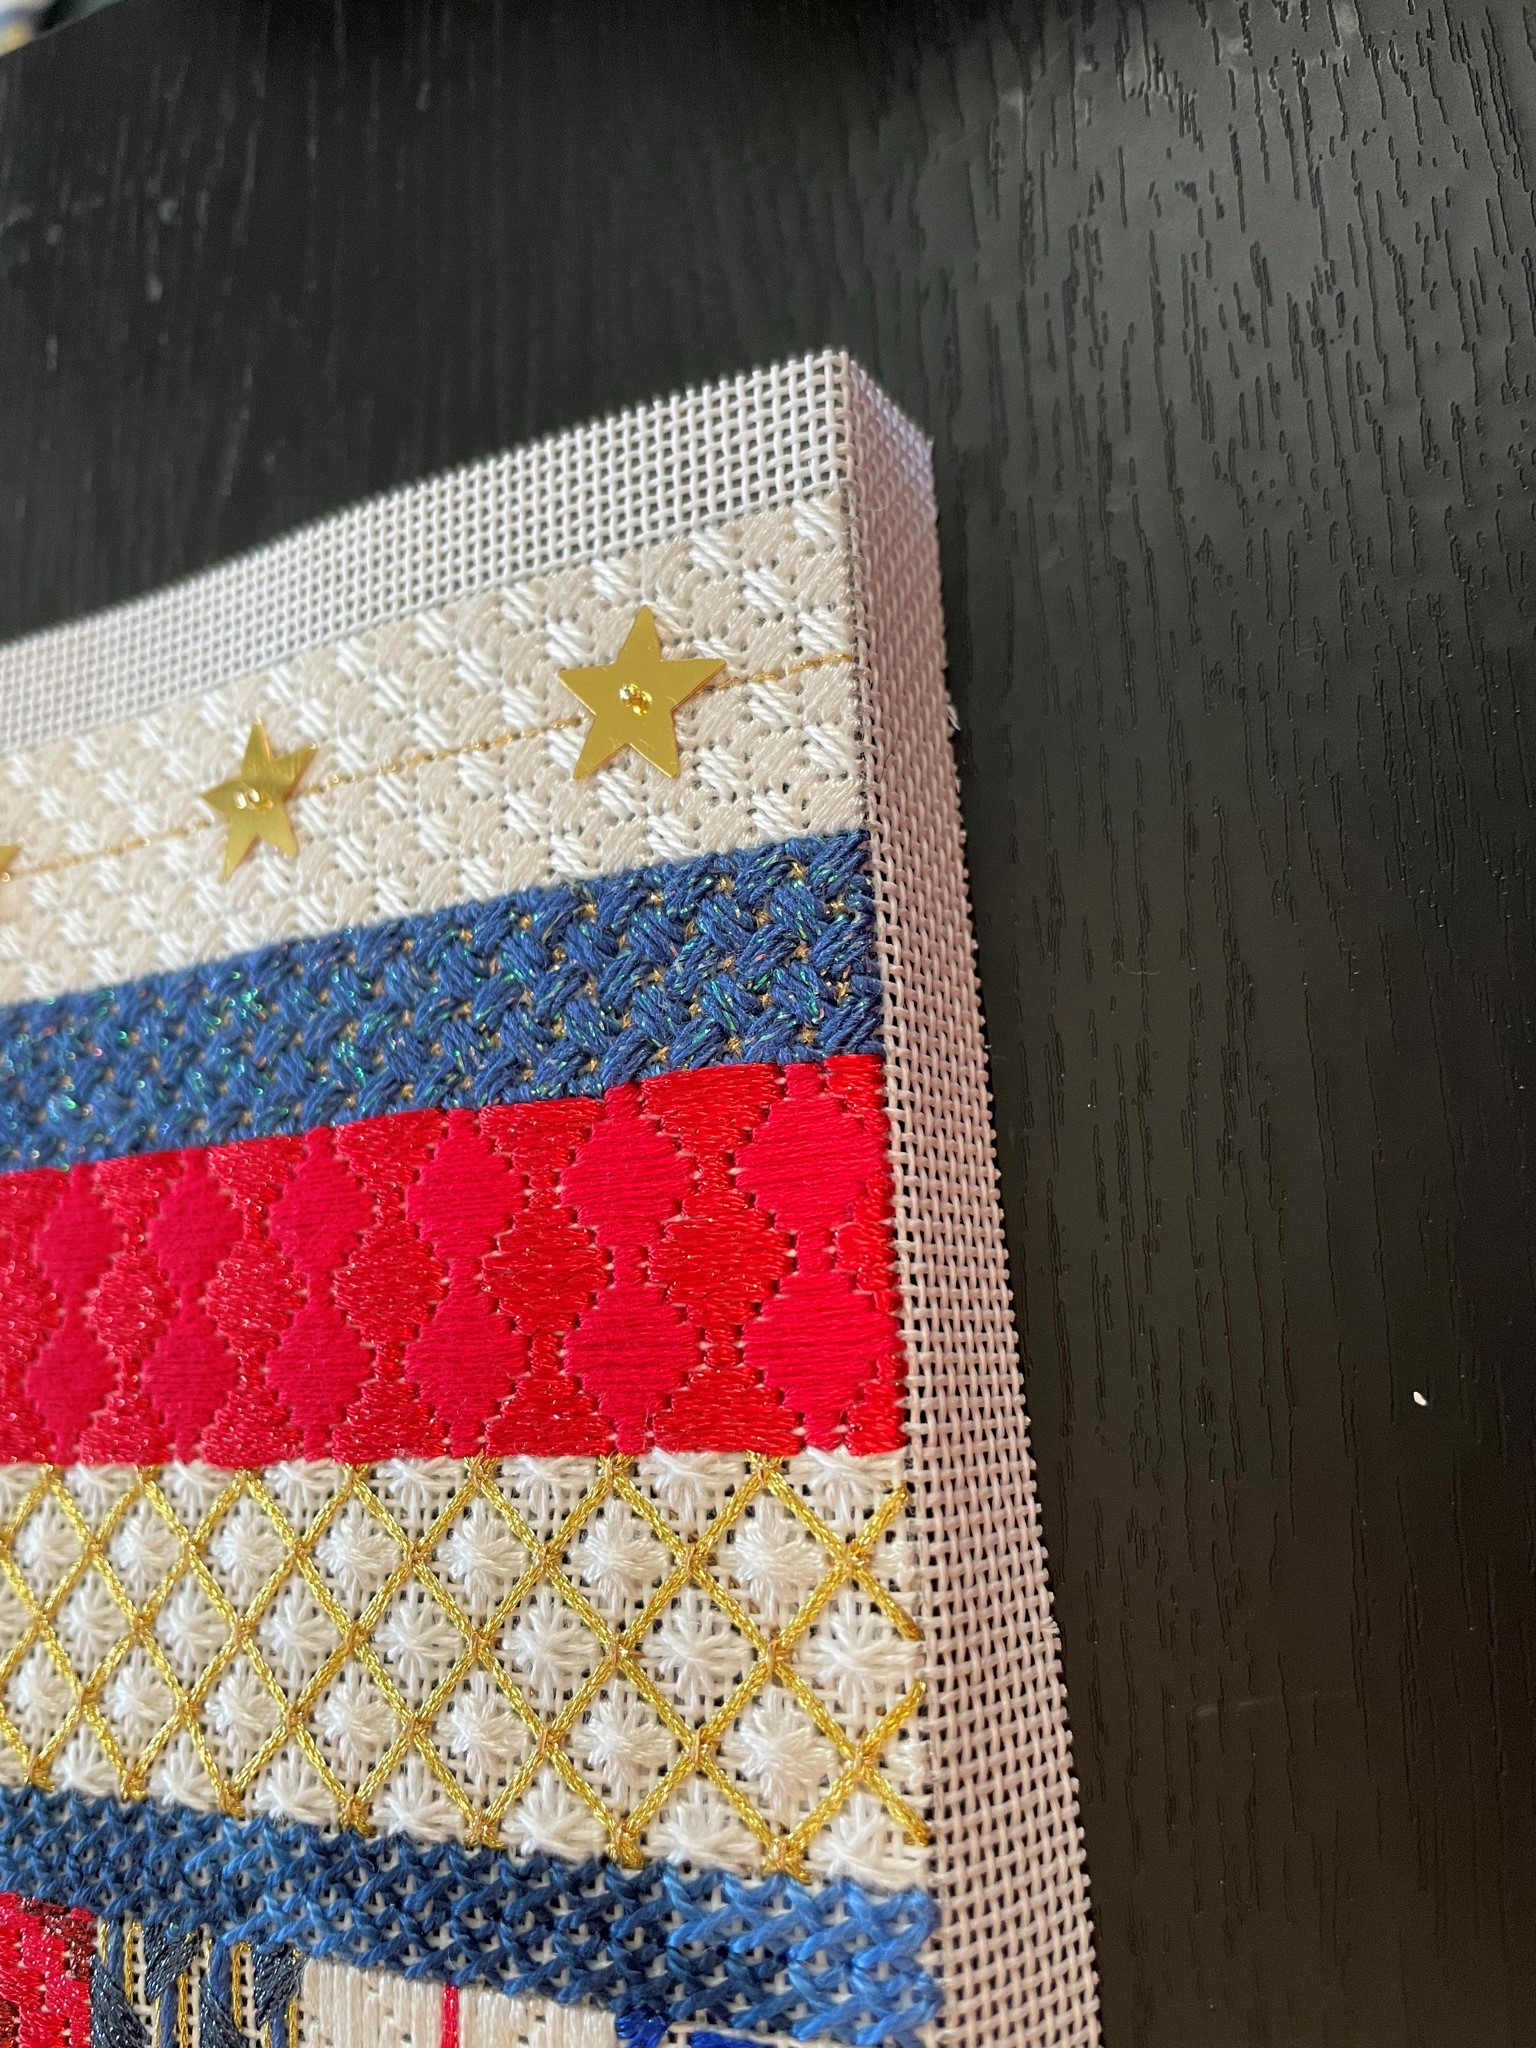
August 13, 2020--The CyberPointers Chapter of ANG offered this project by Toni Gerdes as a class to be held during its July and September meetings.  I purchased the full kit and love the variety of threads and stitches.  Lesson one given at the July meeting covers the largest of the three firecrackers.  I plan on getting the stitching done in time for the second lesson given in September.

Here's my progress to date.

Firecracker Largest Top Portion Completed


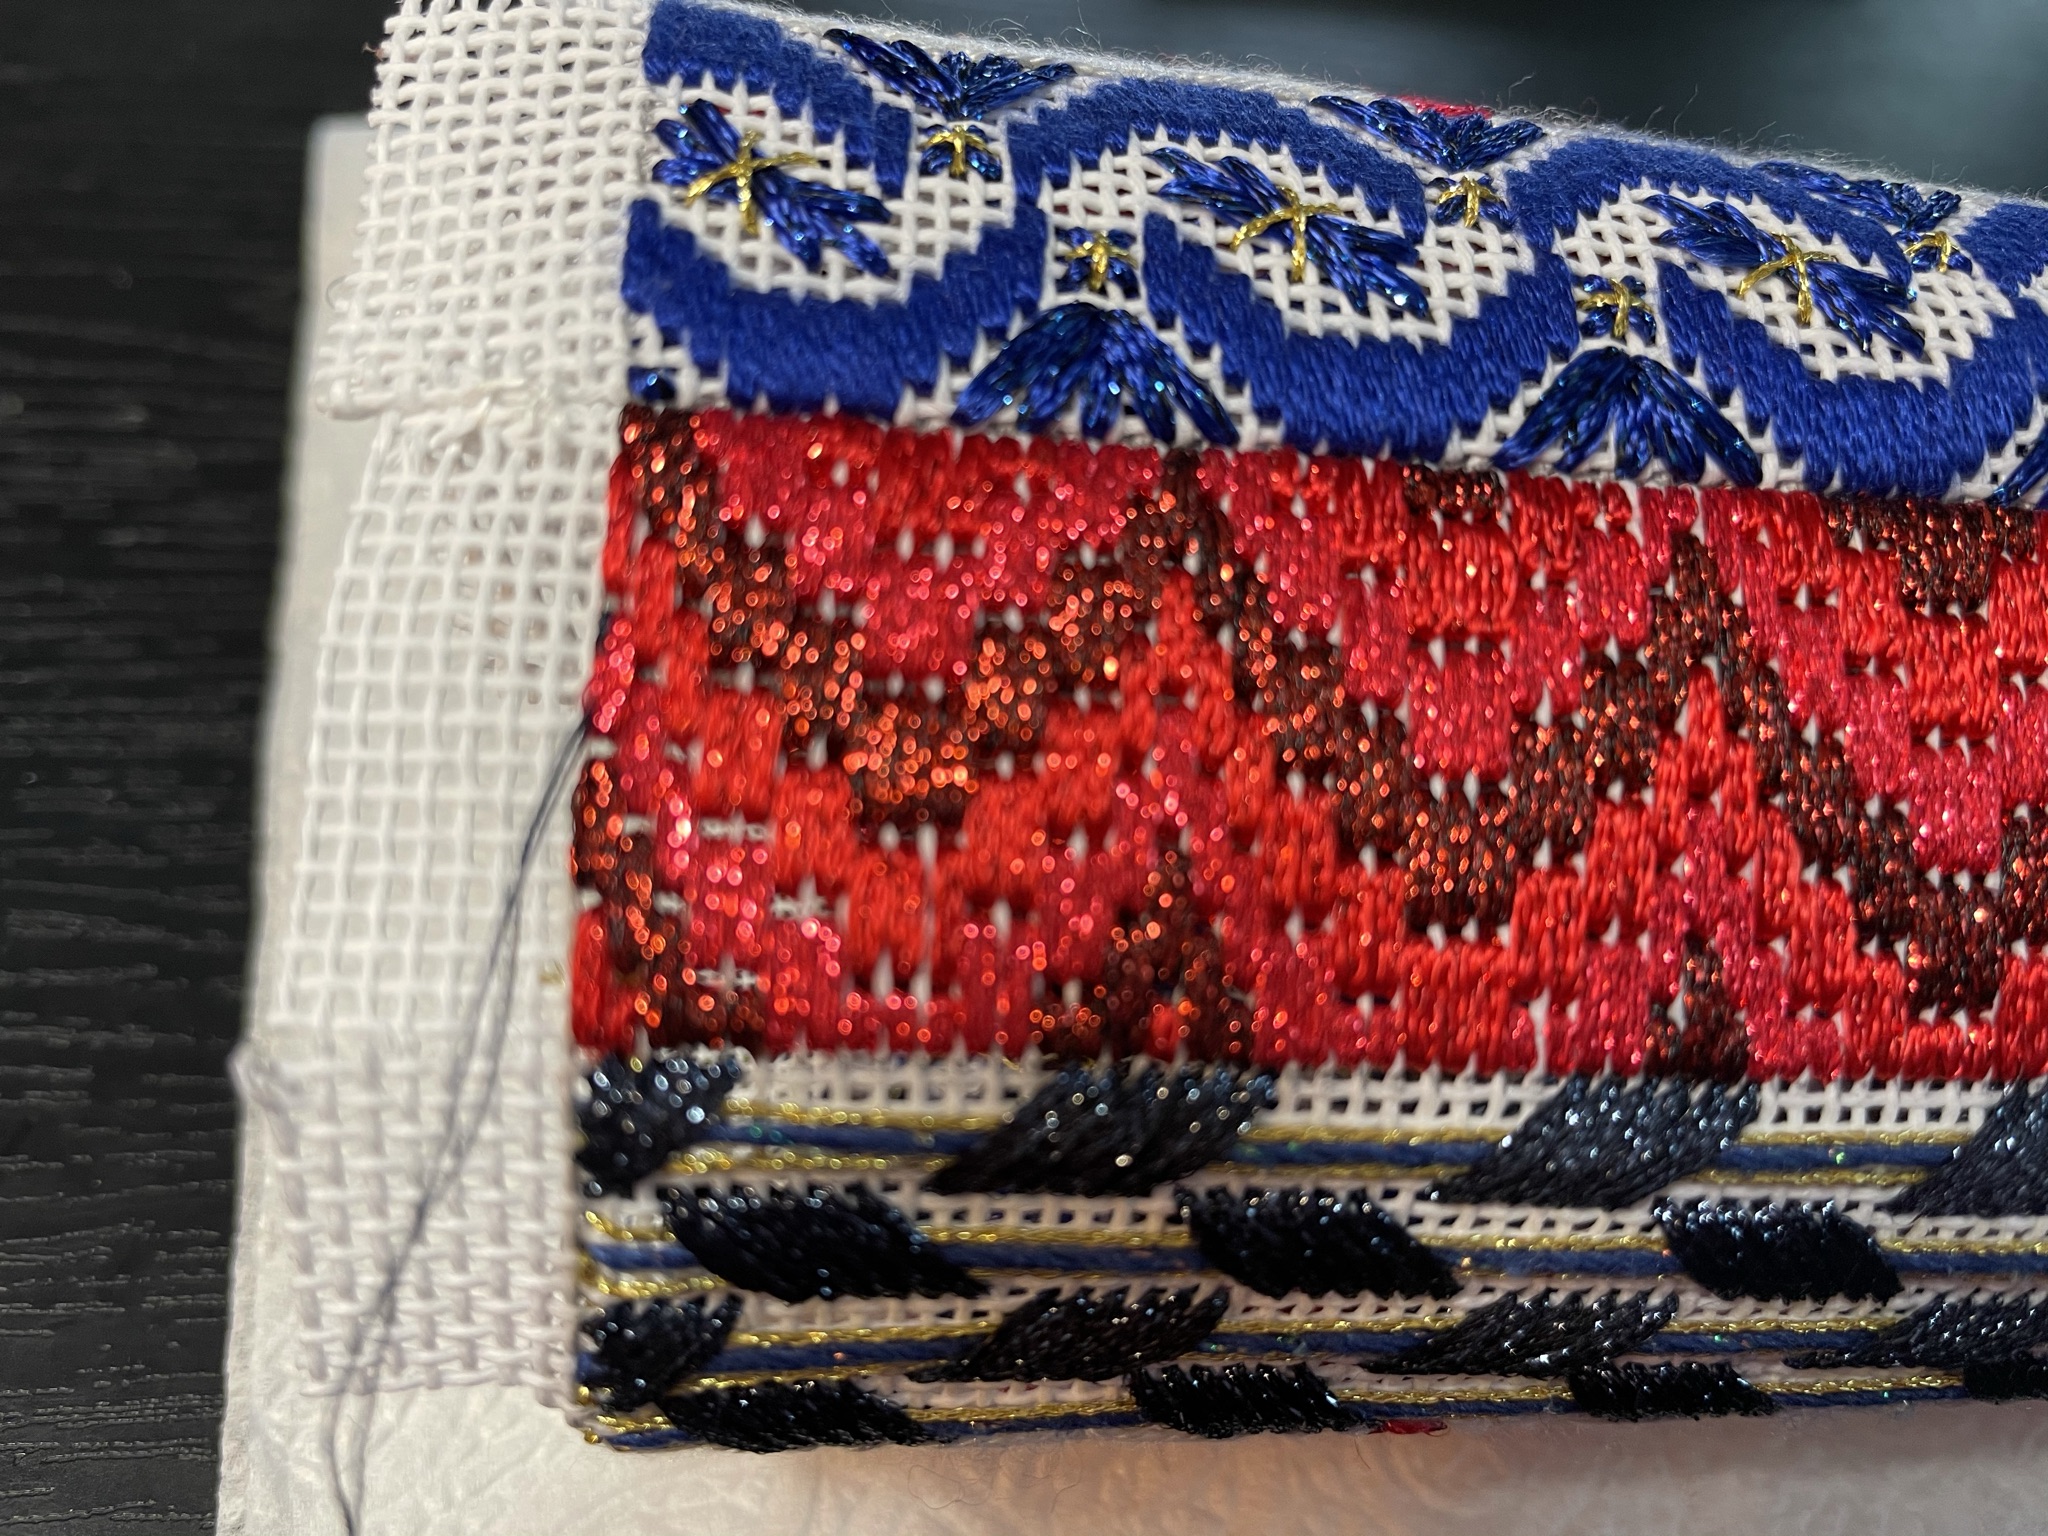
Firecracker Largest Top Portion Completed Closeup


Toni advised us to be sure the laid threads in bargello are flat, not only on the front, but on the back as well to avoid a "twist" working its way from the back to the front.  She's right.  You can see this problem in a few of my red threads on the right side where I didn't worry about what was happening in the back.   Of course, to do this means flipping the canvas over after every stitch.  I realize now that I need to Iearn how to lay stitches on the back without turning the canvas over.  This will be interesting.