Statcounter

Showing posts with label Pilot Stitch Program. Show all posts

Monday, March 25, 2024

Parcheesi Anyone - 3/27/24

March 27, 2024--This is a piloted project I stitched for Susan Hoekstra who will be teaching this adorable game board class at the 2024 ANG Seminar in Kansas City, MO.  Susan tells me the unusual colors and design were copied from an antique Parcheesi board.  The kit includes a line drawn canvas, instructions, threads, frame pieces and parcheesi game "men".  

I probably won't use the unfinished frame pieces supplied with the kit, but instead will have my framer set this in a black lacquered frame and add "footies" so it can sit on a table.  The parcheesi men supplied are also unfinished and the thought of painting these myself is untenable, especially after I had hand painted all the checkers in a previous pilot stitched project for Susan called "Game Is On".  Too fiddly.   I'm actually thinking of hitting some second-hand shops for an older parcheesi game just for the game pieces.  If I find one with all the playing pieces in colors that I like--that'll be that.

Parcheesi Anyone Completed

Below is a photo of the project taken from the seminar brochure.  If you sign up for this project, you're going to love the interesting stitches and scrumptious threads used.


Tuesday, September 19, 2023

Game is On Checkerboard - Updated 9/19/23

September 19, 2023--Won an Honorable Mention Ribbon in the Canvaswork/Needlepoint category at Rehoboth Beach Museum's 11th Annual Needlework Exhibition in Rehoboth Beach, DE.  So pleased.

February 5, 2023--My local framer, Michael's Arts and Crafts in Rehoboth Beach, DE, had a devil of a time putting together the frame that was part of the "Game is On" checkerboard kit.  It's an adorable frame with grooves for holding checkers, but the frame itself wasn't squarely cut or mitered evenly, so it looks a bit wonky and uneven.  She showed me some of the problem areas, but personally, I don't think it's that bad, so after two tries, I took it home.  

The frame and checkers that came as part of the kit were unfinished.  In my earlier blog about this project (see the postings below), I wrote about having to spray paint the frame and paint the checkers with a brush.   The frame was very easy to spray paint and any unevenness doesn't show since the color is "clear".  Painting the checkers was a bit more of a challenge since I've never done anything like this and had to handle each checker nine times to get the top, side and bottom painted twice, then placed one coat of shiny stuff on all twelve checkers.  Whew!  

So here's a picture of the results.  It's really very cute and sits on the bottom shelf of my living room coffee table.


Game is On Checkerboard Finished


January 24, 2022--Just completed stitching 6 rows of basketweave in black all around the checkerboard so the canvas will be totally covered under the glass inside the frame.  I also purchased a can of polyurethane to spray the frame, but this won't get done until the weather warms up (want to do this outdoors in fresh air).  I also need to purchase some paint for the checker pieces.  Lots of bits to take care of, but when done, this will be quite the conversation piece.
Game is On Checkerboard Completed

January 7, 2022--This project is stitched EXCEPT for additional rows needed so that the checkerboard will fill up the the frame that came as part of the kit.  I need about 6-7 rows in black basketweave around the project, so I'll do 6 rows then paint a couple of canvas threads in black in case the canvas does show.  

Game is On Completed Except for Black Border

December 22, 2021--The stitching is done through Area 8 of this interesting project.  I'm loving the stitches, threads, and even the unusual colors.  The next border sections, Areas 9, 10 and 11, should go quickly now that I'm over halfway done. 

I met with the manager of the framing department in Michaels Arts & Crafts who is willing to help me learn how to paint the frame for this piece, along with the checkers.   Once the project is completely stitched and the frame painted, she will then insert the checkerboard into the frame after she has put it together.   Fun.

Read below for more information about the source of this project.


Game is On Stitched Through Area 8


December 2, 2021--The checkerboard portion of this project is now completely stitched and I'm ready to work on the borders.  They look very interesting with a bit of a challenge.   


Game is On Checkerboard Portion Completed


November 20, 2021--I've begun working on a Pilot Stitch project for Susan Hoekstra of Foxview Needlepoint called Game Is On.  It's a beautiful checkerboard with amazing stitches using wonderful threads, some of which don't require a laying tool (yay!).  So far, I've stitched 36 of the 64 squares, so am a little over half done with the checkerboard portion.

Susan will be teaching this piece at ANG's 2022 Seminar in Tucson, AZ and a photo of the project can be seen on ANG's website (click here).  

The kit not only includes a line drawn canvas with delicious threads and excellent instructions, it also comes with a frame that has grooves to hold the checkers that are not in play.  Cool.  The hard part, though, is having to paint the frame and checker pieces.  Since I've never done anything like this, I'll have to ask someone at Michael's Arts & Crafts how to go about getting it done right (if I can find someone there who can help me).  Stay tuned on this bit.

Game is On Checkerboard Half Done


Friday, April 22, 2022

Stacked Rectangles - Updated 9/29/22

September 29, 2022--Won 2nd Place Ribbon for Canvaswork/Needlepoint category at Rehoboth Beach Museum's 10th Annual Needlework Exhibition in Rehoboth Beach, DE.  So pleased.

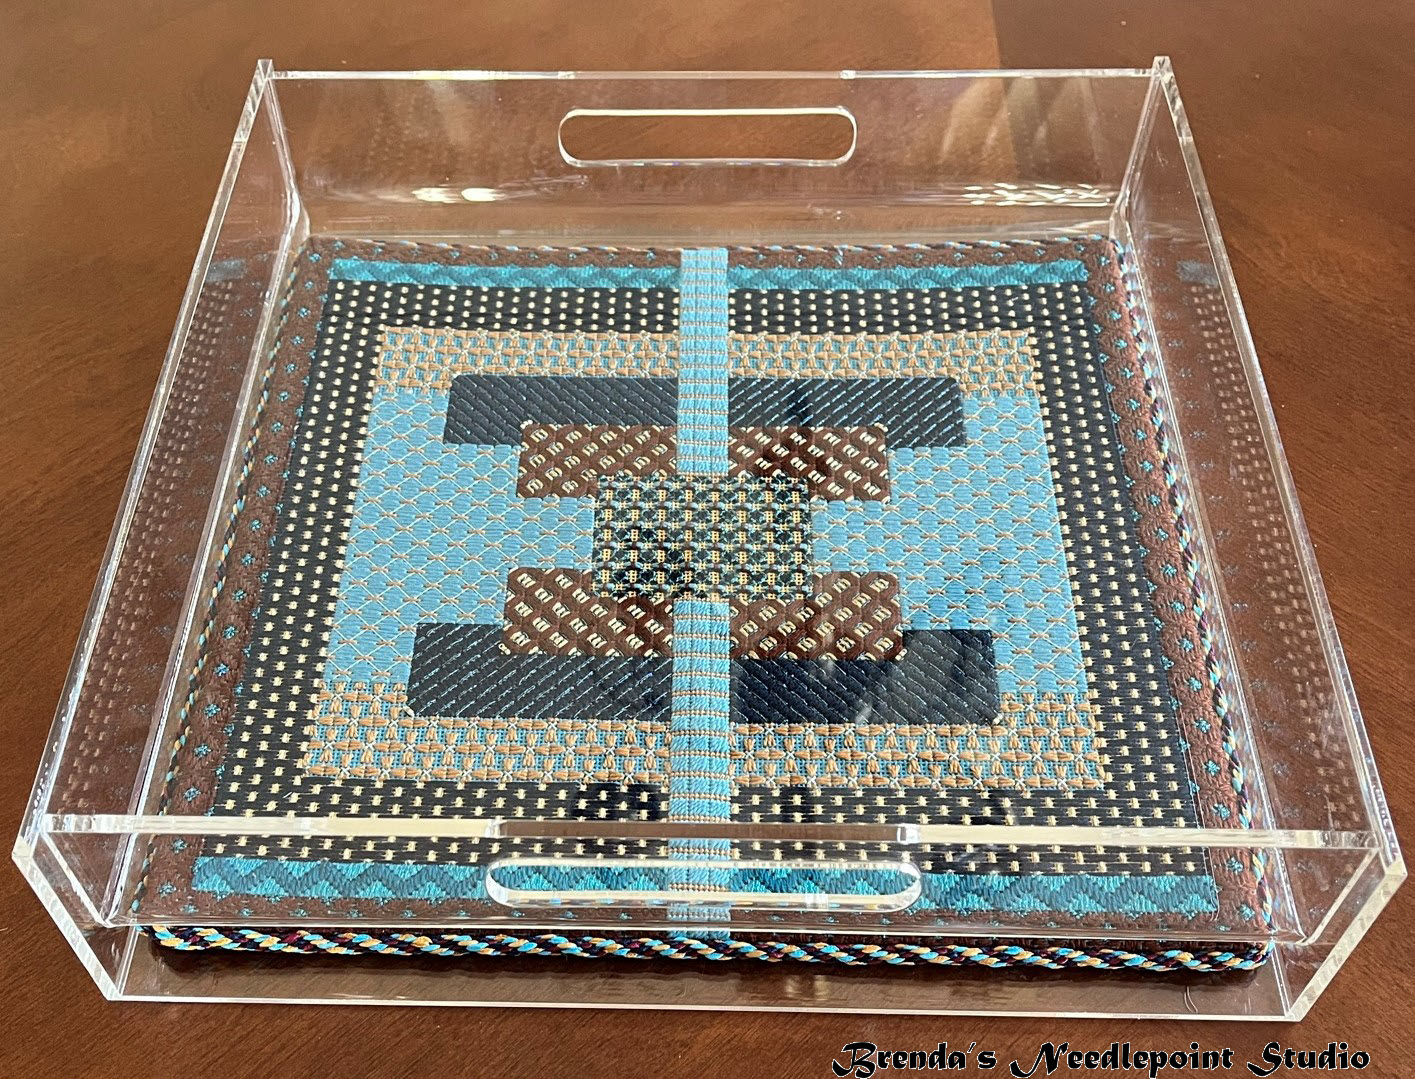
April 22, 2022--Last January I mailed this bright and colorful project to Rittenhouse Needlepoint in Philadelphia for them to finish into an acrylic serving tray and got it back a few weeks ago.  I love it.  I made the Kumihimo cording with 4 colors of ribbon (dark blue, turquoise, burgundy and gold) and it complements the rectangles beautifully.  

If I so desire, I can slide the Stacked Rectangles out of the tray bottom and insert a similarly sized project.  

Stacked Rectangles Finished Side View

Stacked Rectangles Finished Top View

May 6, 2020--Have now completed the stitching on this really cool pilot stitch project designed by Susan Hoekstra for the now canceled ANG Seminar (note this may be available as a future online class).  I would like to place it in an acrylic serving tray, thinking all these electric colors and shiny threads will look great on my outdoor furniture (and better yet holding a bottle or two of wine and glasses).


Later I'll write about my experience on locating a tray and what I need to do to prepare the piece for insertion, or if they want to do it themselves, etc.

Stacked Rectangles Completed

April 22, 2020--Earlier this month I began pilot stitching a project designed by Susan Hoekstra called Stacked Rectangles in advance of the ANG Seminar which may, or may not be held in Tucson, AZ in August.

Originally this was going to be a two day June pilot class taught to participants of the ANG New Jersey Needle Artists chapter, but because of the virus, the class was canceled.  So Susan mailed the kits to 6 of us pilot stitchers to begin immediately, and so far I am thoroughly enjoying the process of putting these challenging, yet fun, stitches on canvas.

Below is a status photo as of April 16th.  The metallic threads make each section pop.  I chose the Rocky Coast colorway with lots of turquoise, gold, navy blue and root beer colors.  My plan is to complete the stitching by month end.  Only eight more days to go.
Stacked Rectangles Status as of April 16, 2020


PS... Susan Hoekstra has approved the posting of this blog.

Tuesday, March 13, 2018

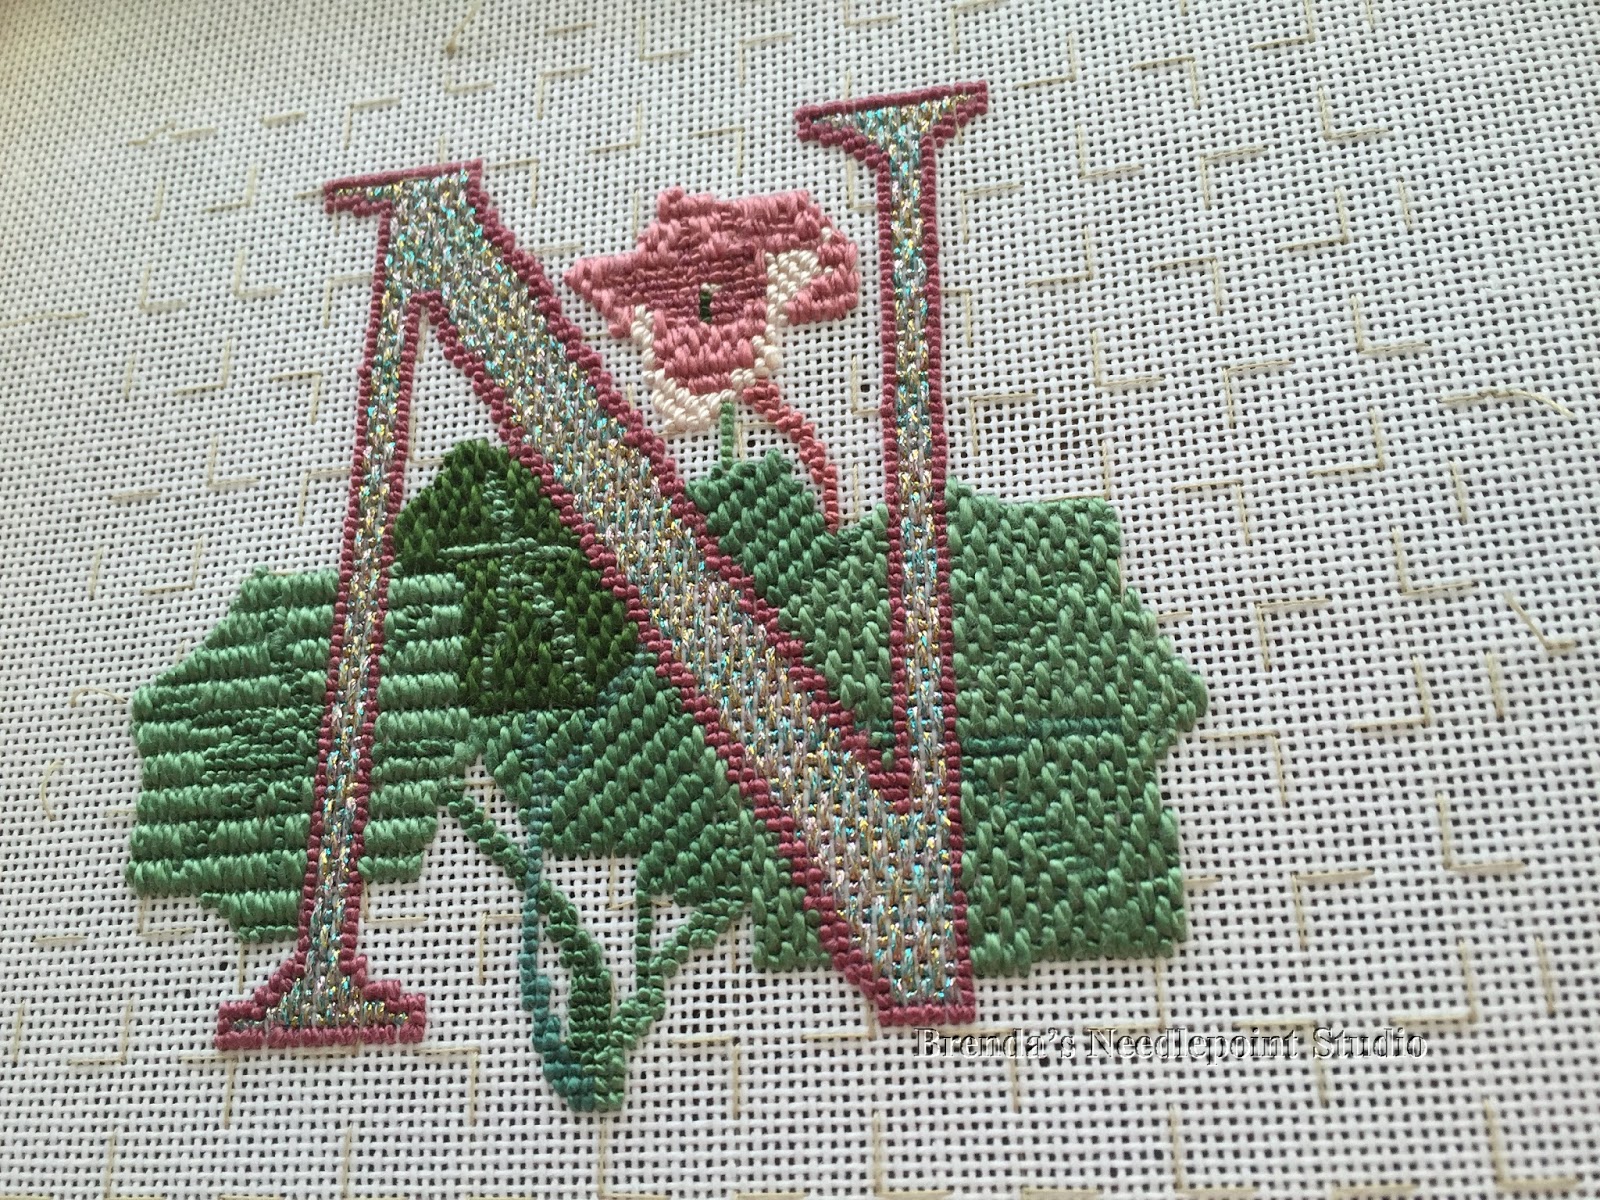
Gardener's Alphabet - The Letter N - Nasturtium - 03/13/18


March 13, 2018--Found a ready made frame for this letter.   Not sure what I'm going to do with it, so maybe a friend with a name beginning with N will want it.  It's very pretty in person.

Gardener's Alphabet Letter N

October 10, 2015--Sometime in mid-August, Liz Morrow sent out an email searching for pilot stitchers for her Gardener's Alphabet project (counted stitch, not painted) described below.  I've admired Liz's work with bargello and jumped at the opportunity to do this.  Here's the end result* and more information follows.


Gardener's Alphabet Letter N


Gardener's Alphabet Letter N Side View
Liz wrote:
  • The Garden Alphabet was designed by Jim Williams as a rug. The designs were first published in Needlepoint News, Jan/Feb 1982 issue. At that time, it was worked on 10-count canvas with Paternayan wool in Tent stitches.  Mr. Williams has graciously allowed the designs to be reworked for 18-count canvas, color coded to DMC floss.  The designs may be worked entirely in Basketweave or Continental. If desired, decorative stitches may be used, particularly for the background and letters. The background could also be left unstitched, especially if a colored canvas is used. A light coverage stitch on a colored canvas is also an attractive option. 
Liz sent me the letter N to stitch, using the canvas, colors, threads and stitches of my choice.  I have to admit that I have very little experience in choosing my own stitches, but tried to keep the different areas uniform in size while giving contrast.  I did something very unusual though (at least for me it’s unusual)—all the stitches are vertical on 24 count congress cloth—there aren’t any diagonal or horizontal stitches on the piece.  The color choices were based on the Kreinik thread used for the letter.  I love this color called Confetti Pink and it works with the flower and leaves.   Also, for the background, the basting stitches, worked over 5 threads in blocks of ten, were left in place.  I thought it gave a nice trellis-like look to it.

If I had more time (this needed to be done by the end of September), I would have redone this project, using threads with more contrast for the flower and a darker thread for the veins of the two center leaves.  Also, because the spaces within the flower were so small, would have chosen different stitches.   Oh well, for the most part it worked and Liz is going to use it.

* Liz has approved this early blog about the project and hopes to have the full alphabet up on her web site by the end of October.  Can't wait to see what the other stitchers have done.


Thursday, September 21, 2017

ANG Stitch of the Month 2017 - 9/21/17

September 21, 2017--Almost a year ago I was invited to pilot stitch the ANG Stitch of the Month project designed by Deborah Forney.  Almost forgot that I worked on some of this since time restraints prohibited me from completing all of the steps.  Below is a picture of what I stitched.   It really is a fun project. 

The monthly instructions posted on the ANG website (click here) will entice you to stitch each month's section and look forward to working on the next.  Of course, if you start now, the first nine months of instructions are already available.   Please post pictures of your progress--would love to see your color choices.

ANG Stitch of the Month 2017 Partial


Sunday, September 4, 2016

Rose Swirls - Updated 9/4/16

September 4, 2016--I am so pleased to report that this project, Rose Swirls, won a second place ribbon in Category 3 for Independent Projects (Non-Professional) at the 2016 American Needlepoint Guild (ANG) Seminar Exhibit in New Orleans, LA.   I feel this venue is the pinnacle of exhibits with the most stringent judging, and winning ANY ribbon is something to be extremely proud of.

All in all, very happy.

Second Place Ribbon Won at ANG 2016 Seminar
March 18, 2015--Won 2nd Place Ribbon in the Canvaswork-Multi category at Woodlawn's 52 Annual Needlework Exhibition in Alexandria, VA.

November 18, 2014--From January through April of this year, 2014, I participated in an ANG pilot stitch program and am finally able to write about this beautiful project.  It's called Rose Swirls and is designed by Carol Algie Higginbotham.  This is the first time I've done anything as a pilot stitcher online and thoroughly enjoyed the process.  Of course, Carol's written instructions and photographs were wonderful and I had very few comments to make to assist Carol in preparing her final classroom instructions.

BTW, this is now an ANG Correspondence Course and can be found at this link.


Rose Swirls Completed
I only made two changes to Carol's instructions.  The first involves the outlining.  Her instructions called for a stem stitch outline which I changed to couching.  I've not had good luck doing stem stitches--the lines are more zig zag in fashion instead of straight or curved.  So I purchased perle 5 in the same colors as the floss being outlined and couched the perle with one strand of matching floss.  It worked great for me.   The picture below shows the raised, couched outline.

Rose Swirls Raised Couched Outline
The second change was to add a trellis darning pattern to the background.  Her instructions didn't call for anything in the background, but I wanted to place the project in a square frame, so needed to do something with all that blank space.  I really like how it came out.

I learned a number of new things doing this project--ribbon embroidery being one of them.   I loved the petite ribbon roses and also used ribbon to make some of the french knots.  Of course, the feather stitches were done in a random fashion which I'm not a big fan of, but they too came out well.  Many of the white pulled work stitches inside the circle were new to me and again, had a lot of fun working them.

The last picture shows how this piece is framed.

Rose Swirls Framed