Statcounter

Showing posts with label Gifts. Show all posts

Sunday, August 19, 2018

Pinwheel Christmas Ornaments - Updated 8/19/18

August 19, 2018--The three projects completed in 2014 (see below) have now all been turned into ornaments.  The small stocking, the first stocking I've ever "finished",  was a bit of a problem because I tried to sew it using "dressmaker" techniques.  Big mistake--too many layers to turn and the top was a mess, to put it mildly.   The next stocking I plan to finish is larger and I'll try the technique recommended by Pat Mazu.

The round pinwheel ornament below was part of my ANG chapter's ornament exchange in 2014 and the small square pinwheel ornament hangs on my tree at Christmas.


Pinwheel Stocking Completed Front
Pinwheel Stocking Completed Back


Pinwheel Round Ornament Completed Front

Pinwheel Round Ornament Completed Back

Completed Square Ornament Completed Front

Completed Square Ornament Completed Bck


August 21, 2014--Finished stitching this CyberPointers July project designed by Pat Mazu.  Really fun and fast to stitch and loved using up some of my stash.  Can't wait to learn how to finish the two ornaments and stocking--lessons coming up at the September meeting.


Thread Choices for the Pinwheel Stocking and Ornaments
 Picture taken from my Threads Inventory blog post

August 5, 2014--ANG's online CyberPointers Chapter offered Pat Mazu's pinwheel ornaments as their July stitching project.  There are three to choose from--a mini stocking, a round ornament and a square ornament.  Pat will instruct us how to finish these ornaments during the September meeting.  I've decided to stitch all three, choosing threads from my stash.

Sunday, July 29, 2018

Nashville, TN Ornament - Updated 7/29/18

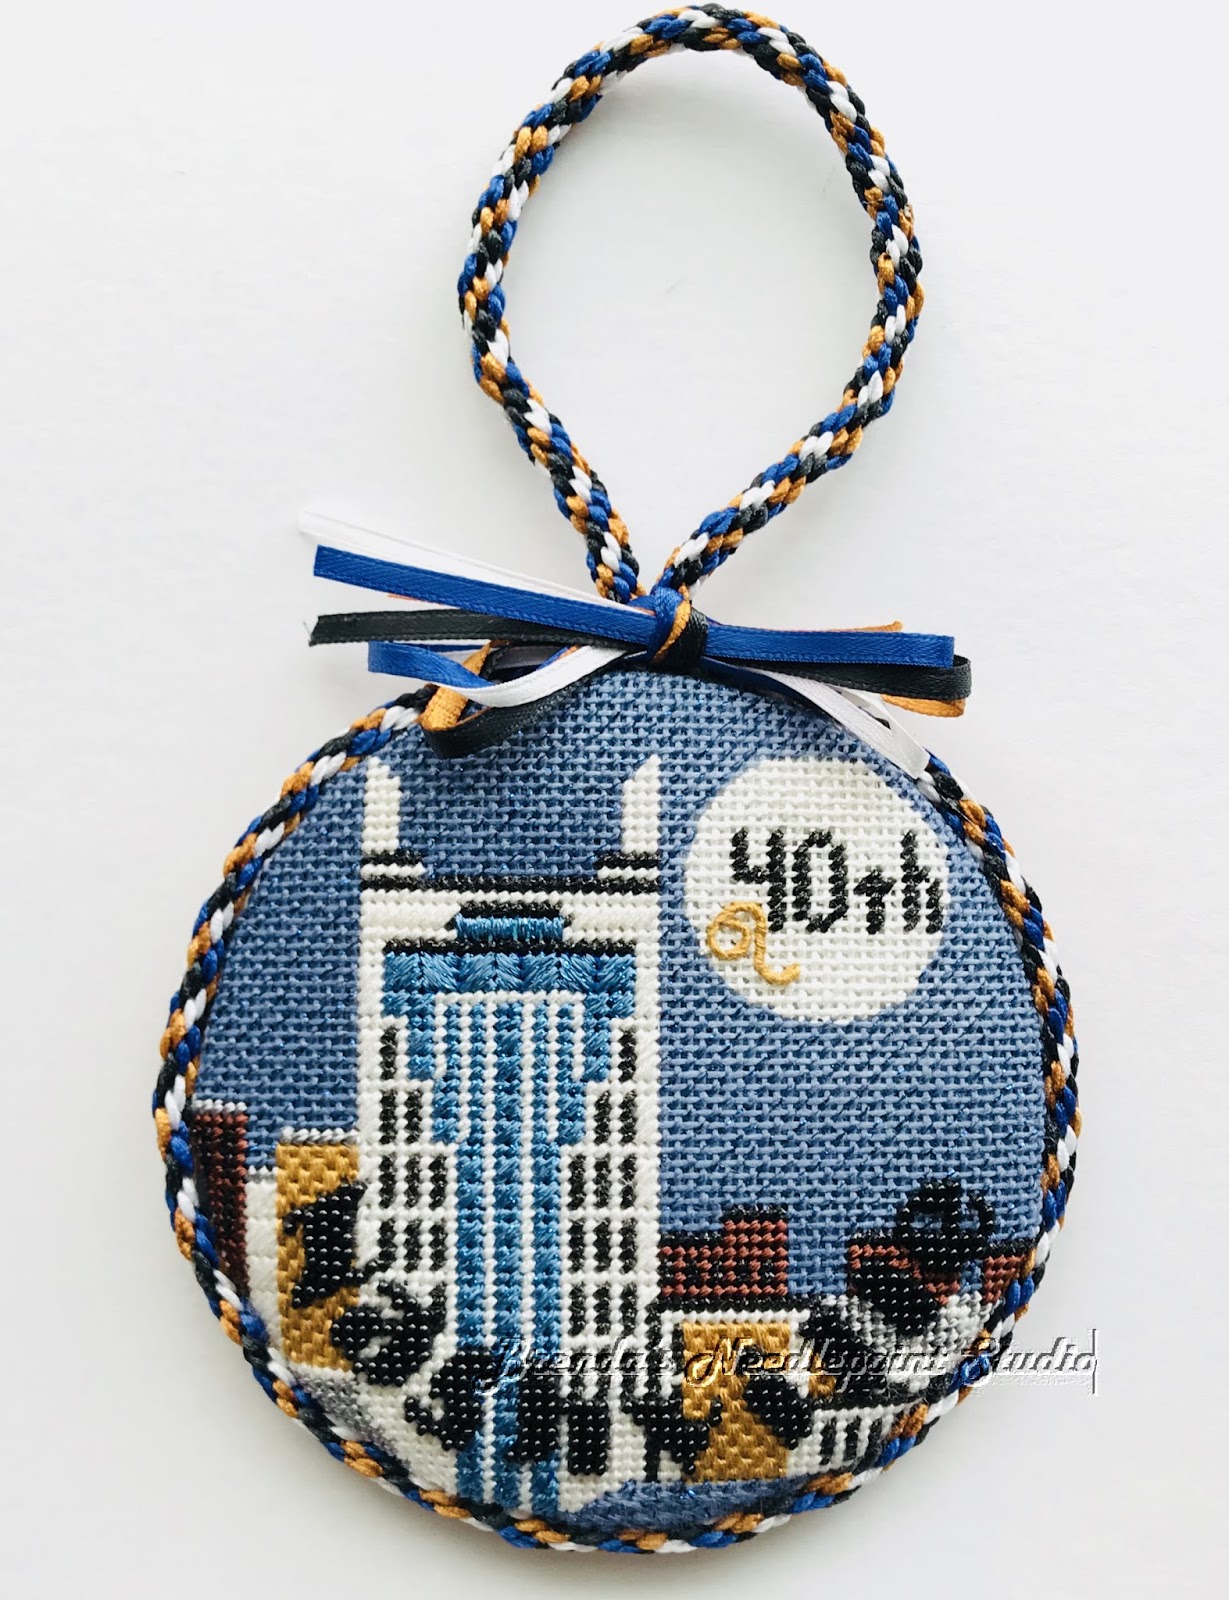
July 29, 2018--The ornament was presented last Thursday to the birthday girl while celebrating in Nashville, TN.  I was fearful she wouldn't recognize the building, so before giving the ornament to her, I brought Nashville's skyline to her attention, pointing out how the building was referred to as the "Batman" building by the locals.  Problem solved.   I hope she enjoys it for years to come as a memento of the wonderful time we all had.  Below is a picture of the building in question.  I think it was well represented by the artist.

Batman Building in Nashville, TN


April 10, 2018--Finished this Nashville 4" ornament commemorating my husband's niece's 40th birthday being celebrated in Nashville.  The cording is made out of 8 strands of 1/8" satin ribbon in 4 different colors:  white, gold, blue and black, on a kumihimo braiding round.  The embroidery on the back of the ornament was stitched on my Bernina 1530 sewing machine (an oldie, but a powerhouse goodie). 

The gold backing fabric comes from a drapery sample book given to me by my sister.  She used to fabricate draperies and bedspreads and when she retired, she gave me all of her old sample books, and they are the perfect size for ornaments.

Then the whole shebang is glued together.  I don't place glue directly under the stitching nor under the backing fabric that you see, but the parts that wrap around the mounting board and padding are glued down.  The cording is also glued in place--all faster than stitching.

I hope my husband's niece likes it.


Ornament Nashville Finished Front


Ornament Nashville Finished Back


February 21, 2018--The ornament to celebrate my husband's niece's 40th birthday in Nashville is done.  The little gold design in the moon is the zodiac symbol for the Lion.  I like how it came out.  I have time between now and July to finish it into an ornament with cording and some ribbons (not too many--am not into fru-fru).

Nashville, TN Ornament for 40th Birthday

Side View of Nashville Ornament (beads are more visible)


February 15, 2018--My husband's niece is turning 40 in July and she invited her world to celebrate with her in Nashville, TN.  We've been there once, but it was a quick in and out type of thing, so we responded Yes!  So, what do you get a beautiful woman (and one of the nicest ones too) with a handsome husband, two gorgeous children, a home on a lake, etc.?  Needlepoint!  I'm sure no one else in her life does needlepoint, also I'm quite confident that no one in her family reads my blog, so this will be a surprise.  After inquiring of the wonderful readers on Facebook's Needlepoint Nation as to where I might find a Nashville theme related ornament, I received some nice responses and found one I could order and receive immediately (needing all the time in the world to get this done).  It also had a stitch guide and threads.  Glad it came as a kit--I only had two of the many threads used in this piece.

Below is the canvas designed by Tina Timberlake exclusively for Nashville Needleworks.  There's a lovely white space inside the full moon where I'll stitch in the birthday gal's name, the date or just "40".  Not sure yet.

This is called the "batman building" ornament and I had to google what that meant.  After seeing photos of Nashville's skyline, now I understand why.

Looking forward to getting started.

Ornament Nashville, TN

Sunday, November 26, 2017

Frankie - Updated 11/26/17

November 26, 2017--My sister sent me this picture of Frankie in its new frame.  Love the texture of the frame and filet.  She says it looks perfect in her living room.  Me---so happy she likes it.


Frankie Framed

Frankie Frame and Filet Closeup

September 11, 2016--Frankie is DONE!  And I love it.  And I wish I could keep it.

This is a gift for my sister which will be given to her when visiting next month in her new Florida home.  Can't wait to see how it will look on her walls.

Frankie Completed
August 20, 2016--Working on Lesson 7 consisting of the background stitches.  There are three parts to this lesson:  Bokhara Couching Pattern for the narrow horizontal and vertical bands, Burden Stitch for the wide vertical bands and lastly the outer border area.  The first of the three parts is done and here's a picture.

Frankie through Lesson 7.33
August 12, 2016--Lesson 6 is completed.  This lesson covered the Walnetos with Jessicas and Eight Point Stars.  Love those stars--they are quick to stitch and the results are beautiful.  The color difference in the stars is due to the fact that in one, the gold is stitched first, while in the other it is stitched last.

The last lesson covers the background or filling stitches, and the braided border.  There's a lot to do here, but now this is a good TV watching project.

Frankie through Lesson 6
August 9, 2016--Lesson 5 covering the Double Fans Doubled and Chilly Hollow stitches is done.  Only four more "diamonds" to fill in, then all that's left are the background stitches.  Rounding the bend to the finish.

Frankie Through Lesson 5
July 24, 2016--Back from traveling in New England and Canada and have finished Lesson 4.   This lesson covered stitches for the Diagonal Padded Waffle and Mini Double Fans (these remind me of pinwheels).  The colors are blending nicely.

Frankie Through Lesson 4
July 11, 2016--Lesson 3 is now complete.  This lesson included the filling for the Diamond Jessicas (which I had already stitched before wrapping up Lesson 2), the Amadeus Stitch on the upper and lower bands and the Wheat Sheafs along the outer edges.  Now on to the really fun stuff--those highly engineered Jean Hilton stitches.

Frankie Through Lesson 3
July 5, 2016--Happily stitching along and have finished Lessons 1 and 2, and half of Lesson 3 (out of a total of 7 lessons).

The instructions call for stitching each of the Diamond Jessicas (DJs) before doing the Waffle Stitches and Circular Jessicas that fit inside the DJs.  I changed this by stitching the Waffle Stitches and Circular Jessicas BEFORE stitching the Diamond Jessicas.  This made it a lot easier for me to properly execute the last stitches that go behind the first section.  So here's my progress todate:

Through Lesson 1 - Plaited Stitch Columns

Through Lessons 2 and Half of 3 - Diamond Jessicas
Filled with Waffle Stitches and Circular Jessicas
June 29, 2016--Three years ago I signed up to stitch Frankie, a project by Michael Boren and Carole Lake of StitchPlay Designs (project photo below).  It was being offered through Shining Needle Society and I was very excited to find it available as an online class.  I had planned to stitch this as a gift for my sister whose home has a bit of Art Nouveau, Art Deco and Frank Lloyd Wright styling. When I visited her that year in 2013, she even helped me to choose threads to go with her decor.

Move forward to 2016 and I've finally begun working on this piece.  The instruction manual along with all the online class materials have a 1.5" width and are quite heavy.  Just reading the pre-work portion of the instructions took some time to wade through.  Well all that's behind me now and below is a picture of the pre-work completed.  It looks a little wonky, so imagine vertical bars with stitching to cover all the traveling threads and bar tacks.

There's a reason for starting this project now--I'm visiting my sister in October to see her new home in Florida (she moved from Dallas, TX) and would like to have this project finished by the end of the visit so I can leave it with her for framing.  I plan on getting at least 75% of it done before I leave.  It's a 19 hour train ride from Delaware to Florida, so should be able to get more stitching done while traveling.

This is a beautiful project and am looking forward to putting color on the canvas.

Frankie Pre-Work Completed
Frankie by Michael Boren and Carole Lake of StitchPlay Designs Project Photo


Thursday, February 2, 2017

American Beauty Rose - Updated 2/2/17

February 2, 2017--Made this beautiful rose into a piped knife-edge pillow.  I like the way it looks more like a rose now that the padding rounds out the center.   And the fabric color adds a nice "frame".  All in all, very happy with the results.  My Bernina sewing machine has programming for simple numbers and letters, so I added the following to the back since it's a gift for my mother.

Happy 90th Birthday Mom

Marie-Rose Irene Cote

With Love From

Yours Truly

February 15, 2017

I added her name so the staff at the nursing home where she resides will know it's hers if it happens to "walk".


American Beauty Rose Finished Front

American Beauty Rose Finished Bac

January 8, 2017--Done, and in plenty of time to make this rose into a pillow to give my mother on her 90th birthday next month.  It's an unusual piece--you need to stand far back to actually see a rose.  Once it is piped with a dark purple fabric, the rose should be easier to view.

American Beauty Rose Competed on Stretcher Bars

American Beauty Rose Completed
December 15, 2016--Wow, it's been over 2 years since I last worked on this project.  And work on it I must now do!  This is going to be a gift for my mother's 90th birthday in February and I have a lot yet to stitch.  I have a small suspicion that it won't get done in time.  If that happens, I'll show her the project and explain it'll be a beautiful pillow when done--and promise she'll get it ASAP.   In the meantime, however, I'll stitch on it furiously and see if I can make the finish happen in time.

American Beauty Rose as of 12/14/16
November 30, 2014--Status to date.  Thought I would do as Liz Morrow has done with her rose (she's stitching hers in neutral tones) and complete a full quadrant.  Still am unable to see the rose yet.  Will now go back to working on one color/stitch at a time.


American Beauty Rose Upper Left Quadrant
American Beauty Rose Upper Left Quadrant Completed
10/13/14--This project has 8 different stitches done in 8 different colors.  The picture below shows the first color and stitch done, and a little of the 2nd one started (the canvas color is Lavendula/Lilac).

Not doing a lot of stitching these days--have been traveling and more trips are planned.

Stitch and Color One
8/11/14--While at the 2012 ANG Seminar in San Antonio, TX, I purchased instructions for DebBee's Designs American Beauty Rose with the intent of stitching this project for my mother's 90th birthday, using her favorite colors in the violet/lilac range.  Well, she'll be 90 in a little over 2 years and I figure I better get this started sooner, rather than later.

Since I'm not really good at making color substitutions--in this case from reds (listed in the directions) to violets, I wrote Debbie Rowley of DebBee's Designs for help.  Wow, she really was very helpful.  Debbie went to her LNS, The Stitcher's Garden in Conway, AR and worked with Lynda Bass Gaiser, first gathering the red colorway, then finding the perfect violet/lilac threads.  Debbie sent me the first picture below and asked if the colors they chose would work.  I immediately responded with YES! and ordered her suggestions from Lynda.  The second picture is a closeup of the violet threads that came in the mail yesterday.   Cannot wait to begin stitching.  Soon.......
Thread Comparisons--Reds to Violets

Violet Colorway


DebBee's Designs American Beauty Project Photo

Tuesday, December 10, 2013

Bargello Ribbons Ornament Updated 12/10/13

December 10, 2013--Below are pictures of the finished results.  Made two ornaments--one for me to practice finishing techniques and the second for the ANG Delaware's Seashore Chapter Holiday Lunch and Ornament Exchange on December 9th.  This was the first time "stuffing" an ornament and I found it much easier than glueing canvas and fabric around poster board.  I hand stitched the trim along the edges, but next time will try using my brand new glue gun to attach trim.  A fun project all-in-all.

Front

Back


October 1, 2013--Have begun stitching Liz Morrow's Bargello Ribbons Ornament published in Needlepoint Now magazine, September/October, 2013 issue.  This will be part of Delaware's Seashore Chapter's Holiday Ornament Exchange in December, so pictures of the finished project will not be posted until after the exchange.  But I can show the colors I've chosen below.   The RG Patina, Renaissance Green, was a table favor at the 2012 ANG Seminar Banquet and it is beautiful in this project.  The blue/green Kreinik found in my stash is called Peacock, a perfect match for the green Threadworx Floss.


Bargello Ribbons Ornament Project Photo from Needlepoint Now Magazine

Saturday, September 21, 2013

Candy Bar Pillow

September 21, 2013--Had the candy bar canvas made into a pillow.  I love the chocolate brown and blue fringe--it'll look perfect in my DGD's TV room which is beautifully decorated by my DDIL in blues and browns.   Now to decide when to give it to her--at Thanksgiving when we'll next be visiting or in May, 2014, after the Rehoboth Beach Museum's Needlework Exhibit.


April, 2013--Ever since my first visit in 2009 to Waste Knot in Arlintgon, VA where this piece was on display, I've always wanted to stitch it.  Finally, in 2012, I ordered the kit (painted canvas from Point Of It All and wonderful DMC Perle 5 threads) from Lori Maza, the proprietor.  My intention is to have it made into a pillow and give it to my DGD for her play/TV room.  She was visiting this week and helped me finish stitching the canvas by filling in the last 4 little chocolate kisses.  Now to shop for backing fabric and some really cool fringe.