Statcounter

Showing posts with label Sampler. Show all posts

Sunday, February 18, 2024

Spring Sampler - Updated 9/17/24

September 17, 2024--Won a 1st Place Ribbon in the Canvaswork/Needlepoint category at Rehoboth Beach Museum's 12th Annual Needlework Exhibition in Rehoboth Beach, DE.  So pleased.

February 18, 2024--Picked this up from the pillow fabricator yesterday and love how it looks sitting on an extra dining room chair.  The colors work perfectly with the furniture, wall paint and draperies. 
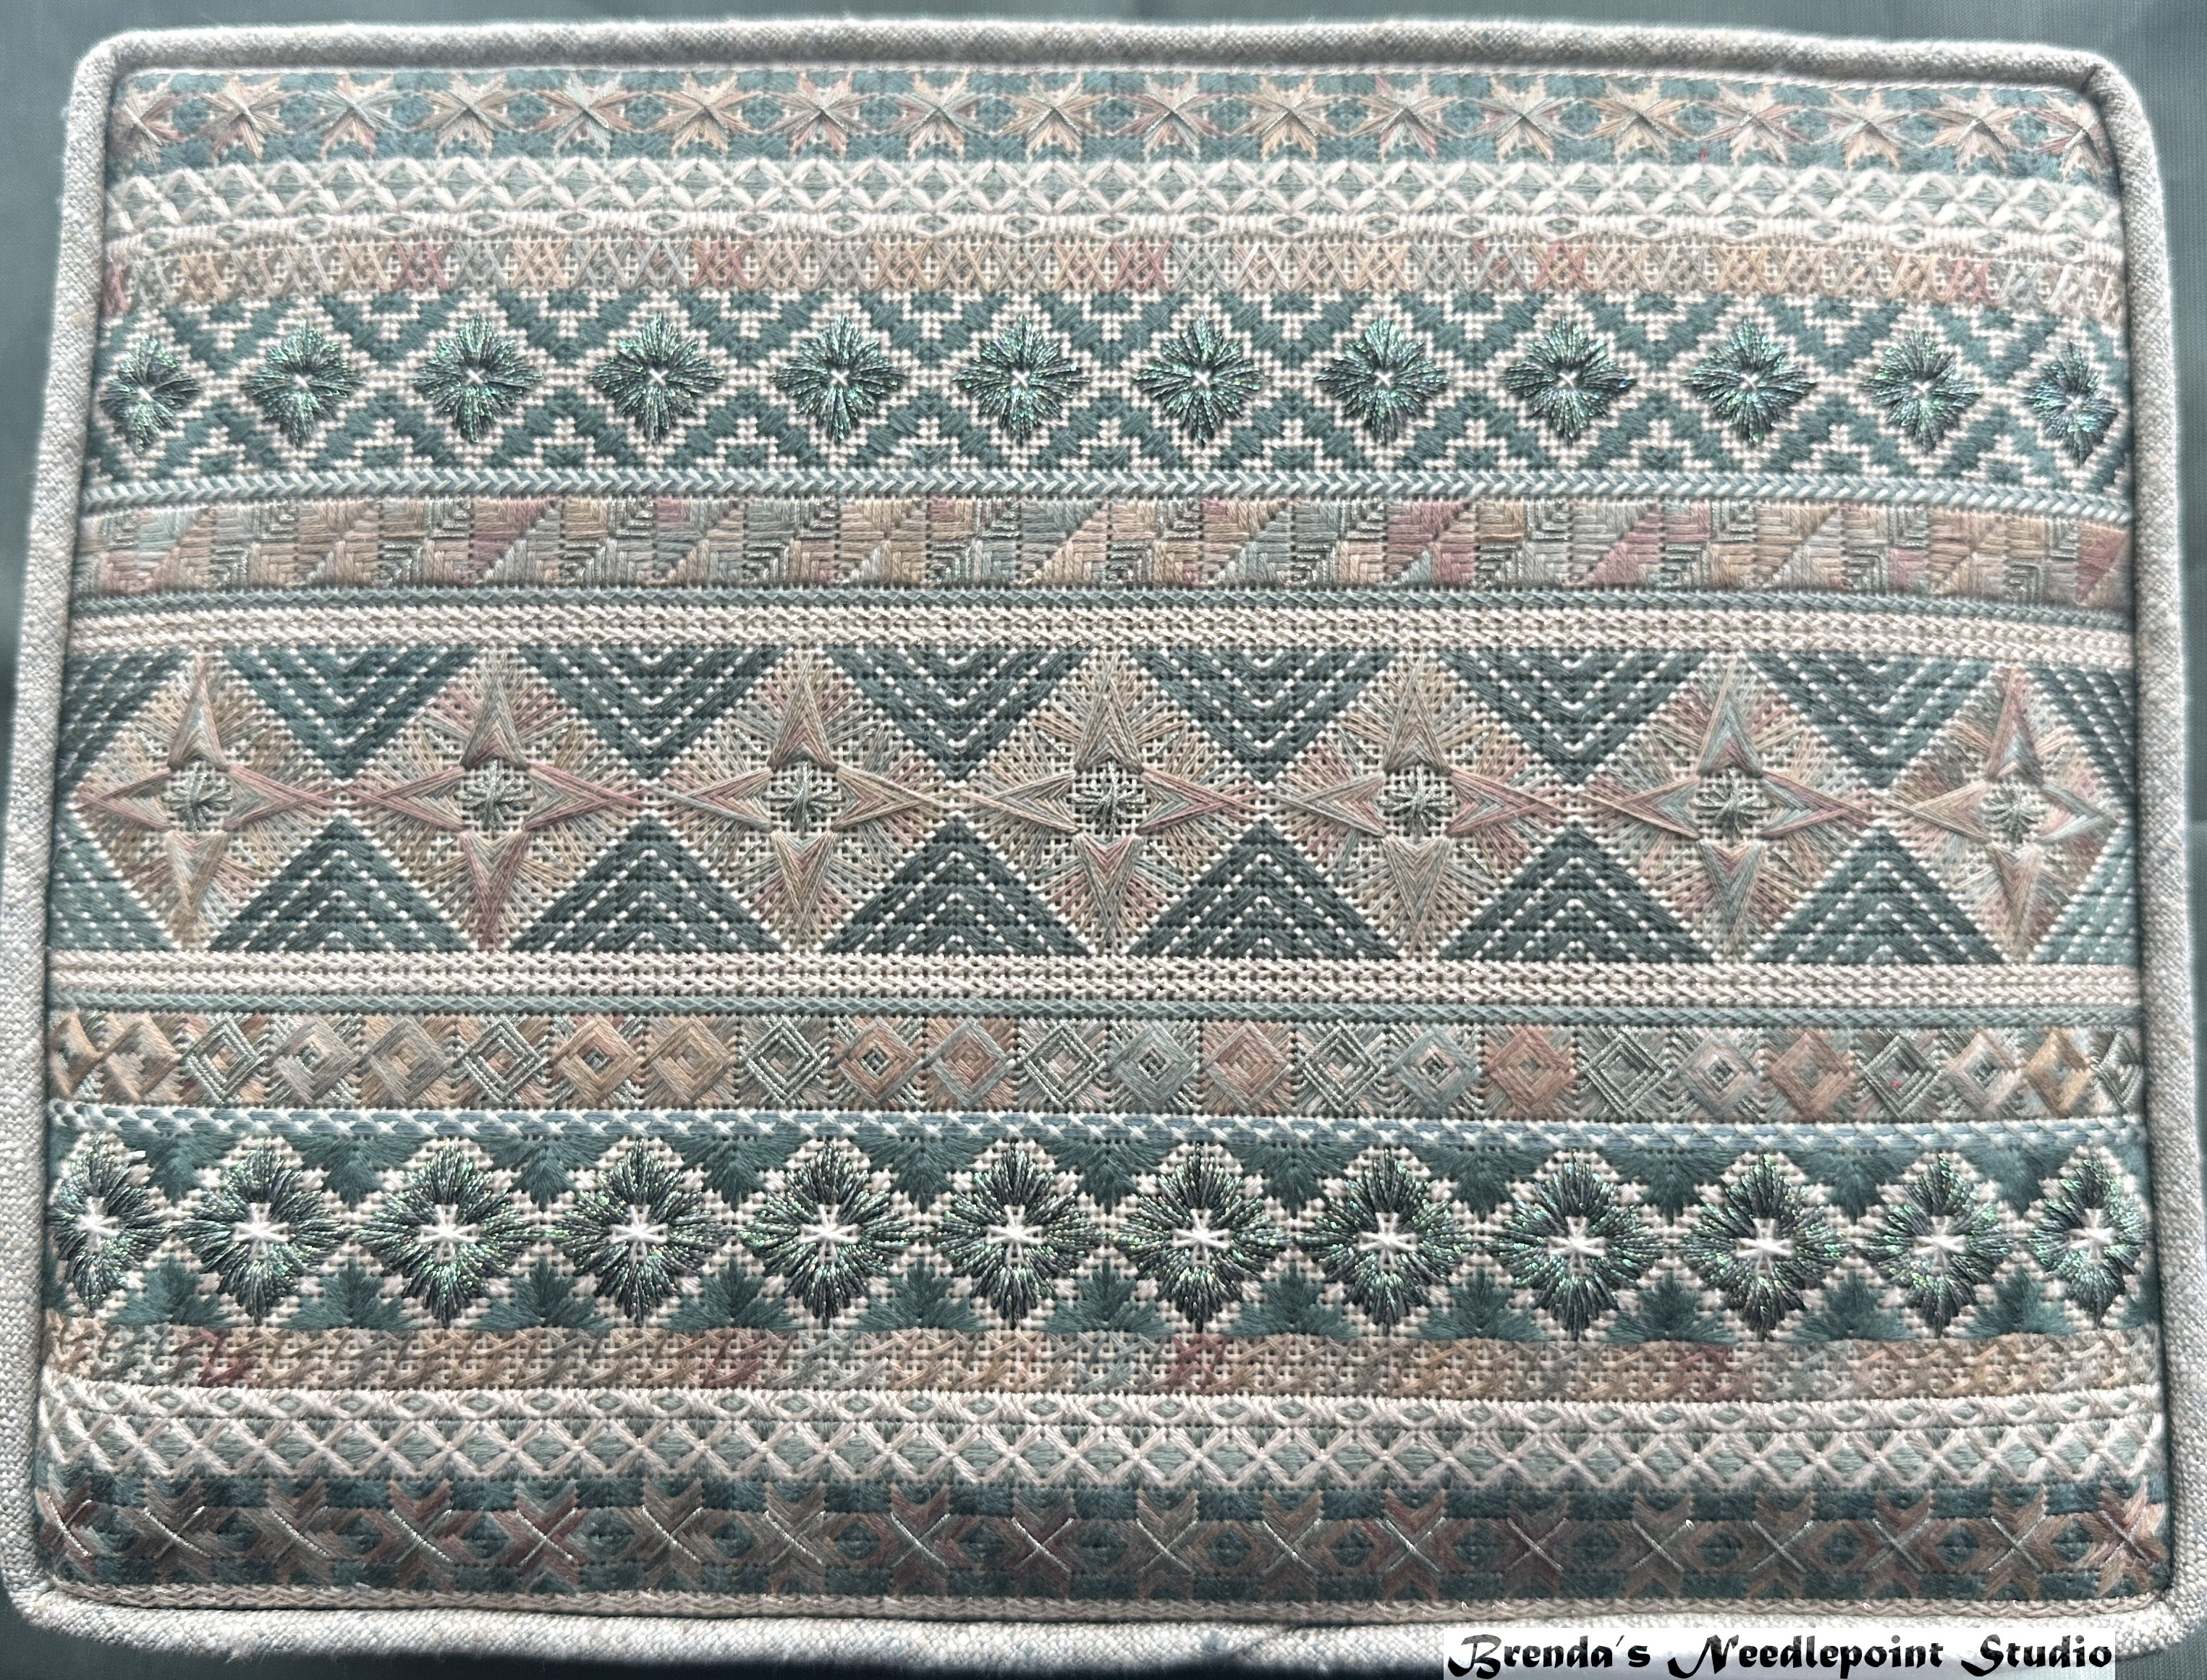

Spring Sampler Finished into a Pillow

Spring Sampler Pillow on a Dining Room Chair

January 22, 2024--The stitching is complete on all 21 bands.  Loved working on this project and I especially love the colors.  Next step is to meet with my pillow fabricator to determine what color will look best for the pillow back and whether or not she'll need a few rows of tent stitches around the edge so the canvas won't show. 

Scroll to the very end to see a full list of my threads used for each band as compared to those used by Melita.  Hope you will find this helpful if you decide to stitch this wonderful piece.

Spring Sampler Completed

January 6, 2024--Now thirteen bands are done, and each one complements the other beautifully.  I'm putting this project away so I can continue stitching on it at EGA's CampWannastitch in Ocean City, MD.  Stay tuned.....

It's interesting how different rows 6 and 16 look from each other because of the way my window light hits the canvas at a slant.   When all the stitching is done, I'll find another way to photograph this piece so the light shines evenly on it.

Spring Sampler Bands 5 through 17 Completed

December 29, 2023--Eleven bands are now stitched, and I love the colors.  As we work from the center outwards (in this case, up and down), Bands 6 through 16 are done.  

Spring Sampler Bands 6 through 16 Completed

December 12, 2023--When I took the photo below on November 1 that shows a partially stitched Band 6, I stopped working on it to confirm with Melita, the project's designer, that the thread used was too bright and light.  She agreed, and I finally had an opportunity to purchase a new thread color from Waste Knot Needlepoint in Arlington, VA on November 20th on my way to Thanksgiving in Ohio.

Sampler Spring Border 6 Question

After looking at all the ribbon-like threads, nothing struck my fancy.  Finally, I found the color Mermaid, #5009, by Kreinik.  Size 16 Medium Braid and it works perfectly--and I love the sparkle.  So, I put away the RG Sparkle Rays PS68 Light Sage for use in a future project.  Of course, I had lots of "frogging" to do and tucking away of tail ends, but I got it done in no time. Here's the result.

Spring Sampler Bands 6 through 15 Completed

The next Band, number 16, uses the same colors and similar patterns as in Band 6, That will balance the project nicely.  


October 10, 2023--I've now stitched seven bands (8 through 14) on this delightful sampler (about one-third done).   I want to take this with me to the New Jersey Needlefest event that takes place in a week and a half, so I'll hold off on doing any more until then.

Spring Sampler Bands 8 through 14 Completed

October 5, 2023--I couldn't resist starting this project instead of waiting for the class that begins later this month.  Melita's instructions are wonderful, so I haven't had any problems so far.

We are instructed to start with Row 11, the center row, then work our way north and south.  So that's what I've done, then I added the top and bottom Rows 10 and 12.  The colors are developing into an interesting combination.  Now I'm really looking forward to adding more rows to see how the colors play together.

Spring Sampler, Rows 10, 11, 12

September 9, 2023--I recently signed up to take Melita Glavin's Spring Sampler project (photo below) through my local EGA chapter at Brandywine (near Wilmington, DE).   This is an award-winning piece designed by Melita and I'm very excited to begin working on it.  

But first, choosing the threads.  This could have been a daunting task if it weren't for the fact that Melita, and her friend, chapter mate and stitcher extraordinaire, Linda M., were willing to meet with a few of us at Fireside Stitchery in Malvern, PA, only a 2.5-hour drive for me from southern Delaware.

I brought some fabric swatches and a paint sample with me upon which I would base my project's color palate.  Linda M. volunteered to work with me and I'm so glad she has the patience of a saint.  I just couldn't imagine how her suggestions would look and kept her constantly finding alternatives.   But in the end, everything came together and I'm very happy with the colors chosen.  Melita was also consulted on some of the color choices and thread substitutions and offered invaluable assistance.  All in all, a very fun day (almost as much fun as going to the casino).


My color palate (fabric and paint swatches from my living and dining rooms are on the right)
Spring Sampler Thread List Revised


And best photo of all--Melita's project photo (hers is done in purple):

Spring Sampler designed and stitched by Melita Glavin--Project Photo

Class will be held towards the end of October, but I may not be able to wait that long to start.
Thread List by Band and Stitch


2 comments:


MelitaJanuary 5, 2024 at 9:48 PM0

It's coming along really nicely. Love the new darker thread in Bands 6 and 16. Perfect! Can't wait to see it in person on the 17th. Don't forget to bring it!

Reply

Brenda M. CôtéJanuary 6, 2024 at 10:25 AM

Thanks Melita. I'll bring it to the meeting on the 17th and also to Camp Wannastitch.


Thursday, April 12, 2018

A Study in Rozashi--A Petite Imari Sampler - Updated 4/12/18

April 12, 2018--Finished this rozashi project into a little ornament.  Like how it came out.  I'm hanging non-Christmas type ornaments like this in my new all wood dressing closet by Closet Works.  They look sweet hanging from the sides of the supports.

Rozashi Imari Sampler Finished as an Ornament


December 3, 2017--Finished lessons 3, 4 and 5, completing all the stitching.  These sections are called Kaku (upper left), Tortoise Variation (upper middle) and a pattern with no name (lower right).  Margaret advised us to be frugal with the use of the kitted threads since we could run out if mistakes were constantly made.  Well, I took that advise to heart and was careful to place the stitches correctly.  In the end there was plenty of thread left.  Of course, there were mistakes that had to be ripped out, but fortunately, they were small ones. 

Rozashi consists of vertical stitches over horizontal threads and I found this type of work to go very quickly.  Will now look for similar projects using this method.

This will make a lovely framed picture for my in-home office.

Rozashi Imari Sampler Completed Closeup

Rozashi Imari Sampler Completed
November 29, 2017--Lesson 2 for sections called Tortoise and Daiya is now done.  More challenges with all the compensation that's needed.  Still enjoying this project.  Working on such a small canvas, however, does require good magnification.  Glad for my mageyes.  It's also a good thing that this is worked "in the well" so to speak (canvas is attached in back of the wood holder).  I'm stitching right to the edge of the wood and it's easy to end threads on the back because there's nothing in my way.

Rozashi Imari Study Lesson 2 Tortoise and Daiya Closeup

Rozashi Imari Study Lesson 2 Tortoise and Daiya

November 27, 2017--Lesson 1, section called Diamond Flower, is done.  This was a bigger challenge than expected.  Margaret Kinsey instructed us to stitch in a diagonal direction when working the light peach area.  Because of all the compensation stitches, I found that hard to manage, so I stitched along the horizontal line.  I don't think it changed the appearance that much.

Love the shine of the silk threads.

Rozashi Imari Sampler through Lesson 1 Diamond Flower Closeup

Rozashi Imari Sampler through Lesson 1 Diamond Flower


November 12, 2017--Last June I signed up to take this class through ANG's online chapter called CyberPointers.  The lessons were held during the chapter's November meeting and I'm loving it.  I'm still working on Lesson 1, but can see how beautiful this little sampler is going to be.

The working surface is very different from the mono canvases to which we're accustomed.  Rozashi stitching is done on starched silk gauze material called a "ro".  There are 3 horizontal threads, called "dan" that are woven very close together and are considered as one thread for stitching.  This causes an elongated vertical stitch.  A very pretty effect.  The "ro" is glued to a thin wood frame and all stitching is done "in hand"--no floor or table stands needed, at least not for a project this small.  And the twisted silk threads are scrumptious.  They reflect so much light.

I'm even learning to count up to three in Japanese.  Ichi is one, ni is two and san is three.  This count is important as all stitches are done over ichi, ni or san dan.    Margaret Kinsey's instruction booklet is wonderful and the added lessons through CyberPointers are very helpful.

Here's what I've done so far.

Rozashi Imari Sampler through 11/12/17

Closeup of the "dan" row of a "ro" canvas


Saturday, June 18, 2016

18th Century Sampler by SJ Designs - 6/18/16

June 18, 2016--Have been wanting to stitch this beautiful sampler ever since I read about it on other needlepoint blogs.  It has all the elements I love--beautiful design, challenging stitches, perle threads, etc.   So I ordered it from SJ Designs and a few days ago received the kit and prework instructions.  I managed to stitch the middle section and that's all that will get done until the class starts July 1st, or whenever I receive the instruction manual in the mail, whichever comes first.  I hope to keep up with the class, but with all the traveling DH and I will be doing (most of July, lots of August, September and October), it looks dubious.

I chose to stitch this with ecru perle on 24 ct. eggshell canvas.   Susan has set up a Facebook page for those participating in this project to share their progress and ask questions.

18th Century Sampler through 6/18/16

18th Century Sampler by SJ Designs Project Photo

Saturday, April 30, 2016

Summer Solstice Sampler - Updated 10/10/16

October 10, 2016--Had this framed at my local Michael's Arts & Crafts and am very pleased with the results.  The frame looks "antique" and the two mats are perfect with the linen.  Looks very colonial.  However, my house is not colonial so the sampler will be relegated to dress up my craft room.


April 30, 2016--My first cross stitch sampler is completed and I thoroughly enjoyed this quick and easy piece.  Using my new MagEyes made the job so much easier on my eyes.

One change I made, however, was deciding not to continuing to stitch "in hand" and to mount the linen on stretcher bars.  What a difference!!!  I was able to stitch more quickly without worrying about warping the fabric or getting it wrinkled and dirty.  Here's the results.....


Summer Solstice Sampler Completed

Summer Solstice Sampler Mounted on Stretcher Bars
March 9, 2016--Our March, 2016 member led project at the ANG Delaware's Seashore Chapter meeting was Summer Solstice Sampler by Sally Ann Designs.  I understand this is second in a series of four seasonal samplers and a companion piece to "Winter's Whisper Sampler", another beautiful sampler done in pale threads.

I've never worked on a cross stitch sampler and this is a beautiful introduction which includes a variety of stitches.

I'm working "in hand" on 32 count linen using 1 strand of Caron Waterlillies over 2 threads in a darker, less variegated color than that used by the designer.  My magnifying glass is going to be an eye saver while working on this piece.  Below is my progress to date.

Progress at 3-9-16


Saturday, March 15, 2014

Asian Journey

March 15, 2014--Recently signed up to take Judy Souliotis' online class through Shining Needle Society called Asian Journey.  Class will run April 15 through July 31, 2014.  It's a beautiful piece on congress cloth and I chose the blue colorway.  Am not sure if I will stitch the sedans throughout the piece or chose the alternate design (both shown below).
Asian Journey Project Photo

Asian Journal Alternate Project Photo

Friday, August 16, 2013

ANG's 40th Anniversary Sampler Synchronicity Updated 3/20/14

March 20, 2014--Won 2nd Place Ribbon in the sampler category at the Rehoboth Beach Museum 4th Annual Needlework Exhibit.

August 13, 2013--The sampler is now framed.  It's big--33" long by 17.25" wide.  Love it.


August 1, 2013--The sampler is finished and off to be framed!  This was so much fun to complete and fellow chapter members who also worked on this project shared many helpful hints.  Will post a new picture of the sampler when it's back from the framer.


In prior posts (written below), I wrote about not wanting to do Band 7, called the Contemporary Drawn Thread Band, as instructed by Catherine Jordan, feeling that it was a little too "helter skelter" for my tastes.   Not knowing how to handle the three blocks in this band, I purchased a book titled BEGINNER'S GUIDE TO DRAWN THREAD EMBROIDERY by Patricia Bage, Search Press Ltd., 2011.    Perfect.  Her instructions and photographs are so clear and sample projects so beautiful, I now want to do more of this type of work.  Below are pictures of the band as I stitched it and another as designed by Catherine Jordan.

PS  When cutting out the horizontal threads, I held my breath to keep from shaking the scissors and clipping the wrong thread.  Success.

Band 7 Completed

Band 7 as Designed by Catherine Jordan

July 9, 2013--Added beads to Bands 1, 8 and 11.  Still thinking about what to do with Band 7.  Stay tuned.
Band 1 With Beads
Band 8 With Beads
Band 11 With Beads


July 3, 2013--Band 18 is now complete.  Almost done with this sampler---Band 7 needs my attention. The original design by Catherine Jordan is called Contemporary Drawn Thread, calling for threads to be cut and wrapped together in what I consider to be a helter-skelter manner.    Will be doing further research on what do to with this.

Band 18--Liberty ANG designed by Ro Pace


June 24, 2013--Band 17, designed by Mary K. Campbell, is done.  I used beads from my stash rather than what was suggested.   One more band to stitch on the bottom then I must concentrate on what I'll do with Band 7.

Band 17--Beaded Pins designed by Mary K. Campbell


June 19, 2013--Another band completed, this one designed by Pat Mazu.  Really like this project.  Each band is so different from the other that it's like starting a new project each time--boredom never sets in.

Band 16--Butterflies designed by Pat Mazu


June 17, 2013--So far I've completed 15 bands of ANG's 40th Anniversary Sampler Synchronicity.  In October, 2012, our local Seashore Chapter took this on  as a group project.   I chose colors in the burgundy, Williamsburg blue and tan families.  Plan on hanging it in my home office when done.  Below are pictures of the bands stitched to date.  Note:  I will not be stitching Band 7 as shown in the lessons, but instead will do some research on cut thread patterns and do something more traditional.  Some of the bands need beads which will be added last.  This has been lots of fun to do while being very educational at the same time.

Band 15--Goldwork designed by Michele Roberts


Band 14--Pulled and Drawn Thread designed by Pat Donaldson


Band 13--Bowties and Stars designed by Janet Zickler Casey


Band 12--Realistic Shading by Sandy Rogers


Band 11--Jean Hilton designed by Jim Wurth


Band 10--Composite Pattern designed by Margaret Bendig


Band 9--Nami Pattern designed by Margaret Kinsey


Band 8--Beaded Heart designed by Nancy Cucci


Band 7--Contemporary Drawn Thread designed by Catherine Jordan (to be completed at a later date)


Band 6--Blackwork designed by Carol Algie Higginbotham


Band 5--Red Ruby Roses designed by Sandra Arthur


Band 4--Geometric designed by Susan Reed


Band 3--Camellia designed by Cara Hayes


Band 2--Pattern Couching designed by Carlene Harwick


Band 1--Couching designed by Joni Stevenson