Statcounter

Monday, December 7, 2015

Star Crossed Ornament Updated 12/7/15

December 7, 2015--Finished these "stars" into two ornaments.  Love how they came out and they are quiet large--5.5" in diameter.  One of these ornaments will be part of my ANG Delaware's Seashore Chapter's Holiday Lunch and Ornament Exchange which is taking place today.  Hope the recipient likes it.   Tried something a little different for my signature on the back's red velvet fabric.  Just initials with the date (done on my Bernina sewing machine).  Like how it came out.

Star Crossed Ornaments Finished


Star Crossed Ornament Back
August 31, 2015--Completed all the stitching on the five arms and outlined the star with red Kreinik thread.  I like how the Kreinik seems to hide irregularities in stitch compensation along the diagonal lines.  The green basting thread will assist me in finishing the star as a round ornament.  Instead of adding stitches to the star's background, I'll back the canvas with a shiny white fabric since the canvas itself has opalescent threads running through it (can't see it in the pictures).  I'm very pleased at how well it came out.

Completed

Fifth Arm Complete

August 26, 2015--Moving along nicely--fourth arm completed.  Stitching two of these ornaments at the same time, so it's taking time to do each section.  The compensation stitches aren't easy to do along the diagonal lines of the star and I'm constantly aware of the chance to "over stitch" a pattern.

The project photo (first picture below) shows this as a round ornament with no background stitching.  I'm thinking of doing a light coverage darning pattern using a very shimmery thin thread in the background.  Hmmm....will have to play with that idea.

Fourth Arm Completed
August 18, 2015--Third arm of the star is completed.  Compensating the stitches along the angle of each arm is a challenge and I may have to outline each arm to cover up discrepancies and other irregularities (LOL).

Third Arm Completed
August 12, 2015--Second arm of this delightful ornament is stitched.  Looking forward to seeing how the colors will look when the third arm is done.

Second Arm Completed
August 7, 2015--The basting and first arm of the star is stitched.  There was lots of basting, but it was necessary to properly line up the inside and outside points of the star.  Also makes a nice guide for compensating.  Susan Jones, however, has written very detailed instructions on where to place the basting stitches and how to compensate the complicated stitches in each star arm, so very little has to be decided upon.  Easy, peasy :-).

Basting

First Arm of the Star Stitched

August 4, 2015--Started stitching Susan Jones Star Crossed ornament.  This project is from the July/August issue of Needlepoint Now magazine and the challenge of variations and compensation stitches is right up my ally.  Below is a project photo.  In process pictures will be posted as each arm of the star is stitched.

Star Crossed Ornament Project Photo

Tuesday, November 17, 2015

Road Trip to the Needlearts 2015

November 15, 2015--I just returned from a wonderful weekend of stitching and camaraderie at the 20th Annual Road Trip to the Needlearts Retreat sponsored by SSP (Stitching Sisters Presents).


The three "sisters", pictured below from left to right, are

  • Cindy Knowles of The Hang Up in Sterling, VA
  • Ellen Meyer of In Stitches Needlework in Alexandria, VA
  • Michelle D. Arsenault of Michelle Ink Designs in Laurel, MD

I had the good fortune of sitting with these terrific ladies as well as (from left to right), Patty Yergey, Needlework Designer of Samplers Revisited, Patricia Eaton with In Stitches and Wanda Kellum.


We wanted for nothing all weekend.  The hotel was very comfortable and the stitching lounge was airy, spacious and well lit.  We were fetted with a reception on Friday and a catered dinner on Saturday.   The three "sisters" also had a boutique open with all types of needlework goodies to purchase.   And the stitching--so many beautiful projects being worked on by all of the participants.  The weekend also included a trip to see the Needlework Exhibit at Montpelier Mansion.  

The coordinators are thinking about holding the next retreat in March, 2017 to coincide with the Woodlawn Needlework Exhibit in Alexandria, VA.  Looking forward to that one!

Thursday, October 22, 2015

Silver Bell Santa Updated 10/22/15

October 22, 2015--Finally finished stitching this delightful santa.  There's lots of dimension on this santa as can be seen in the second picture (but the beads aren't showing).  Will eventually have this santa and others made into ornaments.  How adorable they'll look on my tree.

Silver Bell Santa Completed


Silver Bell Santa Completed Side View

July 29, 2015--Along with the hat, all of santa's hair is stitched--beard, mustache, sideburns and eyebrows.  The last thing to do is the fur on the hat.  The beard is very shiny and had to take a side view so the beads would be visible.

He's a cutie.

All Hair Stitched

Side View of Beads in Beard
May 11, 2015--Signed up to take this class from the Shining Needle Society in December, 2014 and am just now able to work on it.   Only the face has been stitched, but it's nice to see santa "come alive".  Love these Janet Zickler Casey santas--they are fast to stitch and Janet's instructions are so easy to follow.
Face Completed

Tuesday, October 20, 2015

Beachcomber's Booty - Updated 3/16/16

March 16, 2016--Won 3rd Place Ribbon for Canvaswork at the Rehoboth Beach Museum 6th Annual Needlework Exhibit.

March 7, 2016--Placed this project into a 6.5" box top with an antique finish white paint.  Love it.

Beachcomber's Booty Box Top

October 20, 2015--Finished this beautiful project and will now shop for a box with an insert top.   Enjoyed seeing how easy the blackwork stitches were to execute.

Beachcomber's Booty Completed


October 7, 2015--My local ANG chapter, Delaware's Seashore Chapter, was fortunate to have Ann Strite-Kurz teach us a class called Beachcomber's Booty.  It's a beautiful sand dollar design (it's our chapter's logo).

Below is a picture of my project so far.  It's fun to work these beautiful stitches and I hope to have it done this month.

There's a story behind this.  Linda,  another chapter member, and I took a class from Ann at the 2012 Philadelphia ANG Seminar.  While there, Ann told us about her beach house in Rehoboth Beach, DE.  We asked Ann if she would be willing to teach a class when in Delaware and shared contact information.  Well, earlier this year she wrote to say she would be here in October and asked if we were still interested in having her teach a class.  We answered with a resounding yes, yes, yes!

Ann brought some examples of her pieces along with anything we wanted to purchase (saving us lots of shipping costs).  We drooled over her techniques and marveled at the results.

Thank you Ann for a wonderful learning experience and we'll have a beautiful project when done.

Beachcomber's Booty in Process at 10/7/15


Thursday, September 10, 2015

Namaste Cases

September 10, 2015--I like needlepointing in the car and found it difficult to have tools at my fingertips.  Attaching them with magnets to a metal board worked well, but then had to insert the whole board into a bag to keep the items from detaching themselves when put away.

Then I found these delightful Namaste magnetic cases.  I purchased two in the eggplant color--one large for traveling, the other to keep the "smalls" in one place while in my happy chair at home.  The large one is perfect.  I'm able to place many tools in the bottom section of the case and keep my needles nicely organized and protected under the flap in the top portion.

Large Case Opened - Bottom (my ort box is on the right)

Large Case Opened - Top

Namaste Magnetic Cases - Large and Small

Small Case Opened - Bottom

PS  The needle guide attached to the insert of the large case is from The Needle Index, 1996 Valley Quail Chapter, EGA Walnut Creek, CA


Friday, September 4, 2015

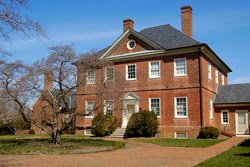
Montpelier Mansion Needle Art Exhibit Updated 9/4/15

September 4, 2015--Just received information about this year's Needle Art Exhibit at Montpelier Mansion, Laurel, MD in November, 2015.

It's a beautiful venue for displaying needlework and I'm looking forward to this year's exhibit.

Montpelier Mansion, Laurel, MD


November 24, 2014--Recently visited the Montpelier Mansion in Laurel, MD to see their 19th Annual Needle Art Exhibit which runs from November 1 through November 30, 2014.   I was joined by a co-member of the ANG Delaware's Seashore Chapter and we were amazed at the number of beautiful samplers displayed, but dismayed at the very few needlepoint pieces (less than 5 from what we could tell).   The samplers, however, were so wonderful that I'm seriously considering doing one.  A trip to In Stitches in Alexandria, VA is in order.

Fortunately we met the organizer for this event and she told us that needlepoint exhibits are most certainly welcomed and was pleased to learn that our Delaware chapter members would be very interested in exhibiting our pieces at Montpelier next year.  The entry fee is $5 per item and there is no limit to how many pieces you can exhibit.   I for one love the venue.


Wednesday, August 19, 2015

Pumpkin Coasters in Reversible Cross Stitch Updated 8/19/15

August 19, 2015--Stitched the border on the second set of coasters--a gingham pattern in black.  Love how well the technique is working.  The below pictures show front and back of two coasters.  Next step--stitching the cute pumpkins.


Second Pattern Front

Second Pattern Back

August 9, 2015--Signed up to take Catherine Jordan's online class through the Shining Needle Society (SNS) called Reversible Cross Stitch Pumpkin Coasters (project photo below).  There are four coasters to stitch with floss, in two different patterns, on Zweigart Biella 28 count fabric.

Yesterday I began to stitch the outline of one of the designs and discovered early on that I had to increase the magnification of my glasses.  Doing so made a tremendous difference in the quality of my stitches.  The technique learned is a challenge, requiring full attention to each stitch.  Catherine's instructions, however, are wonderful and she even included a password to access a special online, very, very helpful, video to see how the stitches were done.

I also had to zigzag the edges to keep the fabric from unraveling.  Why zigzag using red thread?  It's what was on my sewing machine and I was too lazy (lol) to change the thread.

The whole idea of the technique I'm learning is for the cross stitches to look the same on the front and back.  I've somewhat succeeded with doing this, but hiding beginning and ending threads is still a bit of a challenge for me.  The idea is to NOT have the tails showing under the cross stitches on either side.   Getting there.

First Pattern Front

First Pattern Front Closeup

First Pattern Back

Second Pattern Back Closeup (note:  logo makes the bottom stitches look incomplete)

Catherine Jordan's Reversible Cross Stitch Pumpkin Coasters Project Photo


Tuesday, June 2, 2015

Paper Clips Embellished 6/2/15

June 2, 2015--I love these dressed up paper clips and want to thank Funk & Weber Designs for their fun tutorial.

I did take the liberty, however, to make a few changes and/or additions as noted in the instructions below:


Supplies:  18 count Interlock canvas
                  Caron Watercolours (1 strand)
                  Paper Clips 2" long


1.  For each clip, cut the canvas - 44 threads wide by 16 threads high.


2.  Stitch 8 smyrna crosses beginning 6 threads up and over from the left (you will have 6 blank threads on the top, bottom, left and right sides of the smyrna crosses.


3.  Fold each canvas edge at the third thread on all sides.  The pictures below show how the fold is made (front and back) and the pin "marks the spot".


The picture below shows all four sides folded to the back leaving 3 threads in the front and 3 threads folded back

Front Side

Back Side

Step 4.  Satin stitch over 2 threads (leaving far edge thread unstitched on all sides) around the smyrna crosses, being sure to cover the long sides of the paper clip.  Pictures below show front and back of the covered paper clip.  Be sure to leave the rounded edge on the short side of the paper clip unattached as shown.


I now want to play with dressing up the edges, possibly add a raised stem stitch, etc.  


Wednesday, May 27, 2015

Magnifying Glass - A Must Have Tool

May 27, 2015--A month or so ago I purchased a Naturalight magnifying glass that has an LED light and a large enough clip to fit and hold tightly unto evertite stretcher bars.  It also has two swing out "legs" on each side so it can sit on a table top.


At first I thought I would only use it for the smallest of stitches on congress cloth, but now I want to use it all the time.  My current project is on 18 count dark blue canvas, stitching with dark blue threads, and the new magnifying glass is proving invaluable.  The photo below shows how well it magnifies.  You can even see the inset lens enlarging a portion of the snowflake .  I'm hooked!

PS  I've been warned to keep a cover over the glass when not stitching to avoid burns.  Now I'm remembering grade school experiments using magnifying glasses and how quickly something can be set on fire.


Tuesday, May 5, 2015

Drawn Thread Class 5/5/15

May 5, 2015--I was privileged to give a class to the members of the ANG Delaware's Seashore Chapter on canvas drawn thread work.  Below are the instructions I put together to do a simple four box project.  If you would like to learn more about drawn thread work, please feel free to follow the lessons and send me your questions via the comment section at the end of this post.  Have fun.

Boxes 1 through 4 Completed
Steps 1 and 2 - Supplies List along with Basting and Satin Stitches for Boxes 1 through 4:

Instructions for Steps 1 and 2 - Basting and Satin Stitch for Boxes 1 through 4


Step 1 Basting Completed


Step 2 Satin Stitches for Boxes 1 through 4


Step 3 - Drawing or pulling canvas threads from each of the four boxes.  

Begin with Box 1, clip 14 threads between the horizontal basting lines on both sides of Box 1.  Move scissors as close to the satin stitches as possible.  There will be two horizontal threads uncut on both the top and bottom of Box 1 for placement of the Zig Zag Hemstitch.


After cutting, begin to loosen each thread by pushing it down with a needle.  This may be difficult because of the sizing or glue on the canvas which keeps it stiff.  It gets easier as more threads are removed.


As each horizontal thread is loosened, pull it out with tweezers


This is what Box 1 looks like after all the horizontal threads have been drawn or removed.


For Box 2, count down 2 horizontal canvas threads from the top basting stitches and clip 10 horizontal threads from both sides of the box, leaving 2 horizontal canvas threads above the basting stitches at the bottom.

For Box 3, use the same instructions as for Box 1.

For Box 4, clip 5 horizontal threads below the top basting line, then clip 5 horizontal threads above the bottom basting line on both sides of the box, leaving 4 horizontal threads in the middle of the box.

Below is what Boxes 2, 3 and 4 will look like after drawing threads from each


Step 4 - Box 1 - Zig Zag Hemstitch


Step 4 - Box 1 - Zig Zag Hemstitch


Box 1 Completed - Zig Zag Hemstitch

Step 5 - Box 2 - Four Sided Hemstitch and Coral Knot

Step 5 - Box 2 - Four-sided Hemstitch and Coral Knot


Box 2 - Four-Sided Hemstitch Completed

To stitch the Coral Knot, begin on the right side.  Insert needle under the first two vertical canvas threads, wrap your stitching thread around the needle (see second picture below) and pull the two vertical canvas threads over as far as possible to the left side.

Next step is to again insert your needle under the next two vertical canvas threads as well as the two vertical canvas threads in the next group of four.   Wrap your stitching thread around the needle (see second picture below) and pull.  This will now form a cluster of four vertical threads (two from the previous group and two from the next group).


Box 2 - Coral Knot - Step 1

Box 2 - Coral Knot - Step 2
Box 2 - Coral Knots Completed

Step 6 - Box 3 - Hemstitch Over 2 Threads with Beads

Begin stitching the Hemstitch on the left top side over two canvas threads.  Stitch the bottom beginning on the right over two canvas threads.

Box 3 - Hemstitch Over 2 Threads
To add the beads, secure your stitching thread in the middle of the right side (under the satin stitches), slip a bead onto your stitching thread then insert your needle behind the next four vertical threads (forming a cluster).  

Box 3 - Beads - Step 1
Then insert your needle up between the four vertical threads in the cluster (two vertical threads on each side), keeping your stitching thread above the needle.  

Box 3 - Beads - Step 2
Now pull your stitching thread tightly, forcing the left two vertical threads to lie over the right two vertical threads as shown below. 

Box 3 - Beads - Step 3
Continue adding beads and working the stitch until there are no more vertical canvas threads to wrap.  Add a bead to the left side before anchoring your stitching thread to the back of the satin stitches.

Box 3 - Beads - Completed
Step 7 - Box 4 - Hemstitch and Herringbone Stitch

Box 4 - Herringbone Stitch Chart

Box 4 - Hemstitch and Herringbone Stitch Completed

That's it.  I hope these instructions were clear.  I am not a teacher by profession and am not sure if I've over done it or didn't do enough instructions.

I want to reference the Beginner's Guide to Drawn Thread Embroidery by Patricia Bage as a wonderful resource for drawn thread work.