Statcounter

Tuesday, December 17, 2013

Halloween Treat Updated 10/29/14

October 29, 2014--Back from the framer just in time for Halloween.

Halloween Treat Framed


December 17, 2013--Found these non-scary cuties (buttons and witch applique) while at Britex in San Francisco, CA, to place onto Halloween Treat.  Now to decide whether or not to have this project framed or simply backed with fabric and an easel.

Halloween Treat Decorated
August 23, 2013--This little bit of scariness is done.  Love the ghost and bargello sections.  Now to find the most frightening buttons possible to place in three of the areas filled with scotch stitches.  If the best buttons have shanks, I can cut them off with wire cutters and secure them to the canvas with stitches around small parts of the design.  Would love to find a little, dangly skeleton.


August 17, 2013--Started working on this delightful Halloween Treat after our ANG chapter met on Monday and went over all of the sections.  Thank you RJ for a wonderful job in highlighting areas which will require some attention.  We started with Area 2 shown below.  It's unfortunate the camera doesn't pick up the shine of the RG Petite Sparkle Rays used for the ghost.  It looks like he's shimmering right up to you out of the background.

Area 2 of 13
July 8, 2013--Delaware's Seashore Chapter of ANG is doing Marilyn Owen's Halloween Treat, taken from the most recent Chapter Project Book.  Before we can have our class at the August meeting, we were assigned prestitching of the outline.  Had to concentrate on my stitching at each intersection--the gobelin stitches are over two except at the intersections where some were over 3 (avoiding a lot of over one compensation).   Looking forward to getting this completed in time for Halloween.


Saturday, December 14, 2013

Holiday Wreath by LJP Designs

December 14, 2013--Just purchased the instructions for Laura J Perin Designs Holiday Wreath.  Her blog just announced it's availability and what a beautiful project.  Don't know when I'll be able to begin working on this, but will plan for sometime next year.

Holiday Wreath Project Photo from LJP Designs

Tuesday, December 10, 2013

Bargello Ribbons Ornament Updated 12/10/13

December 10, 2013--Below are pictures of the finished results.  Made two ornaments--one for me to practice finishing techniques and the second for the ANG Delaware's Seashore Chapter Holiday Lunch and Ornament Exchange on December 9th.  This was the first time "stuffing" an ornament and I found it much easier than glueing canvas and fabric around poster board.  I hand stitched the trim along the edges, but next time will try using my brand new glue gun to attach trim.  A fun project all-in-all.

Front

Back


October 1, 2013--Have begun stitching Liz Morrow's Bargello Ribbons Ornament published in Needlepoint Now magazine, September/October, 2013 issue.  This will be part of Delaware's Seashore Chapter's Holiday Ornament Exchange in December, so pictures of the finished project will not be posted until after the exchange.  But I can show the colors I've chosen below.   The RG Patina, Renaissance Green, was a table favor at the 2012 ANG Seminar Banquet and it is beautiful in this project.  The blue/green Kreinik found in my stash is called Peacock, a perfect match for the green Threadworx Floss.


Bargello Ribbons Ornament Project Photo from Needlepoint Now Magazine

Saturday, December 7, 2013

Paper Gift Box Tutorial

Paper  Gift Box Tutorial
(My Holiday Gift to You)


December 7, 2013--The instructions below are for making a paper gift box, top and bottom.  These little boxes are wonderful for holiday ornaments, etc. and can be made out of festive papers (thick type).  

1.  You’ll need 2 equal size pieces of scrabbooking paper, scissors, pencil and a long ruler.  Remove ¼” from 2 sides of the sheet you want to use for the box bottom.  The rest of the instructions are the same for both the box top and bottom.


2.  Draw 2 lines from corner to corner, intersecting at the middle.  Be as accurate as possible.


3.  Fold each corner towards the middle intersection, wrong sides together.


4.  This is what it looks like when all 4 corners are folded towards the middle


5.  Fold each point back on itself towards the box edge, right sides together


6.  This is what it looks like when all 4 points are folded back


7.  Open out all the folds as shown below


8.  Now fold each point to meet the 2nd fold on the wrong side.  Do 4 times.


9.  Open up all the folds.


10.  Make 4 cuts on 2 sides ONLY.   The 2 cuts on each side should be 3 folds deep (from the points) on each side of the center line.


11.  .Fold the uncut point into the shape of a box side.


12.  Fold other uncut side into a box shape.  It will look like the picture below


13.  Now fold the 2 cut sides into box shape.


That's it.  Wrap some ribbon around it, attach a pretty bow, and you're done.  I hope you enjoy making this little gift box and let me know if you have any questions.

Wednesday, December 4, 2013

Stitches for Effect Classes - Menagarie, Sky's the Limit, Quilting Bee

December 4, 2013--Recently I signed up to take three more online classes from the Stitches for Effect ladies, Beth Robertson and Suzanne Howren, through the Shining Needle Society.   They are:  


Menagarie
Sky's The Limit
Quilting Bee
I love these classes and have learned so much about threads, their uses, various stitches, when used, etc.  I've got a binder filled with examples and refer to it often.  

Follow this link for an earlier blog about other stitch classes taken.


Monday, December 2, 2013

Blog Now on Facebook

December 2, 2013--I've recently added my blog as a "Page" on Facebook called:  Brenda's Needlepoint Studio Blog.  If you don't enjoy using a reader to follow blogs and are currently on Facebook, please look up my Facebook page and click "Like".  You will then automatically receive updates.  My Facebook family and friends can now see what I'm up to in the needlepoint arena without having to wade through all my posts.

Hope you like it.

https://www.facebook.com/pages/Brendas-Needlepoint-Studio-Blog/597834713603876?ref=hl


Sunday, December 1, 2013

SOTM 2013 Updated 10/29/14

October 29, 2014--Love the framing.

Stitch of the Month 2013 Framed

December 1, 2013--There's nothing more to add for December, so I'm done!  Now to see what my framer can do.

November 8, 2013--The November lesson is done.  I like the chain pattern, but am not sure how I like the colors.  The two narrow edges are now lost.  Looking forward to the final lesson in December.

SOTM 2013 November
October 6, 2013--October stitching is now complete and I love how nicely the gold diagonal back stitches fill in the empty space.  Now I'm wondering how the canvas will be stitched between the two outside borders.


September 4, 2013--The lesson for this month is done.  It's looking very pretty.  Looking forward to what the next three months will bring.


August 16, 2013--I have been asked to list the colors used in this project.  Below are my DMC selections:

-----------------------------------------------------------------------------------------------------------------------

Original Thread Type Amount for Congress Cloth Thread Selection and Color
Kreinik 1/16" Ribbon  1 spool Vatican Gold #102
Keinik #4 Braid 2 spools Vatican Gold #102
Need 3 color families
Main Color - 5 Values Blues
Dark 3 skeins DMC 311 Md Blue
Medium Dark 1 skein DMC 312 V Dk Baby Blue
Medium 1 skein DMC 322 Baby Blue
Medium Light 1 skein DMC 334 Md Baby Blue
Light 1 skein DMC 3755 Lt Baby Blue
Second Color - 4 Values Pinks
Dark 1 skein DMC 3721 Dk Shell Pink
Medium Dark 1 skein DMC 3722 Md Shell Pink
Medium Light 1 skein DMC 223 Lt Shell Pink
Light 2 skeins DMC 224 V Lt Shell Pink
Accent Color - 3 Values Beiges
Dark 2 skeins DMC 840 Md Beige Brown
Medium Dark 2 skeins DMC 841 Lt Beige Brown
Medium Dark 1 skein DMC 842 V Lt Beige Brown

----------------------------------------------------------------------------------------------------------------

August 3, 2013--Just finished stitching the August lesson--took very little time to do this month's assignment.  Am unable to figure out what direction the design is taking, but so far it's been interesting.  Looking forward to September.


July 5, 2013--Completed the July stitching.   It's a beautiful trellis pattern which fills in much of the space very quickly.  Nice.


June, 2013--The stitches inside the red area remind me of a fruit pod.  Pretty.


May, 2013--The additional blue section is adding nice dimension.


April, 2013--The four corners are called leaves by Debbie.  If I had known this at the beginning, I would have reversed the colors.  Oh well, I'll play it out through December and hope it won't matter.  


March, 2013--This month's lesson gave us dimension.  Pretty border.


February, 2013--What a great beginning.  Love the pattern.


January, 2013--Love starting a new ANG Stitch of the Month Mystery project.  This is my fourth SOTM and each year has been a real treat to stitch.  This year's project is taught by Debbie Stiehler using Bargello stitches.  January's lesson was to lay down basting stitches from corner to corner on the diagonal.  Onward to the fun.


Monday, November 4, 2013

Signature on Finished Needlepoint Ornaments

November 4, 2013--About 20 years ago, I purchased a Bernina 1530 sewing machine, updating an older model.  Back then I was an avid sewer of garments for myself and got a lot of use out of the machine.  However, I never used the few pre-programmed embroidery features which included the alphabet and numbers (in capital letters only).    Yesterday I spent the afternoon reading the user's manual on how to program the 1530 and finally came up with a very nice signature and date.  The accents had to be hand sewn onto the fabric, but only 3 stitches were involved, so not a problem.  Last year I signed my self-finished ornaments by needlepointing with wash-away canvas.  It worked OK but wasn't satisfactory (see:  http://brendasneedlepointstudio.blogspot.com/2013/06/stash-star-ornaments-multi-and-green-red.html

I've got more playing to do with my signature--try to get it smaller, etc.  But if this is all I can do, I'm not unhappy.

BTW, the fabrics I'm using to back my ornaments come from old, out-of-date drapery fabric sample catalogues given to me by my sister.  She used to design and fabricate draperies, pillows, bedspreads, etc. and was about to throw out all of her old catalogues.  While visiting her a few years ago, I noticed the sizes of these samples were perfect for ornaments and had them shipped from her home in Texas to mine in Delaware. What a wonderful stash I've got now.  Thanks sis.

Signature in Blue Thread

Signature in Gold Thread


Tuesday, October 8, 2013

Seminar 2014 Chicago

August 8, 2013--I'm so excited about the classes at the Chicago ANG Seminar in 2014.  The pictures have just been posted in the ANG Yahoo Group List Photo Album.

I can't wait to sign up.  There are so many wonderful choices.

Saturday, September 21, 2013

Candy Bar Pillow

September 21, 2013--Had the candy bar canvas made into a pillow.  I love the chocolate brown and blue fringe--it'll look perfect in my DGD's TV room which is beautifully decorated by my DDIL in blues and browns.   Now to decide when to give it to her--at Thanksgiving when we'll next be visiting or in May, 2014, after the Rehoboth Beach Museum's Needlework Exhibit.


April, 2013--Ever since my first visit in 2009 to Waste Knot in Arlintgon, VA where this piece was on display, I've always wanted to stitch it.  Finally, in 2012, I ordered the kit (painted canvas from Point Of It All and wonderful DMC Perle 5 threads) from Lori Maza, the proprietor.  My intention is to have it made into a pillow and give it to my DGD for her play/TV room.  She was visiting this week and helped me finish stitching the canvas by filling in the last 4 little chocolate kisses.  Now to shop for backing fabric and some really cool fringe.


Sunday, August 18, 2013

Commenting on Blogs

August 18, 2013--I love writing this blog, but most especially, I love reading the blogs of other needlepointers (as you can see from "My Blog List" on the black right side bar--place mouse on the right side for the bar to show up).

Reading blogs is a favorite morning activity, along with that first cup of java.  It's where other stitchers share their love of needlepoint  through writing, photographs, etc.  Sometimes you can even glimpse a hint of their personal lives.   And the fun part is being able to leave a comment on something that speaks to you personally--a blog give-and-take, so to speak.

Needle Nicely has written a very nice blog about writing comments and how to do so using Google. She says it so well that I'm taking you there through the below link.  Her description of getting through the decoding process is spot on.  She also has a very nice blog to read.  Enjoy.


Friday, August 16, 2013

ANG's 40th Anniversary Sampler Synchronicity Updated 3/20/14

March 20, 2014--Won 2nd Place Ribbon in the sampler category at the Rehoboth Beach Museum 4th Annual Needlework Exhibit.

August 13, 2013--The sampler is now framed.  It's big--33" long by 17.25" wide.  Love it.


August 1, 2013--The sampler is finished and off to be framed!  This was so much fun to complete and fellow chapter members who also worked on this project shared many helpful hints.  Will post a new picture of the sampler when it's back from the framer.


In prior posts (written below), I wrote about not wanting to do Band 7, called the Contemporary Drawn Thread Band, as instructed by Catherine Jordan, feeling that it was a little too "helter skelter" for my tastes.   Not knowing how to handle the three blocks in this band, I purchased a book titled BEGINNER'S GUIDE TO DRAWN THREAD EMBROIDERY by Patricia Bage, Search Press Ltd., 2011.    Perfect.  Her instructions and photographs are so clear and sample projects so beautiful, I now want to do more of this type of work.  Below are pictures of the band as I stitched it and another as designed by Catherine Jordan.

PS  When cutting out the horizontal threads, I held my breath to keep from shaking the scissors and clipping the wrong thread.  Success.

Band 7 Completed

Band 7 as Designed by Catherine Jordan

July 9, 2013--Added beads to Bands 1, 8 and 11.  Still thinking about what to do with Band 7.  Stay tuned.
Band 1 With Beads
Band 8 With Beads
Band 11 With Beads


July 3, 2013--Band 18 is now complete.  Almost done with this sampler---Band 7 needs my attention. The original design by Catherine Jordan is called Contemporary Drawn Thread, calling for threads to be cut and wrapped together in what I consider to be a helter-skelter manner.    Will be doing further research on what do to with this.

Band 18--Liberty ANG designed by Ro Pace


June 24, 2013--Band 17, designed by Mary K. Campbell, is done.  I used beads from my stash rather than what was suggested.   One more band to stitch on the bottom then I must concentrate on what I'll do with Band 7.

Band 17--Beaded Pins designed by Mary K. Campbell


June 19, 2013--Another band completed, this one designed by Pat Mazu.  Really like this project.  Each band is so different from the other that it's like starting a new project each time--boredom never sets in.

Band 16--Butterflies designed by Pat Mazu


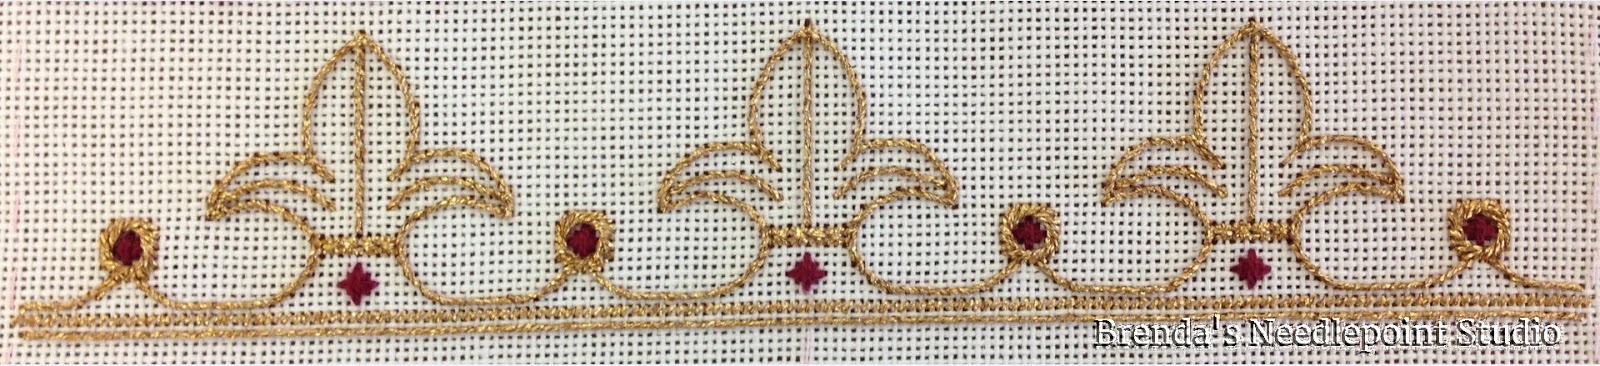
June 17, 2013--So far I've completed 15 bands of ANG's 40th Anniversary Sampler Synchronicity.  In October, 2012, our local Seashore Chapter took this on  as a group project.   I chose colors in the burgundy, Williamsburg blue and tan families.  Plan on hanging it in my home office when done.  Below are pictures of the bands stitched to date.  Note:  I will not be stitching Band 7 as shown in the lessons, but instead will do some research on cut thread patterns and do something more traditional.  Some of the bands need beads which will be added last.  This has been lots of fun to do while being very educational at the same time.

Band 15--Goldwork designed by Michele Roberts


Band 14--Pulled and Drawn Thread designed by Pat Donaldson


Band 13--Bowties and Stars designed by Janet Zickler Casey


Band 12--Realistic Shading by Sandy Rogers


Band 11--Jean Hilton designed by Jim Wurth


Band 10--Composite Pattern designed by Margaret Bendig


Band 9--Nami Pattern designed by Margaret Kinsey


Band 8--Beaded Heart designed by Nancy Cucci


Band 7--Contemporary Drawn Thread designed by Catherine Jordan (to be completed at a later date)


Band 6--Blackwork designed by Carol Algie Higginbotham


Band 5--Red Ruby Roses designed by Sandra Arthur


Band 4--Geometric designed by Susan Reed


Band 3--Camellia designed by Cara Hayes


Band 2--Pattern Couching designed by Carlene Harwick


Band 1--Couching designed by Joni Stevenson