Statcounter

Tuesday, March 13, 2018

Gardener's Alphabet - The Letter N - Nasturtium - 03/13/18


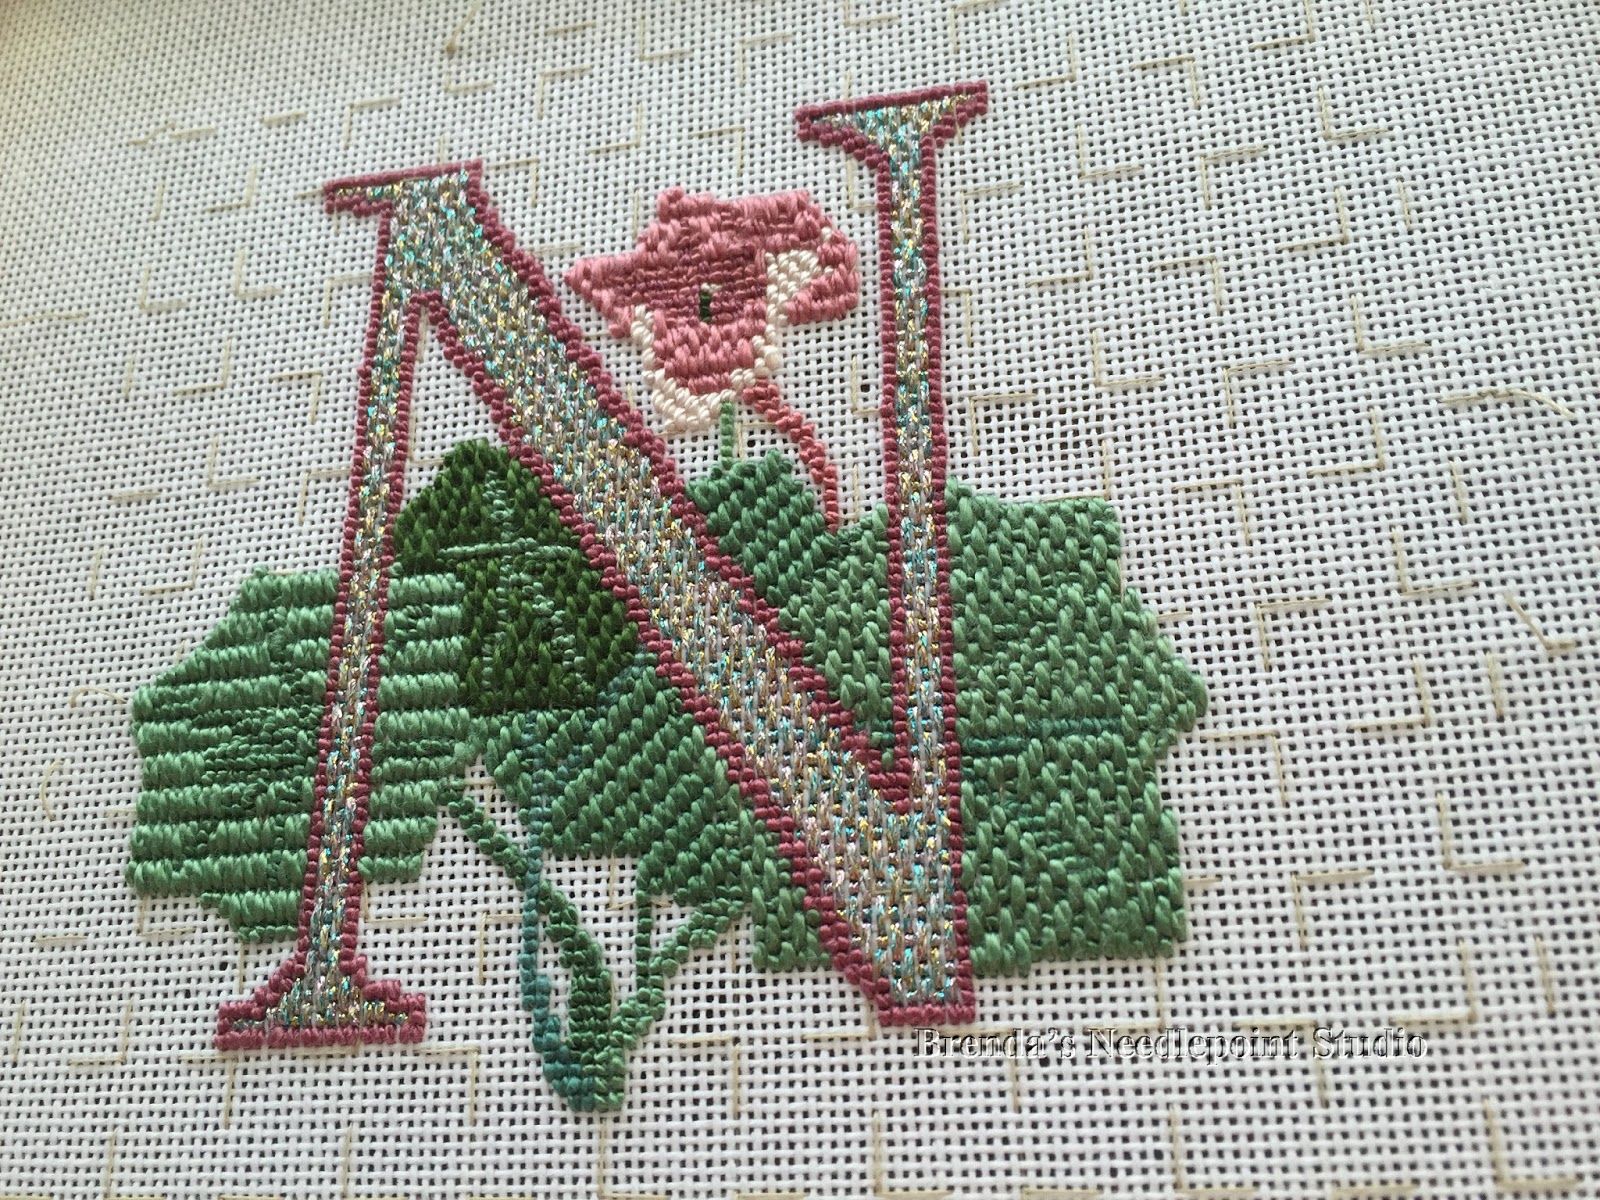
March 13, 2018--Found a ready made frame for this letter.   Not sure what I'm going to do with it, so maybe a friend with a name beginning with N will want it.  It's very pretty in person.

Gardener's Alphabet Letter N

October 10, 2015--Sometime in mid-August, Liz Morrow sent out an email searching for pilot stitchers for her Gardener's Alphabet project (counted stitch, not painted) described below.  I've admired Liz's work with bargello and jumped at the opportunity to do this.  Here's the end result* and more information follows.


Gardener's Alphabet Letter N


Gardener's Alphabet Letter N Side View
Liz wrote:
  • The Garden Alphabet was designed by Jim Williams as a rug. The designs were first published in Needlepoint News, Jan/Feb 1982 issue. At that time, it was worked on 10-count canvas with Paternayan wool in Tent stitches.  Mr. Williams has graciously allowed the designs to be reworked for 18-count canvas, color coded to DMC floss.  The designs may be worked entirely in Basketweave or Continental. If desired, decorative stitches may be used, particularly for the background and letters. The background could also be left unstitched, especially if a colored canvas is used. A light coverage stitch on a colored canvas is also an attractive option. 
Liz sent me the letter N to stitch, using the canvas, colors, threads and stitches of my choice.  I have to admit that I have very little experience in choosing my own stitches, but tried to keep the different areas uniform in size while giving contrast.  I did something very unusual though (at least for me it’s unusual)—all the stitches are vertical on 24 count congress cloth—there aren’t any diagonal or horizontal stitches on the piece.  The color choices were based on the Kreinik thread used for the letter.  I love this color called Confetti Pink and it works with the flower and leaves.   Also, for the background, the basting stitches, worked over 5 threads in blocks of ten, were left in place.  I thought it gave a nice trellis-like look to it.

If I had more time (this needed to be done by the end of September), I would have redone this project, using threads with more contrast for the flower and a darker thread for the veins of the two center leaves.  Also, because the spaces within the flower were so small, would have chosen different stitches.   Oh well, for the most part it worked and Liz is going to use it.

* Liz has approved this early blog about the project and hopes to have the full alphabet up on her web site by the end of October.  Can't wait to see what the other stitchers have done.


Friday, March 9, 2018

Shades of Christmas Poinsettia Ornament - Updated 3/9/18

March 9, 2018--Took a moment to finish this into a Christmas ornament.  The instructions couldn't have been easier--stitch 2 pieces of linen together on 3 sides using a running stitch, make the cord for hanging, stuff a piece of batting between the two pieces of fabric, then finish stitching (catching the cord).  All that's left is to remove some threads around the ornament--finished.

Ornament Poinsettia Shades of Christmas Front


Ornament Poinsettia Shades of Christmas Back

May 10, 2017--This pretty little poinsettia is complete and all that needs to be done is turn it into an ornament.  I really like the variations in the thread colors, but think the size used--Caron Wildflowers (perle 8 to 12 equivalent), is too thin and doesn't cover the linen as well as I would have liked.  Maybe once it is pressed the thread will "flatten" out and cover more.

Ornament Shades of Christmas Poinsettia Completed
May 4, 2017--I am nearly finished "cross stitching" a beautiful Christmas poinsettia called Shades of Christmas led by Bobbie R. of Delaware's Seashore Chapter, ANG.  I am learning a little about cross stitching (this being my second chapter project) and like how pretty the projects are along with the challenge of counting stitches and thread color changes (I think the crosses are all going in the same direction).  Once the green leaves are stitched, I plan on making this into a very simple ornament with fringed edges.

This is a free chart designed by Crossing Montana for Eterna Silk.  However, I'm using Caron Wildflowers for the threads.  Love the variegations.

Ornament Shades of Christmas Poinsettia

Thursday, March 8, 2018

Hardanger Bookmark Simple - Update 3/8/18

March 8, 2018--Done, and it didn't take long at all.  For the most part, am pleased with how it turned out.  I see some areas where my stitching (especially the buttonhole stitch) needs improvement, but the next one I do will look better.  Even though it's supposed to be reversible, I think it looks a bit messy on the back.    All in all, a fun project and great practice for my planned project called Christmas in the Heartlands by Cindy Valentine (click here to see a photo).


Hardanger Simple Finished Front

Hardanger Simple Finished Back


March 7, 2018--I haven't done much hardanger, but love its simplicity and beauty (actually, it's not so simple).  So when a member of  Delaware's Seashore Chapter of ANG, Lucille C., volunteered to teach a class on how to stitch a simple bookmark, I immediately signed up.  She designed this beautiful piece, wrote the stitch guide and gave us wonderful tips and tricks during the class.  Below is my progress to date.  BTW, this is supposed to be reversible when done.

Hardanger Bookmark Simple at 03/07/2018


Wednesday, February 28, 2018

New Tool For Straightening Threads - 2/28/18

February 28, 2018--I have a new favorite tool--a Vinida 2-in-1 cordless hair straightener ceramic flat iron and curling iron that is rechargeable with a USB charger. It was a little more expensive than some others, but I wanted a portable, rechargeable flat iron because we are unable to plug in appliances while taking classes at the ANG national seminar.   It is recommended the iron be turned off after each use, but that isn't a problem--when you turn it on, it heats up immediately and then cools quickly when you're finished using it.

Vinida Portable Flat Iron
I had some experience with similar irons brought into classes for students to use, but didn't think they were necessary.  Well, I'm a convert now.  I've been using it to straighten out everything--from RG/Neon Rays to RG/Splendor (love what it does to silk).  I find the threads don't kink up so much and are easier to "lay" flat and smooth.   I'm going to experiment using it for all threads.  Yes, it's an additional step to stitching, but at this point, it seems worth it.


Tuesday, February 27, 2018

Fire and Ice Class - 2/26/18

February 26, 2018--Just finished taking a 2-day class called Fire & Ice taught by Toni Gerdes and hosted by the ANG Checkerspot Chapter of Silver Spring, MD.  Had a wonderful time learning new stitches and starting to "build" this wonderful project.  Toni designed this piece by selecting threads, colors and shapes based upon the Museum at Prairiefire in Overland Park, KS.

Have lots of "thread spaghetti" to untangle when I get back to this project--and it is calling to me.

Museum at Prairiefire, Overland Park, KS

Toni Gerdes, Teacher and Designer of Fire & Ice


Fire & Ice at Class End


Monday, January 15, 2018

Fiber Talk Podcast - 1/15/18

January 15, 2018--A few months ago I read or heard about a new podcast called Fiber Talk hosted by Gary Parr and Christine Williams for and about needleworkers.  I've never bothered with podcasts before, but I love, love, love this one. 

Every week since January, 2017, Gary Parr and Christine Williams interview needlework artists, as well as have a mid-week chat with just the two of them talking.  I'm currently binge-listening to these podcasts and getting to know teachers, designers, shop owners, etc., etc., through these interviews.   There are so many wonderful needlework artists out there.

Kudos to Gary and Christine for what they are doing and I look forward to their future podcasts as well as catching up on their older ones.

Fiber Talk Podcast Logo

Wednesday, January 10, 2018

Pine Cone Santa - Updated 1/10/18

January 10, 2018--Another Janet Zickler-Casey Santa done!  This is the 5th kit ordered through the Shining Needle Society and I love doing them.  So much so that I have all the past ones in my "planned to stitch" pile.  They are too cute.

There's lots of texture to this little guy--sequined pine cone on the cap, little button nose, fluffy moustache and beaded beard.  Lots of stitching variety.
Pine Cone Santa Completed


Pine Cone Santa Side View


December 29, 2017--Recently signed up to take the Shining Needle Society's annual Janet Zickler-Casey santa class.  This year's is called Pine Cone Santa.  Two lessons have been posted to date on the project's private Yahoo Group List and I've yet to begin.  Will do so once the holidays are over--lots of fun traveling with visits to friends and family.

Wishing everyone a very Happy and Prosperous New Year for 2018.


Friday, January 5, 2018

Tablet Holder for Floor Stand - 1/5/18

January 5, 2018--I recently purchased a tablet holder from Amy's Golden Strand for my K's Creations floor stand and love it!!!   I'm able to adjust the height, angle, etc. of where I want the tablet.  It's great for watching movies while stitching. 

Below is a picture of what I see in front of me. 

Right now I'm using the tablet holder to view the stitching instructions for my current project.  All I did was scan the instructions, save it to a directory in "the cloud" (I have OneDrive), then open that saved file on my iPad.  No more pieces of paper flying all over the place (usually landing up under the chair, etc.).  With 2 fingers, I'm able to enlarge the graphs for more detail, enlarge the project photos, etc.  Sweet.

PS.  You can see a small bit of the television I'm watching on the upper right of my "stitching post".  So, when seated, I look ahead at my stitching, down to the right at my instructions, up to the right at the television (my wine glass is on a table to the left--LOL).  I do wear bifocal glasses along with "mag eyes" for magnification, so have to move my head a bit to clearly view things, but I'm so used to doing that, I no longer think about it.

New Tablet Holder for K's Creations Floor Stand

Sunday, December 31, 2017

2017 Year in Review - 12/31/17

December 31, 2017-- Happy New Year!  With all the traveling we've done this year, I still managed to complete a few projects shown below.  Click on the caption of each photo for more details.  
2018 promises to be as much fun if not more than 2017 with lots of new projects.  On the agenda are trips to Southern California, Oregon State, Arizona State, ANG Seminar in Washington, DC, a class in February in Maryland (Toni Gerdes' Fire & Ice ), a stitching retreat to Winterthur in Wilmington, Delaware in March, another stitching retreat in Ocean City, MD.   Lots to keep me excited and engaged in this wonderful passion.

Rozachi Baby Iris

Floral Ribbons


Trimming the Tree Ornament
ANG Checkerspot Chapter Nametag

ANG Distance Learning Correspondence Course Chair Name Tag

Holiday Gift Blue Ornament

Holiday Light Copper Ornament

Holiday Brass Bell Ornament


Holiday Gift Copper Ornament
Shades of Christmas Poinsettia Ornament

Nutcracker Santa
Theo Faberge's Jeweled Spiral Coil Egg

Star in the Meadow Stocking
American Beauty Rose


SOTM 2016 


Sunday, November 26, 2017

Frankie - Updated 11/26/17

November 26, 2017--My sister sent me this picture of Frankie in its new frame.  Love the texture of the frame and filet.  She says it looks perfect in her living room.  Me---so happy she likes it.


Frankie Framed

Frankie Frame and Filet Closeup

September 11, 2016--Frankie is DONE!  And I love it.  And I wish I could keep it.

This is a gift for my sister which will be given to her when visiting next month in her new Florida home.  Can't wait to see how it will look on her walls.

Frankie Completed
August 20, 2016--Working on Lesson 7 consisting of the background stitches.  There are three parts to this lesson:  Bokhara Couching Pattern for the narrow horizontal and vertical bands, Burden Stitch for the wide vertical bands and lastly the outer border area.  The first of the three parts is done and here's a picture.

Frankie through Lesson 7.33
August 12, 2016--Lesson 6 is completed.  This lesson covered the Walnetos with Jessicas and Eight Point Stars.  Love those stars--they are quick to stitch and the results are beautiful.  The color difference in the stars is due to the fact that in one, the gold is stitched first, while in the other it is stitched last.

The last lesson covers the background or filling stitches, and the braided border.  There's a lot to do here, but now this is a good TV watching project.

Frankie through Lesson 6
August 9, 2016--Lesson 5 covering the Double Fans Doubled and Chilly Hollow stitches is done.  Only four more "diamonds" to fill in, then all that's left are the background stitches.  Rounding the bend to the finish.

Frankie Through Lesson 5
July 24, 2016--Back from traveling in New England and Canada and have finished Lesson 4.   This lesson covered stitches for the Diagonal Padded Waffle and Mini Double Fans (these remind me of pinwheels).  The colors are blending nicely.

Frankie Through Lesson 4
July 11, 2016--Lesson 3 is now complete.  This lesson included the filling for the Diamond Jessicas (which I had already stitched before wrapping up Lesson 2), the Amadeus Stitch on the upper and lower bands and the Wheat Sheafs along the outer edges.  Now on to the really fun stuff--those highly engineered Jean Hilton stitches.

Frankie Through Lesson 3
July 5, 2016--Happily stitching along and have finished Lessons 1 and 2, and half of Lesson 3 (out of a total of 7 lessons).

The instructions call for stitching each of the Diamond Jessicas (DJs) before doing the Waffle Stitches and Circular Jessicas that fit inside the DJs.  I changed this by stitching the Waffle Stitches and Circular Jessicas BEFORE stitching the Diamond Jessicas.  This made it a lot easier for me to properly execute the last stitches that go behind the first section.  So here's my progress todate:

Through Lesson 1 - Plaited Stitch Columns

Through Lessons 2 and Half of 3 - Diamond Jessicas
Filled with Waffle Stitches and Circular Jessicas
June 29, 2016--Three years ago I signed up to stitch Frankie, a project by Michael Boren and Carole Lake of StitchPlay Designs (project photo below).  It was being offered through Shining Needle Society and I was very excited to find it available as an online class.  I had planned to stitch this as a gift for my sister whose home has a bit of Art Nouveau, Art Deco and Frank Lloyd Wright styling. When I visited her that year in 2013, she even helped me to choose threads to go with her decor.

Move forward to 2016 and I've finally begun working on this piece.  The instruction manual along with all the online class materials have a 1.5" width and are quite heavy.  Just reading the pre-work portion of the instructions took some time to wade through.  Well all that's behind me now and below is a picture of the pre-work completed.  It looks a little wonky, so imagine vertical bars with stitching to cover all the traveling threads and bar tacks.

There's a reason for starting this project now--I'm visiting my sister in October to see her new home in Florida (she moved from Dallas, TX) and would like to have this project finished by the end of the visit so I can leave it with her for framing.  I plan on getting at least 75% of it done before I leave.  It's a 19 hour train ride from Delaware to Florida, so should be able to get more stitching done while traveling.

This is a beautiful project and am looking forward to putting color on the canvas.

Frankie Pre-Work Completed
Frankie by Michael Boren and Carole Lake of StitchPlay Designs Project Photo


Thursday, October 26, 2017

Will There Be Enough Thread? - 10/26/17

October 26, 2017--This has happened or will happen to all stitchers.....you run out of thread and cannot find the exact dye lot.  Do you rip out the old color or try to camouflage the new.

In Elizabeth's Between The Threads Newsletter for Needlepoint Now News, she wrote about a wonderful hint from Brian Shaw, a needlepointer and manager of the Needlepointer Shop in Washington State.  He says....

"...if you are not sure how much thread is needed for a project, cut the skein or card of thread in half. Put one half aside. Using the other half to stitch, it will be easy to judge when you are halfway done with the project if you will have enough left to finish. If you see that you will need more, order right away and blend the half you had set aside with the new thread, so it won’t be obvious if the dye lots are different."

What a great idea this is, especially for projects requiring large amounts of one color, e.g., a background where a dye lot change would be highly visible.  Thanks Elizabeth and Brian.


Tuesday, October 10, 2017

Trimming The Tree Ornament - 12/3/17

December 3, 2017--Finished this project into an ornament in time for the ANG Delaware's Seashore Chapter annual Holiday Luncheon and Ornament Exchange tomorrow.  I stitched two--one for the exchange and one for my tree.  Here they are....

Trimming the Tree Ornament Finished

October 10, 2017--Completed the stitching of this ornament and for picture taking purposes, placed the cut-out oval on top of the canvas to confirm I've got the right shape.  Looks good.  Now to turn it into an ornament with beautiful cording around the edge.  

PS  The black edge along the oval top is caused by shadow, not a pencil.

Trimming the Tree Ornament Completed

September 26, 2017--I've shied away from finishing ornaments into oval shapes--didn't know how to draw a perfect oval template.  Well, no more.  I'm nearly finished stitching the "Trimming The Tree" ornament by Eula C. Malson published in the September, 2003 issue of Needle Pointers, and before I decide to fill in the background with something like the "T" stitch, I needed to pencil in the oval shape on the canvas.  Here's what I did.

I used Microsoft Word's shapes to draw an oval, then used an old bit of software called "Cool Ruler" to make it the length and width I needed to fit my ornament.

Cool Ruler used to measure how far to pull down the oval to the length desired


Cool Ruler used to measure how wide to pull the oval for the width desired

Once the oval shape was set, I used Word's shapes to draw straight horizontal and vertical lines through the middle and printed it out on standard 8.5" x 11" paper.  Then I placed my stitched ornament on top of the template, using the lines to help locate the exact center of top, bottom and sides, then drew my oval.

Lines on Template Visible Through Canvas for Centering
Here's a picture of my ornament with a perfectly shaped oval.  The top has more space than the bottom because a star will be stitched on top of the boxes after I fill in the background.