August 18, 2013--I love writing this blog, but most especially, I love reading the blogs of other needlepointers (as you can see from "My Blog List" on the black right side bar--place mouse on the right side for the bar to show up).
Reading blogs is a favorite morning activity, along with that first cup of java. It's where other stitchers share their love of needlepoint through writing, photographs, etc. Sometimes you can even glimpse a hint of their personal lives. And the fun part is being able to leave a comment on something that speaks to you personally--a blog give-and-take, so to speak.
Needle Nicely has written a very nice blog about writing comments and how to do so using Google. She says it so well that I'm taking you there through the below link. Her description of getting through the decoding process is spot on. She also has a very nice blog to read. Enjoy.
Statcounter
Sunday, August 18, 2013

Friday, August 16, 2013
ANG's 40th Anniversary Sampler Synchronicity Updated 3/20/14
March 20, 2014--Won 2nd Place Ribbon in the sampler category at the Rehoboth Beach Museum 4th Annual Needlework Exhibit.
August 13, 2013--The sampler is now framed. It's big--33" long by 17.25" wide. Love it.
August 1, 2013--The sampler is finished and off to be framed! This was so much fun to complete and fellow chapter members who also worked on this project shared many helpful hints. Will post a new picture of the sampler when it's back from the framer.

In prior posts (written below), I wrote about not wanting to do Band 7, called the Contemporary Drawn Thread Band, as instructed by Catherine Jordan, feeling that it was a little too "helter skelter" for my tastes. Not knowing how to handle the three blocks in this band, I purchased a book titled BEGINNER'S GUIDE TO DRAWN THREAD EMBROIDERY by Patricia Bage, Search Press Ltd., 2011. Perfect. Her instructions and photographs are so clear and sample projects so beautiful, I now want to do more of this type of work. Below are pictures of the band as I stitched it and another as designed by Catherine Jordan.
PS When cutting out the horizontal threads, I held my breath to keep from shaking the scissors and clipping the wrong thread. Success.
July 9, 2013--Added beads to Bands 1, 8 and 11. Still thinking about what to do with Band 7. Stay tuned.
July 3, 2013--Band 18 is now complete. Almost done with this sampler---Band 7 needs my attention. The original design by Catherine Jordan is called Contemporary Drawn Thread, calling for threads to be cut and wrapped together in what I consider to be a helter-skelter manner. Will be doing further research on what do to with this.

June 24, 2013--Band 17, designed by Mary K. Campbell, is done. I used beads from my stash rather than what was suggested. One more band to stitch on the bottom then I must concentrate on what I'll do with Band 7.

June 19, 2013--Another band completed, this one designed by Pat Mazu. Really like this project. Each band is so different from the other that it's like starting a new project each time--boredom never sets in.

June 17, 2013--So far I've completed 15 bands of ANG's 40th Anniversary Sampler Synchronicity. In October, 2012, our local Seashore Chapter took this on as a group project. I chose colors in the burgundy, Williamsburg blue and tan families. Plan on hanging it in my home office when done. Below are pictures of the bands stitched to date. Note: I will not be stitching Band 7 as shown in the lessons, but instead will do some research on cut thread patterns and do something more traditional. Some of the bands need beads which will be added last. This has been lots of fun to do while being very educational at the same time.


August 13, 2013--The sampler is now framed. It's big--33" long by 17.25" wide. Love it.
 |
PS When cutting out the horizontal threads, I held my breath to keep from shaking the scissors and clipping the wrong thread. Success.
 |
| Band 7 Completed |
 |
| Band 7 as Designed by Catherine Jordan |
July 9, 2013--Added beads to Bands 1, 8 and 11. Still thinking about what to do with Band 7. Stay tuned.
 |
| Band 1 With Beads |
 |
| Band 8 With Beads |
 |
| Band 11 With Beads |
July 3, 2013--Band 18 is now complete. Almost done with this sampler---Band 7 needs my attention. The original design by Catherine Jordan is called Contemporary Drawn Thread, calling for threads to be cut and wrapped together in what I consider to be a helter-skelter manner. Will be doing further research on what do to with this.
Band 18--Liberty ANG designed by Ro Pace
June 24, 2013--Band 17, designed by Mary K. Campbell, is done. I used beads from my stash rather than what was suggested. One more band to stitch on the bottom then I must concentrate on what I'll do with Band 7.
Band 17--Beaded Pins designed by Mary K. Campbell
June 19, 2013--Another band completed, this one designed by Pat Mazu. Really like this project. Each band is so different from the other that it's like starting a new project each time--boredom never sets in.
Band 16--Butterflies designed by Pat Mazu
Band 15--Goldwork designed by Michele Roberts
Band 14--Pulled and Drawn Thread designed by Pat Donaldson
Band 13--Bowties and Stars designed by Janet Zickler Casey
Band 12--Realistic Shading by Sandy Rogers
Band 11--Jean Hilton designed by Jim Wurth
Band 10--Composite Pattern designed by Margaret Bendig
Band 9--Nami Pattern designed by Margaret Kinsey
Band 8--Beaded Heart designed by Nancy Cucci
Band 7--Contemporary Drawn Thread designed by Catherine Jordan (to be completed at a later date)
Band 6--Blackwork designed by Carol Algie Higginbotham
Band 5--Red Ruby Roses designed by Sandra Arthur
Band 4--Geometric designed by Susan Reed
Band 3--Camellia designed by Cara Hayes
Band 2--Pattern Couching designed by Carlene Harwick
Band 1--Couching designed by Joni Stevenson
Monday, August 5, 2013
HanDBase Projects Database
August 5, 2013--Earlier I wrote about my Threads Inventory and Thread Brands databases in the HanDBase app I use. Today I'll illustrate how I've set up my Projects database, shown in the screen capture below

There is a lot of information in this database covering:
My favorite sort is by Status....I love seeing all the projects I have finished. The "Completed" sort shows me what canvases need to be finished (sewn into ornaments, framed, etc.). My "On Hold" sort is my own personal Hall of Shame. These are items I've lost interest in or didn't like the instructions (too vague), etc., and will most likely not be completed. But I am an optimist and may get some of them done one day. It's also nice to have a record of when a project was given as a gift, to whom and on what date.
I often use the Notes field to track when I've registered and paid for an online course, when it will begin and end, etc.
Below is the form used to enter a new project into the database:


There is a lot of information in this database covering:
- Project Name
- Status (Planned, In Process, Completed, Finished, On Hold)
- Finished As (framed picture, pillow, ornament, etc.)
- Canvas Type
- Finished Size
- Date Started
- Date Completed (when stitching is done)
- Date Finished (when made into something)
- Source
- Instructor
- Class Type
- Notes
- Cost
- Picture (directory location)
- Gifted To
- Date Given
My favorite sort is by Status....I love seeing all the projects I have finished. The "Completed" sort shows me what canvases need to be finished (sewn into ornaments, framed, etc.). My "On Hold" sort is my own personal Hall of Shame. These are items I've lost interest in or didn't like the instructions (too vague), etc., and will most likely not be completed. But I am an optimist and may get some of them done one day. It's also nice to have a record of when a project was given as a gift, to whom and on what date.
I often use the Notes field to track when I've registered and paid for an online course, when it will begin and end, etc.
Below is the form used to enter a new project into the database:
Many of the fields above have "pop up" lists from which to make choices. For example, when I click on the arrow to the left of Status, the below list pops up:
This is so much easier than typing in the status of each project, especially when changing the status, e.g., from Planned to In Process, then to Completed, etc.
Pop Up Lists are a real convenience, but they are limited (to 100 entries, I believe). So if I have a field that will have a lot of possibilities, I must establish a new database and have the field "point" to it, then from that database, select the record I want.
A perfect example of this is my Instructor field. Right now I have the names of my favorite instructors in a "Pop Up List", but will soon have too many and will have to establish a separate database called "Instructors". When that's done, I'll then have the ability to add information about each instructor, such as their email addresses, needlepoint shops with whom they are associated, etc.
That's all of it. I hope this encourages you to track your needlepoint "assets", be it in an Access type database such as HanDBase, in Excel, on Google's Drive, or Apple's iWork, etc.
When I start a new project, it's such a pleasure to get it listed in my database, then to add the threads to my inventory....it really is a form of "play".
Monday, July 22, 2013
Pumpkin 3D Designed by Ruth Chow
July, 2012--I purchased this Ruth Chow painted canvas from Waste Knot (Arlington, VA) in 2009. Lori Maza had the model available to view and I just had to have it. Unfortunately, I was too new at doing needlepoint and found some of the stitches difficult to do, so I put it aside. After 3 years of gathering needlepointing experience, I picked up the pumpkin again and was easily able to complete it. It was a lot of fun. This is what it looked like while on the scroll bars.

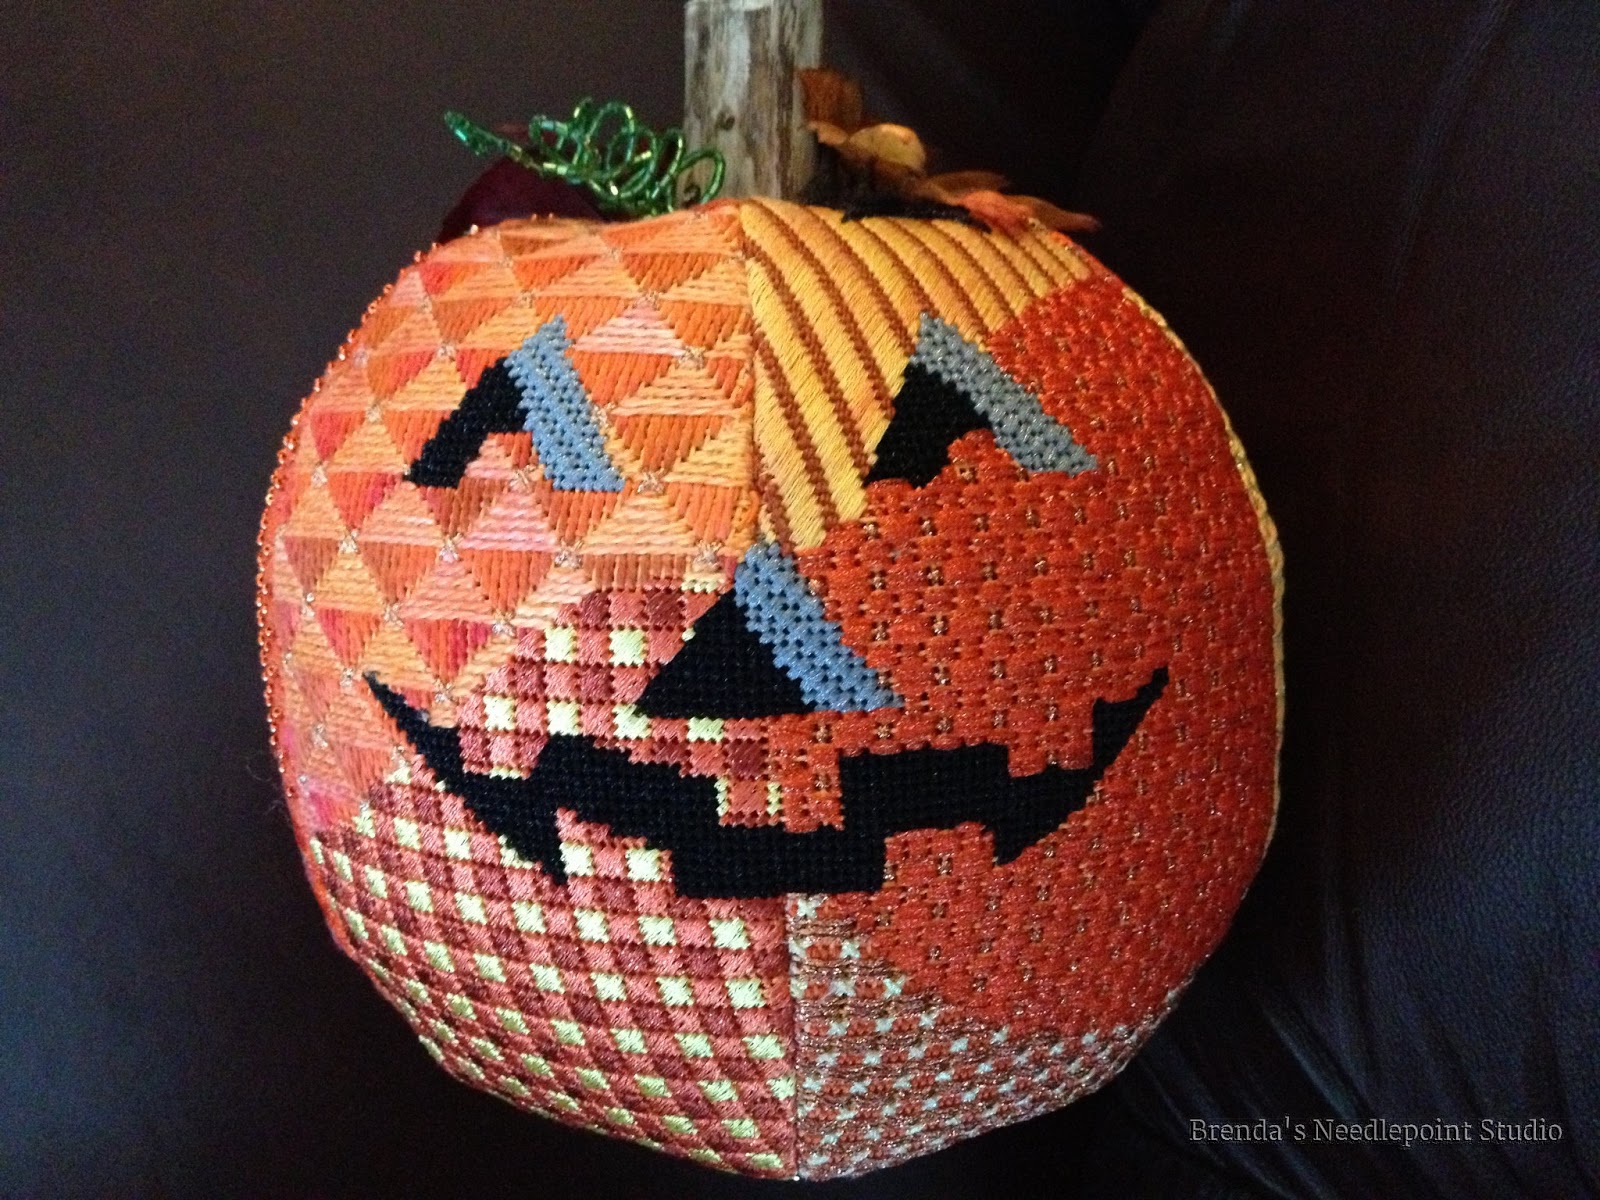
October, 2012--This is what it looked like when I got it back from the finisher. It's so cute sitting next to the candy dish at Halloween.
Saturday, July 20, 2013
HanDBase Threads Inventory Database
July 22, 2013--I mentioned in an earlier blog that my favorite app is HanDBase Database Manager. It has enabled me to inventory all of my threads, books and projects (with pictures). Data can be entered on my PC or on my iPhone, then the two can be synced. I chose this software because I couldn't find anything in the "app" market that would allow for the storage of a high volume of data or give me the flexibility to add or subtract fields I wanted in each record.
Today I'll talk about my threads inventory. Below is a screen capture of the Threads Inventory Database as it appears on my PC. I am able to see this same information on my iPhone. The inventory can be sorted by any field, such as thread name/type, color number, project, etc. (sorting can be done on my PC or on my iPhone). The picture below shows the database sorted by Project, the first being Anasazi Dream. You can see a list of threads used in this project, showing the thread name/type, color number, color name (if available), project in which it was used, color wheel number, HEX number, dye lot, notes, when purchased, from what source, and cost. When I sort this database by Name/Type, I'm able to see what I have in my stash--useful when buying threads for a new project, or making substitution decisions. It's also helpful to see what project a thread was used for--I can easily refer to the project to see how it covered the canvas, what stitches were used, etc.

The field labeled "Name/Type" in the above example only shows the brand name of the thread and whether or not it's a floss, perle, and its size. For more information about the thread, such as its fiber content, ply/strands, washability, gauge, etc., I have another database for that called Thread Brands. The screen capture below shows the setup. Most of the information is taken from the package or card around which the thread is wrapped.

Now, when I have a new thread to add to my Threads Inventory Database, I fill in the information on the entry form below:

However, instead of typing in the thread name/type, all I need do is hit the little arrow to the left of the field name (using Name/Type as an example) and up pops the Thread Brands database. Then I scroll down to the thread I'm looking for. If my new thread is a Kreinik Braid #4, I would scroll down to that thread brand and hit enter. This is a huge convenience when you have a project that's using many colors of the same type of thread, such as DMC floss. Of course, if I'm adding a new thread brand to my inventory that I've never used before, I must first add it to my Thread Brands Database.
The other fields which point to separate databases are Project, Color Wheel and Source. I'll discuss the Project Database in another blog.
The Color Wheel Database is a list of color ranges as used by Joen Wolfrom's Color Tool. I find this very helpful when looking for threads I own in a particular color range, for example, blue-green (color card 06 in the Color Tool).
The Source Database shows how the thread was acquired--whether or not it was included in a kit, purchased from a store, part of my stash, etc. This field doesn't have a separate database, but has something called a "pop up list" where you can pick from a number of items such as where the thread was purchased, if it was included in a kit, etc.
If you have read this far into the blog, kudos! I know there's a lot of information here, but hopefully it will be helpful if you decide to set up your own inventory using a database type of app. Please note that I am not a computer/software guru and had never used Access type software before. This was all new to me. However, DDH Software has some great tutorials and lots of examples of how their customers use HanDBase, and it was from there I began to formulate how I would set up my databases.
If you have any questions, please add them to the comment section and I will respond ASAP.
Today I'll talk about my threads inventory. Below is a screen capture of the Threads Inventory Database as it appears on my PC. I am able to see this same information on my iPhone. The inventory can be sorted by any field, such as thread name/type, color number, project, etc. (sorting can be done on my PC or on my iPhone). The picture below shows the database sorted by Project, the first being Anasazi Dream. You can see a list of threads used in this project, showing the thread name/type, color number, color name (if available), project in which it was used, color wheel number, HEX number, dye lot, notes, when purchased, from what source, and cost. When I sort this database by Name/Type, I'm able to see what I have in my stash--useful when buying threads for a new project, or making substitution decisions. It's also helpful to see what project a thread was used for--I can easily refer to the project to see how it covered the canvas, what stitches were used, etc.

The field labeled "Name/Type" in the above example only shows the brand name of the thread and whether or not it's a floss, perle, and its size. For more information about the thread, such as its fiber content, ply/strands, washability, gauge, etc., I have another database for that called Thread Brands. The screen capture below shows the setup. Most of the information is taken from the package or card around which the thread is wrapped.

Now, when I have a new thread to add to my Threads Inventory Database, I fill in the information on the entry form below:
However, instead of typing in the thread name/type, all I need do is hit the little arrow to the left of the field name (using Name/Type as an example) and up pops the Thread Brands database. Then I scroll down to the thread I'm looking for. If my new thread is a Kreinik Braid #4, I would scroll down to that thread brand and hit enter. This is a huge convenience when you have a project that's using many colors of the same type of thread, such as DMC floss. Of course, if I'm adding a new thread brand to my inventory that I've never used before, I must first add it to my Thread Brands Database.
The other fields which point to separate databases are Project, Color Wheel and Source. I'll discuss the Project Database in another blog.
The Color Wheel Database is a list of color ranges as used by Joen Wolfrom's Color Tool. I find this very helpful when looking for threads I own in a particular color range, for example, blue-green (color card 06 in the Color Tool).
The Source Database shows how the thread was acquired--whether or not it was included in a kit, purchased from a store, part of my stash, etc. This field doesn't have a separate database, but has something called a "pop up list" where you can pick from a number of items such as where the thread was purchased, if it was included in a kit, etc.
If you have read this far into the blog, kudos! I know there's a lot of information here, but hopefully it will be helpful if you decide to set up your own inventory using a database type of app. Please note that I am not a computer/software guru and had never used Access type software before. This was all new to me. However, DDH Software has some great tutorials and lots of examples of how their customers use HanDBase, and it was from there I began to formulate how I would set up my databases.
If you have any questions, please add them to the comment section and I will respond ASAP.
Monday, July 15, 2013
Victorian Ornament
October, 2012--Stitched this little ornament for Delaware's Seashore Chapter's December 2012 holiday ornament exchange. The instructions, written by Teresa Kinberger, were found in the September, 2012 Needlepointers magazine. I changed it from an oval to a diamond shape and filled in the background. Also did the finishing myself. Not yet perfect, but getting better at this.

 |
| Original ornament as designed. |
Thursday, July 11, 2013
Stitching In The Well and Framer's Tool to Push In Tacks
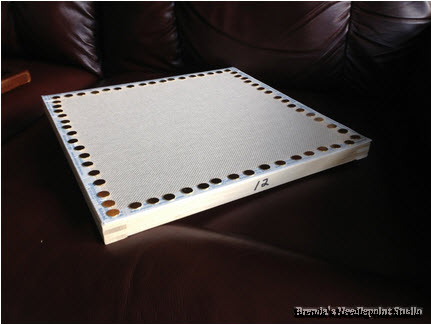
She recommended attaching the canvas so that it appears to be on the "back" of the stretcher bars, as shown below, rather than on top. This keeps your wrists and arms off the canvas, and your work cleaner. By attaching tacks to the inside of the stretcher bars, magnets can be placed on the tacks as needle holders, etc. When your work is put away in a bag, the needles and threads are protected by the sides of the stretcher bars and won't fall off. I often place tacks on top of the bars, and use another magnet to hold graphs in front of me while stitching. Another reason for "stitching in the well"....if the margins of your project are very narrow, you won't have trouble ending your threads on the back because there isn't anything in the way. Bead holders placed inside the stretcher bars won't fall off the canvas either. For some, using a laying tool in a tight corner is difficult unless the canvas is on top of the stretcher bars. I use a "trolley" type of tool--it's a long, large needle welded to a ring that I wear on my index finger. I can then curve my finger around a tight area....or just turn my canvas around for more maneuvering room.
 |
| Canvas right side. Tacks are on the back of stretcher bars |
 |
| Back or wrong side of the canvas. I know there are a lot of tacks, but I find they keep the canvas from stretching |
 |
| Magnet attached to tack used as needle minder |
 |
| This is a "framer's tool" I use to push tacks against stretcher bars. The handle is very comfortable to use. |
 |
| Using the framer's tool to push tacks into the stretcher bars |
Wednesday, July 10, 2013
Folding Ort Box Number 2, Black and Red 3/18/15
March 18, 2015--Won 1st Place Ribbon in the Canvaswork-Multi category at Woodlawn's 52 Annual Needlework Exhibition in Alexandria, VA.
February, 2010. Made this ort box for DH to keep in his office. The black and silver was to match his electronics and furniture while the red was for impact. It got noticed--by other women of course. And what man doesn't love the attention of other women. Now that he's retired full time, the ort box has been re-commissioned to travel with me when taking classes, etc.


February, 2010. Made this ort box for DH to keep in his office. The black and silver was to match his electronics and furniture while the red was for impact. It got noticed--by other women of course. And what man doesn't love the attention of other women. Now that he's retired full time, the ort box has been re-commissioned to travel with me when taking classes, etc.
Monday, July 1, 2013
Kreinik Pen
September, 2012--I bought two of these cool pens at ANG Seminar in Philadelphia...one for myself and one as a gift for my conference roommate, Vicki. She really had a time of it at the hotel check in. Our original plans were that she would arrive first, check in and get the room. Well, it was I who arrived first and was assigned "our room". When Vicki checked in, she was not told I was already in the room, so was very concerned that our room had been assigned to someone else, not recognizing my luggage. She had to get a last minute change of rooms, all to my surprise when I tried to return to the room I had been assigned and found myself locked out. Too funny. It ended well with a nicer room than originally assigned. I have to find out if she ever stitched the pen.
 |
| (Kreinik Stock Photo) |
Saturday, June 29, 2013
Favorite Apps
June 29, 2013--I've added a new section on the right called Favorite Apps. It's wonderful having access to stitches on my iPhone.
My favorite is an Access type app called HanDBase. I use it to inventory my threads, projects, books, beads, etc. In future posts, I'll give details about each database and how they are set up. I chose this type of app so that I could have as much or as little detail I wanted in each database. Also, I can enter data on my iPhone or on my PC and sync the two. It's great to have my thread inventory with me when shopping. Yes, it did take some time to set up, but it was worth it. Now, when I start a new project, I get to "play" with my new threads by entering each one in the database. To me it's all part of the fun of doing needlepoint.
My favorite is an Access type app called HanDBase. I use it to inventory my threads, projects, books, beads, etc. In future posts, I'll give details about each database and how they are set up. I chose this type of app so that I could have as much or as little detail I wanted in each database. Also, I can enter data on my iPhone or on my PC and sync the two. It's great to have my thread inventory with me when shopping. Yes, it did take some time to set up, but it was worth it. Now, when I start a new project, I get to "play" with my new threads by entering each one in the database. To me it's all part of the fun of doing needlepoint.
Wednesday, June 26, 2013
Kissing Pillows
January, 2013--While attending an ANG CyberPointers meeting at Seminar in Philadelphia last year, I picked up some "kissing pillows" to stitch. These are done using very simple stitches. then returned to a group who sew a backing to the front, and stuff them. I understand these little pillows are given to men and women in the miliary who are deployed to areas of combat. The family members about to be left behind "kiss" the pillow for the militia to have with them. Also, military personnel will kiss a pillow for each child to keep with him or her as a reminder that their parent will return. I'm told the demand is great for these little keepsakes.
+Completed+2013-01-10.JPG)
Monday, June 24, 2013
Mt. Vernon, VA Seat Cushion
June 17, 2010--I was so pleased to be chosen to participate in a volunteer project for Mt. Vernon, Alexandria, VA (George Washington's home). About 10 of us were invited to cross-stitch dining room chair covers (after submitting test samples of our work), copying a pattern used by Martha Washington in the 18th century. There are records of when, how much and the color of the yarns she purchased for these covers. Because they had deteriorated over the years, they were being redone to restore the room they'll reside in to its original beauty. It was a pleasure to be a small part of history in the remaking of these beautiful covers. Below is the pattern from which we worked (designed by the wonderful ladies at Mt. Vernon Estates and Gardens).
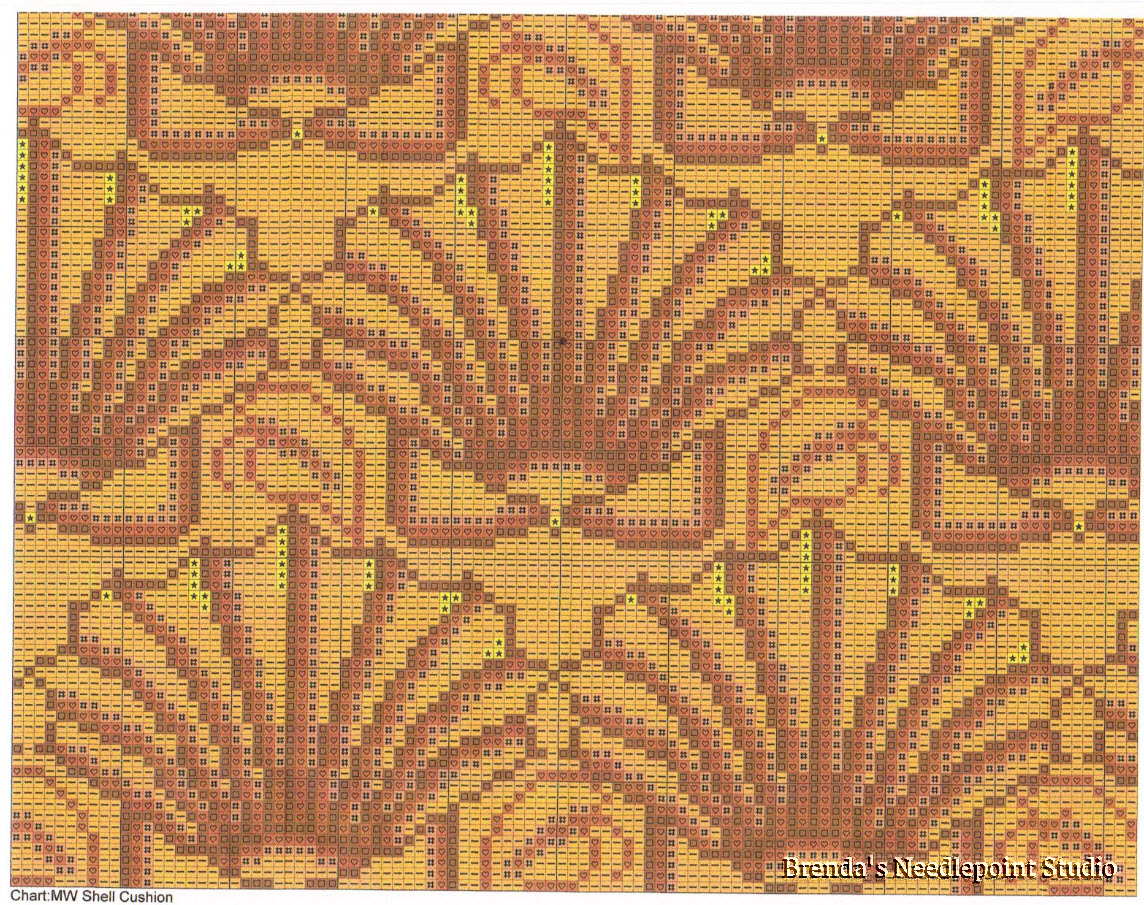
August 2, 2010--Completed the first row of the Martha Washington seat cushion cover. Very brilliant colors. This portion is the back of the cushion cover as it sits against a curved back Windsor chair (very colonial, of course). I outlined the design on the canvas before stitching so I didn't have to continuously count each step.

August 18, 2010--Completed the second of five rows on the Martha Washington Mt. Vernon chair cushion needlepoint project. The third row was about one-fourth done. I calculated there were another 100 hours required to complete it.

September 30, 2010--Completed the third and longest row of the Mt. Vernon seat cushion. At this point I was over one-half done with only two more rows to finish.

January 8, 2011--Next to the last row completed. Just had the 5th and final row to do consisting of 3 shells. Almost done!

January 26, 2011--It's done! After 7 months and nearly 200 hours later, I finished the Martha Washington seat cushion. I was proud to be one of 10 to stitch these seat cushions for placement in the newly renovated parlor at Mt. Vernon, VA. I was looking forward to seeing the chairs with the new cushions in place.

Below is a picture of the full seat cover. I made two very small errors which I now consider to be my "fingerprint". I can very easily identify the cover I stitched.

I placed my name and date of completion in the seam allowance for posterity.

This is the original seat cushion as done by Martha Washington. We understand she stitched a total of 12 cushions, but only 11 of them can be accounted for....Mt. Vernon has 10 and the family of L'Enfant was given one as a gift by Martha's niece. The 12th is lost to history.

Here is a picture of the completed seat cover made into a cushion.

Subscribe to:
Posts (Atom)