
Statcounter
Wednesday, February 22, 2017
Rehoboth Beach Museum's 7th Annual Needlework Exhibit - 2/22/17
February 22, 2017--It's time again for Rehoboth Beach Museum's Annual Needlework Exhibit. This is the 7th year that the Delaware museum has put on a needlework exhibit and it's a big hit for those who reside in the state as well as for visitors to the beach. It runs from March 18 through May 21, 2017 and all are invited to submit entries using the form which can be found here, Hope to see you there.

Thursday, February 2, 2017
American Beauty Rose - Updated 2/2/17
February 2, 2017--Made this beautiful rose into a piped knife-edge pillow. I like the way it looks more like a rose now that the padding rounds out the center. And the fabric color adds a nice "frame". All in all, very happy with the results. My Bernina sewing machine has programming for simple numbers and letters, so I added the following to the back since it's a gift for my mother.
Happy 90th Birthday Mom
Marie-Rose Irene Cote
With Love From
Yours Truly
February 15, 2017
I added her name so the staff at the nursing home where she resides will know it's hers if it happens to "walk".
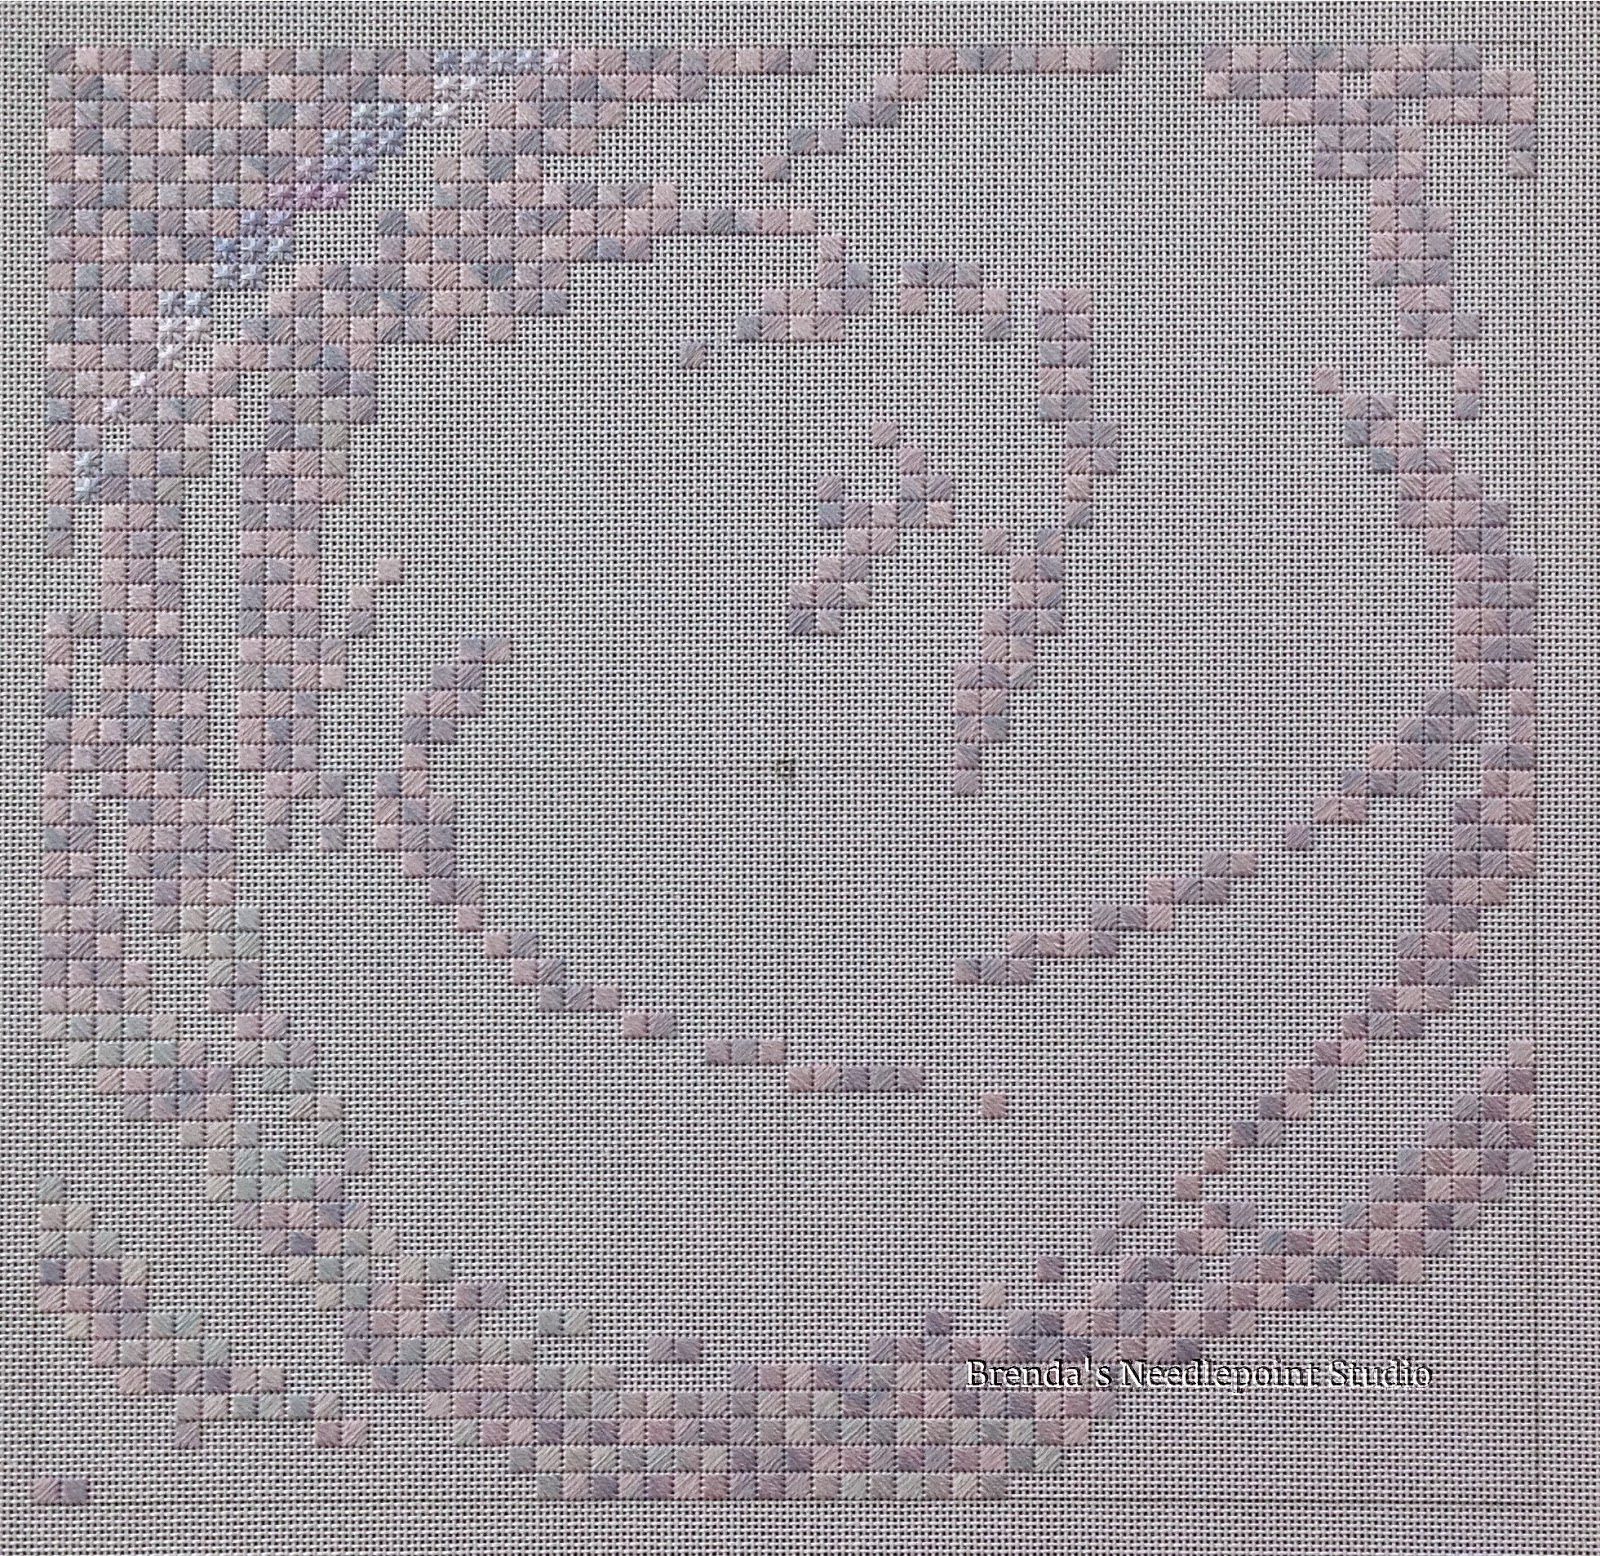
January 8, 2017--Done, and in plenty of time to make this rose into a pillow to give my mother on her 90th birthday next month. It's an unusual piece--you need to stand far back to actually see a rose. Once it is piped with a dark purple fabric, the rose should be easier to view.
December 15, 2016--Wow, it's been over 2 years since I last worked on this project. And work on it I must now do! This is going to be a gift for my mother's 90th birthday in February and I have a lot yet to stitch. I have a small suspicion that it won't get done in time. If that happens, I'll show her the project and explain it'll be a beautiful pillow when done--and promise she'll get it ASAP. In the meantime, however, I'll stitch on it furiously and see if I can make the finish happen in time.
November 30, 2014--Status to date. Thought I would do as Liz Morrow has done with her rose (she's stitching hers in neutral tones) and complete a full quadrant. Still am unable to see the rose yet. Will now go back to working on one color/stitch at a time.
10/13/14--This project has 8 different stitches done in 8 different colors. The picture below shows the first color and stitch done, and a little of the 2nd one started (the canvas color is Lavendula/Lilac).
Not doing a lot of stitching these days--have been traveling and more trips are planned.
8/11/14--While at the 2012 ANG Seminar in San Antonio, TX, I purchased instructions for DebBee's Designs American Beauty Rose with the intent of stitching this project for my mother's 90th birthday, using her favorite colors in the violet/lilac range. Well, she'll be 90 in a little over 2 years and I figure I better get this started sooner, rather than later.
Since I'm not really good at making color substitutions--in this case from reds (listed in the directions) to violets, I wrote Debbie Rowley of DebBee's Designs for help. Wow, she really was very helpful. Debbie went to her LNS, The Stitcher's Garden in Conway, AR and worked with Lynda Bass Gaiser, first gathering the red colorway, then finding the perfect violet/lilac threads. Debbie sent me the first picture below and asked if the colors they chose would work. I immediately responded with YES! and ordered her suggestions from Lynda. The second picture is a closeup of the violet threads that came in the mail yesterday. Cannot wait to begin stitching. Soon.......
Happy 90th Birthday Mom
Marie-Rose Irene Cote
With Love From
Yours Truly
February 15, 2017
I added her name so the staff at the nursing home where she resides will know it's hers if it happens to "walk".
 |
| American Beauty Rose Finished Front |
 |
| American Beauty Rose Finished Bac |
January 8, 2017--Done, and in plenty of time to make this rose into a pillow to give my mother on her 90th birthday next month. It's an unusual piece--you need to stand far back to actually see a rose. Once it is piped with a dark purple fabric, the rose should be easier to view.
 |
| American Beauty Rose Competed on Stretcher Bars |
 |
| American Beauty Rose Completed |
 |
| American Beauty Rose as of 12/14/16 |
 |
| American Beauty Rose Upper Left Quadrant |
 |
| American Beauty Rose Upper Left Quadrant Completed |
Not doing a lot of stitching these days--have been traveling and more trips are planned.
 |
| Stitch and Color One |
Since I'm not really good at making color substitutions--in this case from reds (listed in the directions) to violets, I wrote Debbie Rowley of DebBee's Designs for help. Wow, she really was very helpful. Debbie went to her LNS, The Stitcher's Garden in Conway, AR and worked with Lynda Bass Gaiser, first gathering the red colorway, then finding the perfect violet/lilac threads. Debbie sent me the first picture below and asked if the colors they chose would work. I immediately responded with YES! and ordered her suggestions from Lynda. The second picture is a closeup of the violet threads that came in the mail yesterday. Cannot wait to begin stitching. Soon.......
 |
| Thread Comparisons--Reds to Violets |
 |
| Violet Colorway |
 |
| DebBee's Designs American Beauty Project Photo |
Thursday, December 29, 2016
2016 Year In Review - 12/29/16
December 29, 2016--Happy New Year!! I am so looking forward to 2017 because this year, 2016, has been wonderful and the next promises to be even better. It begins with a resort vacation in Pensacola for a month, then a two-week cruise, rountrip, to Alaska, then the ANG seminar in Anaheim and then a week in Napa, CA with family and lots and lots of wine. And I know there'll be much more.
This is also the time I like to look back on what I've accomplished in the past year. Surprisingly, even with all the traveling we've done, I managed to accomplish some serious stitching. Here's the roundup (click on the caption title to access more information):
This is also the time I like to look back on what I've accomplished in the past year. Surprisingly, even with all the traveling we've done, I managed to accomplish some serious stitching. Here's the roundup (click on the caption title to access more information):
 |
| Let It Snow |
 |
| Christmas Tree Santa |
 |
| Summer Solstice Sampler |
 |
| Orange Grove |
 |
| Chapter Name Tag |
 |
| Downton Abbey |
 |
| Christmas Diamond Ornaments |
 |
| Sisters |
 |
| Frankie |
Thursday, December 1, 2016
Christmas Diamond Ornaments - 12/4/16
December 4, 2016--The threesome of diamond ornaments is now finished and ready to hang. I loved how easy it was to just glue (using my trusty tape gun) each layer onto another, measure, cut, then done.
December 1, 2016--Here's the last of the trio designed by Kurdy Biggs. I have so much enjoyed stitching up these beautiful ornaments on perforated paper, and they worked up quickly. I just returned from Michael's Arts & Crafts with some very pretty paper to place on the back. Pictures of the finished ornaments will be posted soon.
 |
| Christmas Diamond Ornaments Threesome Finished |
December 1, 2016--Here's the last of the trio designed by Kurdy Biggs. I have so much enjoyed stitching up these beautiful ornaments on perforated paper, and they worked up quickly. I just returned from Michael's Arts & Crafts with some very pretty paper to place on the back. Pictures of the finished ornaments will be posted soon.
 |
| Ornament Christmas Diamonds No. 1, 2 and 3 Completed |
 |
| Ornament Christmas Diamond No. 3 Completed |
November 12, 2016--And now there are two. These designs are so pretty, and they work up quickly (being small in size helps). One more to go.
 |
| Christmas Diamond Ornaments One and Two |
 | |
|
October 25, 2016--Finished stitching the first of three ornaments. Love how easy it is to stitch on perforated paper. Here's a picture and now to stitch the next two designs.
 |
| Christmas Diamonds Ornament One Completed |
September 20, 2016--I found the instructions for these Christmas Diamond ornaments by Kurdy Biggs of Threedles in the November/December 2015 issue of Needlepoint Now Magazine and knew I would have to stitch them. There are five examples using three different patterns, two of which were stitched on perforated paper. Never having worked with perforated paper, I thought this would be a perfect opportunity to give it a try. I found some off-white 14 count paper and decided dark blue thread would look good, so below is my progress to date on ornament number one. Still have additional beads to stitch (ran out and had to order more) but am very pleased with the look so far.
The instructions in the magazine lacks details about the threads used for all three of the different patterns and Kurdy Biggs was very helpful in getting me the information I needed. The problem was one of space--there wasn't enough room for the instructions and the full thread list when the article was published. If you decide to stitch these ornaments, Kurdy is very helpful in supplying any additional information you may need.
The instructions in the magazine lacks details about the threads used for all three of the different patterns and Kurdy Biggs was very helpful in getting me the information I needed. The problem was one of space--there wasn't enough room for the instructions and the full thread list when the article was published. If you decide to stitch these ornaments, Kurdy is very helpful in supplying any additional information you may need.
 |
| Christmas Diamonds Ornament One |
Tuesday, November 8, 2016
Downton Abbey Framed - Updated 9/15/2018
September 15, 2018--Just learned this piece won a 3rd place ribbon in the 8th Annual Rehoboth Beach Museum Needlework Exhibit in the Canvas/Needlepoint category. Cool.
November 8, 2016--At last, here's the Downton Abbey threesome framed along with the cards made specifically for each design. You can read about each of the the three pieces by clicking on the names of Countess of Grantham, Lady Edith and Lady Mary. I think the frame is perfect.
November 8, 2016--At last, here's the Downton Abbey threesome framed along with the cards made specifically for each design. You can read about each of the the three pieces by clicking on the names of Countess of Grantham, Lady Edith and Lady Mary. I think the frame is perfect.
 |
| Downton Abbey Framed |
Saturday, October 22, 2016
Thread Organization Updated 10-22-16
October 22, 2016--Well, that didn't work. Six months ago I organized my stash of threads by brand rather than by color. A lot of work--3 days in fact. No go for me.
Recently I agreed to participate in a pilot stitch program that requires the use of your own threads. So now I wanted to stash dive to see what color I might use and found myself tearing my hair out trying to locate all threads of one color. Aaarrrgggg! Soooo, the only thing to do was to reorganize the threads by color and do it better than before. After a day of threads all over the floor of my craft room, I now have bags of thread sorted by color using the Joen Wolfrom system. For my new project, I was able to find the threads that, to me, would be perfect. And it only took five minutes.
Another reason to keep threads by color rather than brand--it's so much easier to put them away after a project is completed. To keep brands together, I had to search for where that brand was located. It wasn't bad for brands with lots of threads, e.g., Splendor, DMC Perle 5, etc., but the lesser used brands with fewer threads in my stash were impossible to immediately get my hands on. And I have a lot of those various brands with just a few threads. When looking for colors, those lesser brands were overlooked. Not anymore. Yay!
And as for knowing what threads I have for what brands--I can still get that information by using my HanDBase Thread Inventory database. All is well now.

April 9, 2016--For quite a few years I've lived with my thread stash organized by color. For example, all the red threads were in a clear plastic bag together, all the blues in another, no matter what the brand. I had about 10 or so bags of different colors. Not a bad way to organize threads, but a royal pain when looking for a particular brand name.
So, after reading on various blogs how many have organized their threads by brand name, I decided to do the same. However, I did not purchase the beautiful plastic bins and organizers that have been proudly displayed in photos. Instead, I've placed all threads of one brand on a "ring" in color order (not number, at least not yet). So all my RG/Splendor threads are now together on one ring, my DMC Perle 5's are on another, etc. I'm using inexpensive rings instead of plastic organizer boxes because I don't know if I'm going to like this new setup.
I'll give it a year. If it works, great. If not, all the threads will go back to my color "filing" system which is certainly easier to use when putting threads away after a project is completed.
The picture below is a white plastic rolling 3 drawer system I've been using to house my threads. Now the top drawer has all cottons, the middle drawer contains silks, silk blends and wool, the bottom drawer has novelty threads. (Kreiniks are in another location, along with DMC floss.)
Whew, what a job. It took 3 days to organize about 1500 different threads. I suspect I'll tweek this system over the next year by placing the large brands in numerical order rather than by color, and place all the miscellaneous little brands by color only because at this time I haven't a clue how I'll find them again, never mind add to them.
 |
| Drawers containing, from top to bottom: Cottons, Silks, Novelties |
 |
| Miscellaneous Cotton Threads on "Rings" |
Monday, October 17, 2016
Downton Abbey Lady Mary Geometric - 10/17/2016
October 17, 2016--The Lady Mary geometric, third of the Downton Abbey designs by Gay Ann Rogers, is now complete. I've also attached a photo of a card designed by Annette Navarro and sold through Gay Ann Rogers on her website. Now off to the framer.
October 4, 2016--I am now stitching the last of the three Downton Abbey Geometric designs by Gay Ann Rogers. More information can be found here. This one is called Lady Mary and the colors are sumptuous. The other two , Countess of Grantham and Lady Edith, are done and can be seen by clicking on their project names. So far, most of the outlining is finished and the upcoming filling stitches will add depth and dimension. Next posting will be of completed piece. A view of the project photo can be found by clicking on the In Process Projects under the Page heading on the right.
 |
| Downton Abbey Lady Mary Geometric Completed |
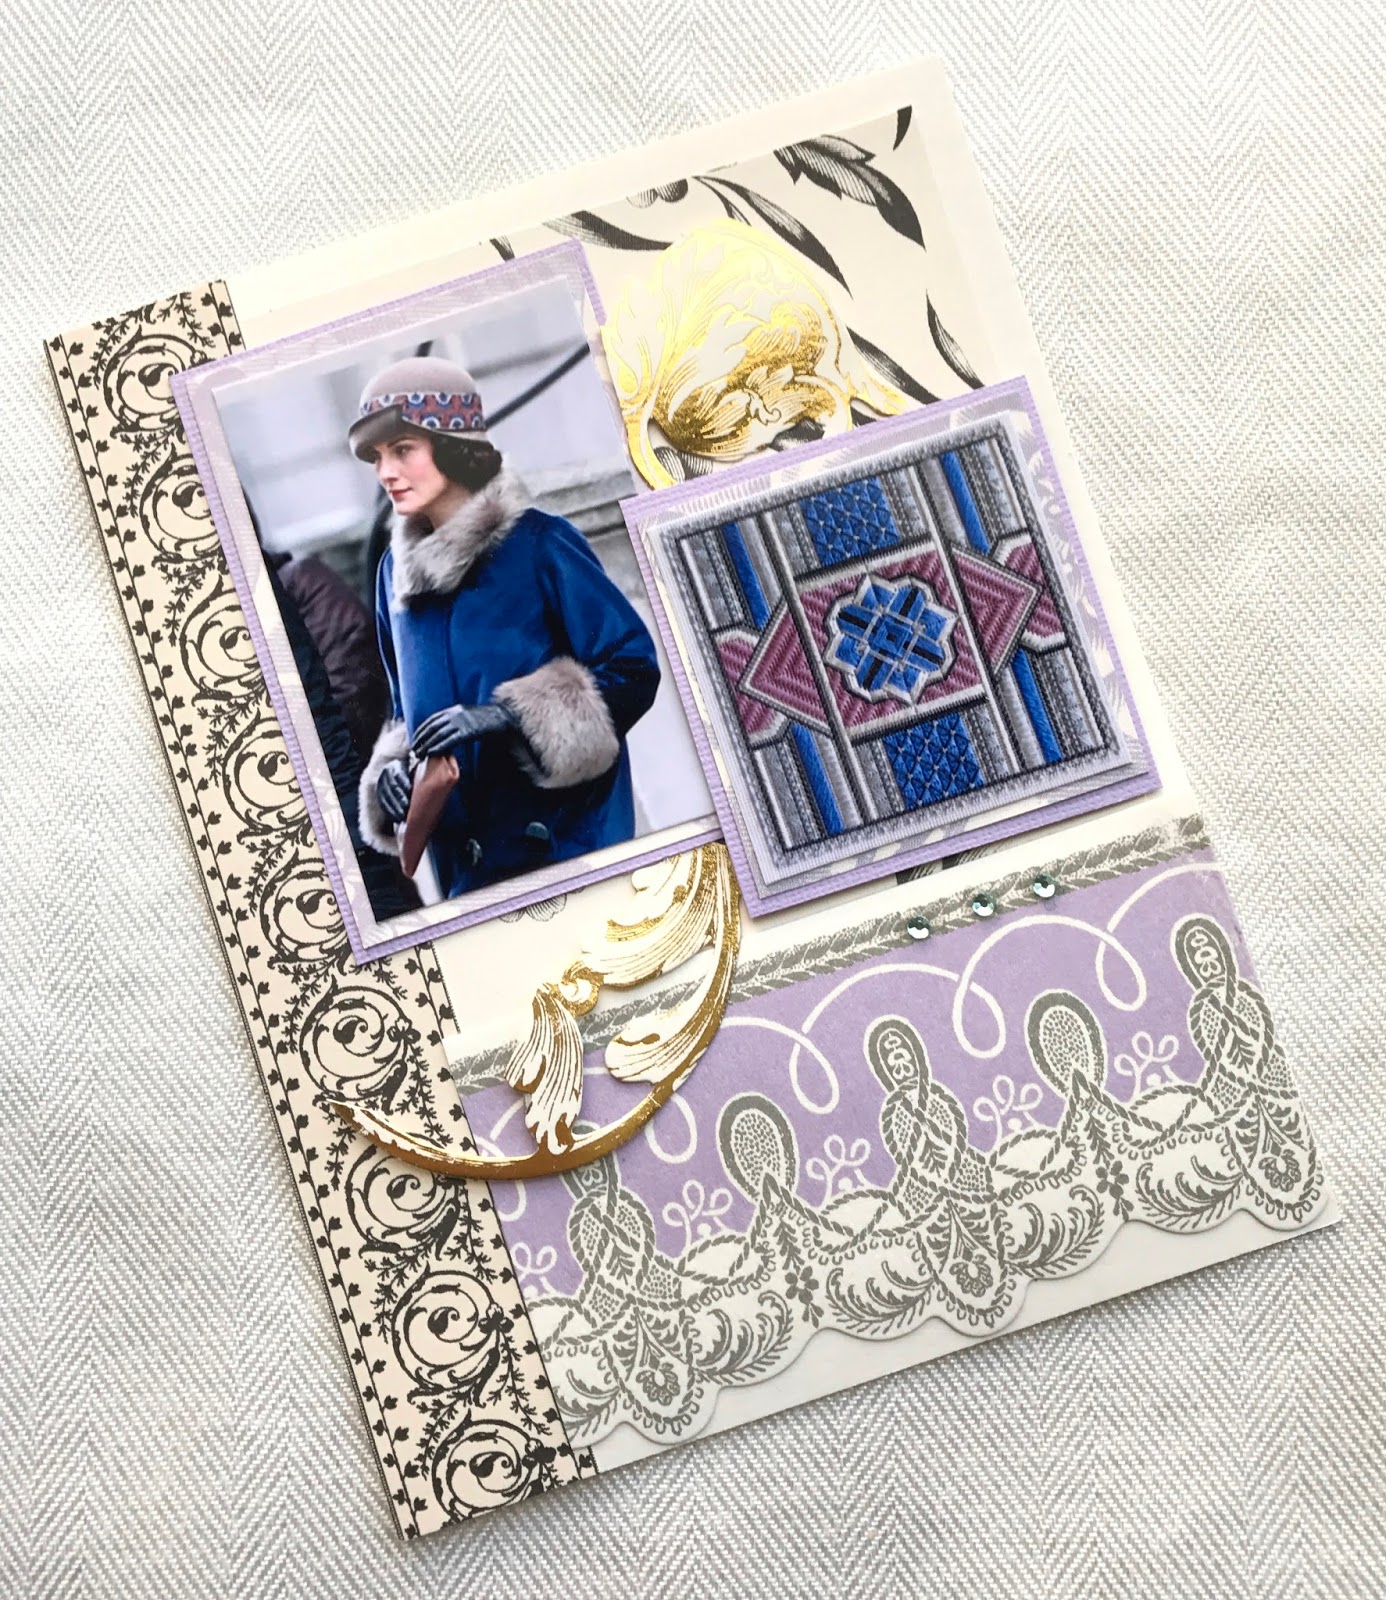 |
| Lady Mary Card |
 |
| Downton Abbey Lady Mary as of 10-05-2016 |
Monday, September 5, 2016
ANG Seminar 2016 "Parade of Stitches" Itinerary - 9/5/16
September 5, 2016--Attended the 44th American Needlepoint Guild (ANG) Seminar (Parade of Stitches) in New Orleans, LA and had a blast! I was also very, very busy. If you look at my itinerary and comments below, I think you'll agree.
Thursday, August 25:
Thursday, August 25:
- 2:00 pm: Arrived at the Hyatt Regency, New Orleans and checked-in.
- 3:30 pm: Met other Distance Learning (DL)* members in the Exhibit Hall to display the DL projects for viewing by attendees. Actually, Barbara E and Kristi H did all the work possible before I got there. Thank you B and K.
- 4:00 pm: Checked in to the seminar. Received a seminar pin for my name tag, a free Mardi Gras Fleur de Lys ornament designed by Michele Roberts, bead necklaces (of course in green, gold and purple), a beautifully printed informational booklet (which included instructions for The Jester's Mask Ornament by Connie Camp), banquet confirmations, a blue accessories tray with snaps (lays flat when opened), etc.
Friday, August 26:
- 8:30 am: Back at the Exhibit Hall with Melita G, Kristi H and Barbara E to hang and label the DL projects. Wrapped this up quickly.
- Free Time All Day--Walked to the French Quarter with DH. Whew, the weather was, hot, hot, hot!
Saturday, August 27:
- 8:30 am to 4:30 pm: Day 1 of 2 day Purse Class taught by Janet Zickler Casey called "Let the Good Times Roll".
Sunday, August 28:
- 8:30 am to 4:30 pm: Day 2 of 2 day Purse Class taught by Janet Zickler Casey called "Let the Good Times Roll".
- 12:00 pm: Lunch meeting in the suite of ANG's Vice President of Education, Becky B, to discuss DL project proposals with Kristi H, the DL Coordinator; Melita G, the outgoing Correspondence Course Committee Chair; Sue E, Chapter Project Book Committee; Barbara E, CyberWorkshop Committee; Kathy L, Workshop by Mail Committee; Marilyn O, Stitch-of-the-Month (SOTM) Committee; and myself, the incoming Correspondence Course Committee Chair.
- 12:00 pm: Exhibit Hall opened. Learned I won a Second Place Ribbon for Rose Swirls. Received a special "exhibitor" pin.
- 5:45 pm: Welcome Reception.
- 6:30 pm: Welcome Banquet and announcement of Special Ribbon Awards recipients.
Monday, August 29:
- 8:30 am to 4:30 pm: Day 1 of 2 day Purse Class taught by Toni Gerdes called "Bronze Purse".
- 11:45 am: ANG Executive Council Lunch. Met members of the ANG Board and learned of some exciting plans for the guild's magazine--Needle Pointers.
- 7:00 pm: Attended the CyberPointers Chapter meeting and met some of the officers and other members. Was nice to put faces to the names I know. A nice event and we received a free instruction pamphlet for Pat Mazu's Crescents with Sparkle Ornament.
Tuesday, August 30:
- 8:30 am to 4:30 pm: Day 2 of 2 day Purse Class taught by Toni Gerdes called "Bronze Purse". I was Class Angel (to assist the teacher as needed, hand out and collect evaluation forms, etc) and received a pin from ANG for this service. Toni gave me a pair of petite embroidery scissors by Sullivans as a gift for being her Class Angel. Thank you Toni.
- 5:30 pm: Work with Melita G, Kristi H and Barbara E to move exhibits stitched by the seminar teachers for display at the Teachers Showcase event.
- 6:00 pm: Attended the Teachers Showcase to meet the teachers and view current and upcoming class projects. Enjoyed meeting Diane Herrmann, Terry Dryden, Gail Stafford, Joni Stevenson, Cynthia Thomas (a new FB friend), Jennifer Riefenberg, Joan Thomasson. It was also nice to again see Nancy Cucci, Lynne Wilkinson, Susan Hoekstra. Also got to personally thank Debbie Rowley of DebBees Designs for the help she gave me on the project she designed called American Beauty Rose; and Kurdy of Threedles for the help she gave me on her Christmas Diamond Ornaments instructions published in the Needlepoint Now Magazine, November/December 2015 issue.
- 7:00 pm: Moved the teacher exhibits out of the Teachers Showcase room back to the Exhibit Hall.
Wednesday, August 31:
- A free day to enjoy my birthday with DH. Did some shopping, sightseeing, gambling and dining, A delightful day!
Thursday, September 1:
- Another free day. Went on a VIP Tour of New Orleans with DH and Melita G. We had a very informative and energetic guide who showed us a New Orleans most people know nothing about.
Friday, September 2:
- 8:30 am to 4:30 pm: One day class taught by Michele Roberts called "Theo Faberge's Jeweled Spiral Coil Egg".
- 12:00 pm: Work with Melita G, Kristi H and Barbara E to pack up the DL exhibit pieces for mailing back to the designers.
- 5:45 pm: Closing Banquet Reception
- 6:30 pm: Closing Banquet and announcement of People's Choice and Delegate's Choice award recipients. DH attended this banquet with me.
- 9:00 pm: Pick up my project from the Exhibit Hall to take home (get to keep the beautiful ribbon).
Saturday, September 3:
- Leave New Orleans and begin the two-day drive home. Fortunately we drove northeast to Delaware after Hurricane Hermine ran her course up the east coast. We had clear weather all the way.
So that's it. Loved being at seminar, but am so very glad to be home. Just reading through this itinerary probably exhausted you as well, but thanks for hanging in there.
* I am the incoming ANG Correspondence Course Committee Chair. ANG's job description for this position can be found here.


Sunday, September 4, 2016
Rose Swirls - Updated 9/4/16
September 4, 2016--I am so pleased to report that this project, Rose Swirls, won a second place ribbon in Category 3 for Independent Projects (Non-Professional) at the 2016 American Needlepoint Guild (ANG) Seminar Exhibit in New Orleans, LA. I feel this venue is the pinnacle of exhibits with the most stringent judging, and winning ANY ribbon is something to be extremely proud of.
All in all, very happy.
March 18, 2015--Won 2nd Place Ribbon in the Canvaswork-Multi category at Woodlawn's 52 Annual Needlework Exhibition in Alexandria, VA.
November 18, 2014--From January through April of this year, 2014, I participated in an ANG pilot stitch program and am finally able to write about this beautiful project. It's called Rose Swirls and is designed by Carol Algie Higginbotham. This is the first time I've done anything as a pilot stitcher online and thoroughly enjoyed the process. Of course, Carol's written instructions and photographs were wonderful and I had very few comments to make to assist Carol in preparing her final classroom instructions.
BTW, this is now an ANG Correspondence Course and can be found at this link.
I only made two changes to Carol's instructions. The first involves the outlining. Her instructions called for a stem stitch outline which I changed to couching. I've not had good luck doing stem stitches--the lines are more zig zag in fashion instead of straight or curved. So I purchased perle 5 in the same colors as the floss being outlined and couched the perle with one strand of matching floss. It worked great for me. The picture below shows the raised, couched outline.
The second change was to add a trellis darning pattern to the background. Her instructions didn't call for anything in the background, but I wanted to place the project in a square frame, so needed to do something with all that blank space. I really like how it came out.
I learned a number of new things doing this project--ribbon embroidery being one of them. I loved the petite ribbon roses and also used ribbon to make some of the french knots. Of course, the feather stitches were done in a random fashion which I'm not a big fan of, but they too came out well. Many of the white pulled work stitches inside the circle were new to me and again, had a lot of fun working them.
The last picture shows how this piece is framed.
All in all, very happy.
 |
| Second Place Ribbon Won at ANG 2016 Seminar |
November 18, 2014--From January through April of this year, 2014, I participated in an ANG pilot stitch program and am finally able to write about this beautiful project. It's called Rose Swirls and is designed by Carol Algie Higginbotham. This is the first time I've done anything as a pilot stitcher online and thoroughly enjoyed the process. Of course, Carol's written instructions and photographs were wonderful and I had very few comments to make to assist Carol in preparing her final classroom instructions.
BTW, this is now an ANG Correspondence Course and can be found at this link.
 |
| Rose Swirls Completed |
 |
| Rose Swirls Raised Couched Outline |
I learned a number of new things doing this project--ribbon embroidery being one of them. I loved the petite ribbon roses and also used ribbon to make some of the french knots. Of course, the feather stitches were done in a random fashion which I'm not a big fan of, but they too came out well. Many of the white pulled work stitches inside the circle were new to me and again, had a lot of fun working them.
The last picture shows how this piece is framed.
 |
| Rose Swirls Framed |
Sunday, August 21, 2016
Updated Name Tag - 08/21/16
August 21, 2016--Leaving on Monday for ANG's Seminar in New Orleans. DH is coming with me and we're driving, taking three days for a little sight seeing along the way.
Anywho, I took a look at my pathetic chapter name tag that I sloppily put together 5 years ago and decided it needed an upgrade, a remake, a total makeover, so to speak. So here it is, before and after. Amazing what a little cording can do, and some ribbon, white lining, etc.
Now I'm ready for seminar. Hope to see you there.
Anywho, I took a look at my pathetic chapter name tag that I sloppily put together 5 years ago and decided it needed an upgrade, a remake, a total makeover, so to speak. So here it is, before and after. Amazing what a little cording can do, and some ribbon, white lining, etc.
 |
| Name Tag Before |
 |
| Name Tag After |
Thursday, August 4, 2016
Sisters by Nancy Cucci Pilot Class - Updated 9/15/18
September 15, 2018--Just learned this piece won a 2nd place ribbon in the 8th Annual Rehoboth Beach Museum Needlework Exhibit in the Canvas/Needlepoint category. Yay!
September 22, 2016--Sisters is now framed.
August 4, 2016--This project is now completely stitched, including the "sisters" box on the bottom. My sister's initials are CW and are placed with mine (BC) inside the turquoise square. I love the feeling of connectedness this piece conveys even though we are separated by many miles. Now to have it framed.
June 26, 2016--Block 3 in turquoise is done. This is the last block with beading. The five smaller ones should go a lot faster.
Really like how the stitches in the three blocks look different from one another even though they are the same. The difference is in the placement, angle and rotation.
June 22, 2016--Block 2 (the gray one) is now stitched and am starting another. This is really pretty.
May 6, 2016--Happily stitching on this lovely project. Here's my progress so far....block 1 is completely done.
April 27, 2016--Just completed a two day pilot class taught by Nancy Cucci for her "Sisters" project, held in Georgetown, DE. One of ANG Delaware's Seashore Chapter members organized the whole thing. Wow, another success for sure! One of the pictures below shows how much, or how little, I accomplished over the last two days, but I really learned a lot. Click on the In Process page on the right for a view of the project photo.
September 22, 2016--Sisters is now framed.
 |
| Framed |
 |
| Sisters Completed |
Really like how the stitches in the three blocks look different from one another even though they are the same. The difference is in the placement, angle and rotation.
 |
| Sisters Block 3 Completed |
 |
| Sisters Block 2 Completed |
 |
| Sisters through Block 1 |
PS I believe this is the fifth class Nancy has come to Delaware to teach and I've been lucky enough to participate in two other of her classes: Stitches in Sterling and Irrisistible Iridescents.
 |
| Class Members |
 |
| Our illustrious instructor Nancy Cucci |
 |
| What I Stitched in Two Days |
Subscribe to:
Posts (Atom)